Home Blog Page 64

Homemade Raspberry Linzer Cookies Recipe

0

These raspberry jam-filled linzer cookies are perfect for Valentine's Day! They consist of two very buttery sandwich cookies that are elevated by the nutty addition of almonds and a heavy dusting of powdered sugar. The cookies are so delicious and addictive! But don't let the heart cutouts fool you. They are so easy to create, and make for the most romantic sweet treat!

These cookies are a romantic treat for Valentine\'s Day!

Video of the Day

Things You\’ll Need

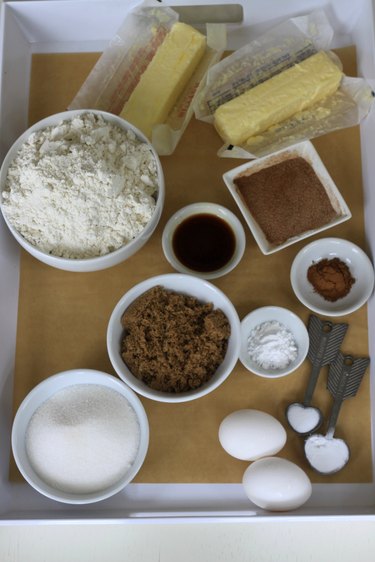
  • 10.6 ounces (300 grams) all-purpose flour

  • 3.2 ounces (90 gams) almond flour

  • 1 teaspoon baking powder

  • ½ teaspoon salt

  • 8.8 ounces (250 grams) unsalted butter, at roomtemperature

  • 6.5 ounces (185 grams) granulated sugar

  • 1 teaspoon vanilla bean extract

  • ½ cup raspberry jam

  • Powdered sugar, for sifting

Step 1: Make the Dough

In a medium sized bowl, whisk together the all-purpose flour, almond flour, baking powder, and salt. Set aside.

Combine the dry ingredients.

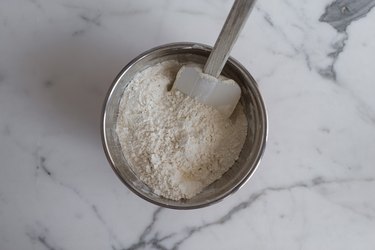
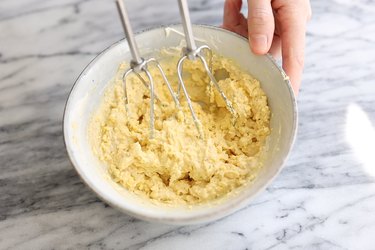
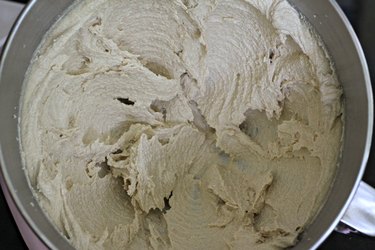
In the bowl of a stand mixer fitted with the beater attachment, or using handheld electric beaters, beat together the butter and granulated sugar on medium speed until light and fluffy, about 4 minutes. Pause mixing and scrape down the bottom and sides of the bowl. Add in the vanilla bean extract and beat until well combined.

Beat until light and fluffy.

Set the mixer speed to low. Add in the dry flour ingredients. Beat until just combined.

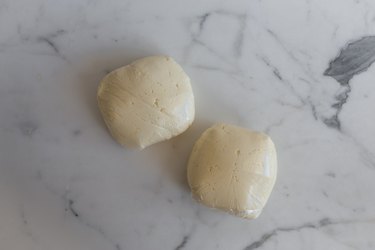
Remove the dough from the beater bowl and divide it in half. Pat each half into a rough disc, then cover both in a layer of plastic wrap. Let the dough discs chill in the refrigerator until firm, about 2 hours, or overnight.

Cover and chill the dough discs.

Step 2: Roll

Pre-heat the oven to 350 Fahrenheit (180 Celsius). Line two large baking sheets with non-stick parchment paper. Set aside.

Set the first dough disc onto a lightly floured work surface. Using a lightly floured rolling pin, roll out the dough until it is about ¼ inch (0.6 centimeters) thick. Using a large heart cookie cutter, cut as many hearts as possible out of the dough. Transfer the hearts to one of the prepared baking sheets, spacing them evenly apart to allow room for spreading. Re-roll the dough scraps as needed and stamp-out any cookies from the remainder of the dough onto the sheet. Place the sheet in the refrigerator to chill.

Cut heart shapes out of the cookie dough.

Repeat the rolling and cutting process as above with the remaining dough disc. Once the dough hearts have been transferred to the baking sheet, use a smaller heart shaped cookie cutter to make a small cutout in the center of each large heart. Place this sheet in the refrigerator to chill.

Step 3: Bake

Bake for 8 to 10 minutes, or until the edges are just beginning to turn golden brown. Remove from the oven and let the cookies cool on the sheet for 5 minutes before carefully transferring them to a wire rack to cool completely.

Bake until just golden brown.

Step 4: Fill & Powder

Once the cookies are cool, begin to fill them. Turn the cookies without the cut-outs flat side facing up. Spoon a teaspoon of the raspberry jam over their center, spreading it almost to the edges.

Use a knife to spread the jam over the cookie bases. Spread the jam to the edges.

Sift the powdered sugar over the cookies with the cut-outs. Then gently press the powdered sugared cookies onto the cookies with the jam.

Sift the powdered sugar over the cut-out cookies.

Step 5: Serve!

Serve and enjoy the cookies! They are best kept stored in the refrigerator in an airtight container for up to 1 week. The dough can be made in advance by up to 1 month, stored and sealed in the freezer. Thaw at room temperature before use.

Enjoy your homemade linzer cookies!

How to Make Deviled Egg Baskets

0

Turn up the style and flavor on classic deviled eggs with a fancy version made to look like edible baskets. Don't judge a book by its cover, though — they aren't much more effort to make than the regular kind. Featuring an assortment of gourmet flavors as well as tiny "handles" made out of chives, these impressive appetizers are sure to make your Easter meal (or any occasion) feel special.

DIY deviled eggs with chive handles and gourmet toppings

Make the Egg Baskets

Deviled egg baskets with gourmet toppings

Things You\’ll Need

  • 6 eggs

  • 3 tbsp mayonnaise

  • 1 tbsp Dijon mustard

  • 1 tsp white wine vinegar

  • Salt and pepper

  • Chives

Tip

This recipe is for half a dozen eggs. Double the ingredients to make a full dozen.

Step 1

Place the eggs in a pan and enough water to cover them by an inch. Bring the water to a boil, place a lid on the pan, and then remove from heat. Let the eggs stand covered for 12 to 14 minutes.

Six eggs in pan of water

Step 2

Transfer the eggs immediately to a bowl of ice water so they can cool quickly. After a few minutes, peel the eggs and slice the pointy tip off the end to create a flat bottom so the eggs can sit upright. Then slice 1/3 off the other end to expose the yolk.

Ends of hard boiled egg sliced off

Step 3

Use a small spoon (such as a 1/4 teaspoon measuring spoon) to gently scoop the yolks out of the egg whites and into a bowl. Add the mayonnaise, Dijon mustard, white wine vinegar, salt and pepper to the yolks. Mix the ingredients together until creamy.

Mixing egg yolks with deviled egg ingredients

Step 4

Scoop the egg yolk mixture into a piping bag (or plastic storage bag with the corner snipped), and pipe the mixture into the egg whites.

Piping egg yolk mixture into egg whites

Step 5

Stick the ends of a chive into the yolk mixture (trimming the length if needed) and bend into a basket handle shape.

Sticking chives into egg yolk mixture to create handles

Spicy Bacon Cheddar

Deviled egg with bacon, cheddar and jalapeno toppings

Top the egg with shredded cheddar cheese, crumbled bacon, and a sliced jalapeño.

Salmon Dill

Deviled egg with smoked salmon, capers and dill

Garnish the egg with smoked salmon, a few capers, and a sprig of fresh dill.

Buffalo

Buffalo flavored deviled egg with blue cheese and hot sauce

Place blue cheese crumbles on top of the yolk mixture, and then drizzle hot sauce on top of the cheese.

Southwestern

Southwestern flavored deviled egg with corn, avocado and pico de gallo

Top the egg with a few kernels of corn, diced avocado, and a spoonful of pico de gallo.

DIY deviled egg baskets with gourmet toppings

We love all of these flavors, but you could certainly experiment with any combination of toppings. Think Parmesan Truffle, Curry Coconut, Sriracha Lime, and so on. We'd love to hear which flavor is your favorite!

Bitter Lemon Drinks

... Enjoy your Bitter Lemon drink with a lemon twist.

Bitter Lemon is a drink originally made by Schweppes. The drink is carbonated tonic water with both lemon juice and rind added to it to create a more bitter flavor. Bitter Lemon is often used with gin, vodka or whiskey to create a refreshing cocktail with a lemon twist.

Video of the Day

Bitter Lemon and Vodka

A regular Bitter Vodka is simply two parts vodka with the rest of the glass filled with Bitter Lemon. However, there are some different (and fun) drinks that you can make with vodka and Bitter Lemon. An Absolut Evergreen is two-thirds Absolut Citron and one-third Pisang Ambon (a banana liqueur); the rest of the glass is filled with Bitter Lemon. If you ask your bartender for Poison, he'll give you a drink that's one part vodka, one part orange liqueur and four parts Bitter Lemon.

Bitter Lemon and Gin

There are a couple of different Bitter Lemon drinks that can be mixed with gin. If you want something refreshing, ask for an Arctic Summer, which includes one and a half parts gin, three-quarters part apricot brandy, a splash of grenadine and four parts Bitter Lemon. A Bitter Christina is one part gin, one part dry vermouth, four parts Bitter Lemon and a splash of banana liqueur. If you ask your bartender for a UFO, he'll pour you a simple drink of one part gin and three parts Bitter Lemon.

Bitter Lemon and Whiskey

Although not as popular as vodka or gin, Bitter Lemon can also be mixed with whiskey to create a more earthy and sweet flavor. A Beef on Rye is half part whiskey, one and a half parts gin (typically Beefeater), half part fruit syrup and two parts Bitter Lemon. If you ask your bartender to Strip and Yell, he'll (hopefully) pour you a drink that's one and a quarter part Rebel Yell whiskey, three-quarters part peach schnapps, one-quarter part Strega herbal liqueur, and four parts Bitter Lemon.

Can I Freeze Buckeyes?

0

Consider yourself lucky if you manage to have any buckeye candy left to freeze after friends and family take a taste. Buckeye candy is a chocolate-covered peanut butter ball with a bare peanut butter circle at the center so the candy resembles the nut from the buckeye tree. Freezer storage is a useful way to keep buckeyes fresh if you want to make them in advance to give as gifts or serve at a party.

Preparation

Buckeyes at room temperature with softened chocolate can stick together if you simply toss them in a bag or container and place them directly in the freezer. They keep their shape best and stay separated if you freeze them before packaging them. After dipping the balls in chocolate, they're placed on trays lined with parchment paper while the chocolate sets. Transfer the trays to the freezer when the chocolate cools to room temperature and leave them for about 2 to 3 hours until the surface feels frozen solid. The frozen buckeyes pop off the parchment paper easily for bulk freezer storage.

Video of the Day

Packaging

The key to keeping chocolate tasting fresh and avoiding moisture accumulation is providing moisture-vapor protection so air and moisture don't affect the chocolate. The buckeyes should be stored in freezer-safe packaging, such as plastic freezer bags or plastic storage containers designated for freezer use. While you can simply place the buckeyes in one of these types of packages, doubling the packaging provides even greater protection. You can place the buckeyes in quart-sized freezer bags and place the bags inside a plastic storage container. Alternatively, you can wrap individual portions of two to three buckeyes in plastic bags or plastic wrap before grouping them together in freezer bags or freezer storage containers. Remove as much air from the storage containers as possible before sealing.

Freezer Storage

Rapid freezing helps prevent freezer damage to the chocolate buckeyes, which is why freezing them on trays before packaging is a good practice. The short two- to three-hour duration might not be enough time to freeze them through to the center, so place the packaged buckeyes against the freezer walls for at least 24 hours to freeze them through quickly. After this period, you can move them anywhere within your freezer. Milk chocolate can be stored for up to one year in the freezer when properly packaged, while dark chocolate lasts for two years. Label each package carefully with both the storage date and the expiration date one to two years after storage.

Thawing

The frozen buckeyes must be removed from the freezer and placed in the refrigerator to thaw for up to 24 hours before setting them out at room temperature. Keep them in the freezer packages while they thaw. If you set them out at room temperature immediately, condensation forms on the chocolate, which leads to dull spots on the chocolate called sugar bloom. Slow thawing decreases the risk of condensation on the chocolate so it still has the shiny surface of tempered chocolate. In the heat of summer, it also helps to wrap the freezer packages with a dish towel to further lengthen the thawing time.

Easy to Make Snickerdoodle Cookies Recipe

0

With just a few simple pantry ingredients, you can have soft and chewy snickerdoodles on the table in under 30 minutes!

snickerdoodles on plate

Video of the Day

ingredients for snickerdoodles

Things You\’ll Need

  • 1 cup butter, softened

  • 3/4 cup granulated sugar plus 2 tablespoons

  • 1/2 cup brown sugar

  • 2 eggs

  • 1 tablespoon pure vanilla extract

  • 1 teaspoon baking soda

  • 1 teaspoon Cream of Tartar

  • 1/2 teaspoon salt

  • 1 teaspoon cinnamon plus 1 tablespoon

  • 3 cups flour

Step 1: Cream the Butter and Sugars

Preheat your oven to 325° Fahrenheit.

In a standing mixer with a paddle attachment, cream the butter with both sugars on medium speed until fluffy, about 2 to 3 minutes.

adding brown sugar fluffy butter batter

Tip

Combine the tablespoon of cinnamon with two tablespoons of sugar in a separate bowl.

Step 2: Add Remaining Ingredients

Add eggs one at a time, plus vanilla and mix thoroughly. Scrape down the bowl, then add baking soda, salt, Cream of Tartar and cinnamon. Mix to combine. Turn mixer on low and add flour last, stirring until only JUST combined.

balls of dough

Step 3: Roll Into Balls

Use your palms to roll balls about two inches in diameter. Then coat each ball in the cinnamon sugar mixture.

ball in bowl dough balls on sheet

Step 4: Bake

Place rolled balls on a parchment lined baking sheet (12 per sheet) and bake at 325° Fahrenheit for 12 minutes. Cool on a wire rack and serve.

snickerdoodles cooling

Tip

This recipe makes about 24 large cookies or 36 smaller cookies. Reduce your cooking time by about 2 minutes if you choose to make the smaller version.

snickerdoodles on a plate

Thanksgiving Recipe Spotlight: Pamela Duncan Cunningham\’s Turkey Cheese Ball

0

With Thanksgiving just around the corner, it's safe to say that the only thing many of us may be looking forward to just as much as quality time with loved ones is the abundance of delicious food. Each year, our team is excited to share some of our favorite holiday recipes with you — this year, we asked you to share some of yours with us!

Pamela Duncan Cunningham\'s Turkey Cheese Ball

Video of the Day

Our Facebook fans were given the chance to show off their tastiest and most creative holiday hits for a chance to claim the crown for top recipe idea. After reviewing — and drooling over — the entires, our team narrowed it down to two finalists before turning it over to our Facebook audience to vote for the winning dish and it was a tight race. We're thrilled to congratulate Pamela Duncan Cunningham for serving up the winning idea with her Turkey Cheese Ball!

Don't forget to like and follow eHow's Facebook page for more festive contests and chances to be featured on our site. Happy Thanksgiving!

Easy Taco Pizza Recipe

0

Enjoy two comfort foods in one with this fun taco pizza recipe. In every bite, you can savor the satisfying crunch of pizza crust with the kick of seasoned meat. It's also perfect for feeding a crowd or celebrating Taco Tuesday in a unique way. Serve it with sour cream, hot sauce or both! Here's how to make this tasty taco pizza.

Taco pizza recipe

Video of the Day

Things You\’ll Need

  • Pizza crust dough (homemade or store-bought)

  • Olive oil

  • 1 pound ground beef, turkey or chicken

  • 1 1.25-ounce packet taco seasoning (2 to 3 tablespoons)

  • 1/4 cup broth or water

  • 1 cup refried beans

  • 1 cup shredded or grated cheddar cheese

  • 1/2 medium tomato, deseeded and diced

  • 1/2 cup lettuce, shredded

Tip

If you're pressed for time, use a pre-made pizza crust. Also, depending on the size of your crust, you might need slightly more or less toppings.

Ingredients for taco pizza

Step 1

Preheat the oven to 450° Fahrenheit. Roll out the pizza crust dough on a greased baking sheet or pizza pan, brush with olive oil and pre-bake for 6 to 8 minutes. If using store-bought pizza dough, pre-bake according to the package's instructions.

Step 2

In a large pan over medium heat, warm 1 to 2 tablespoons olive oil. Cook the ground meat until brown, about 5 to 7 minutes. Use a spatula to break it up.

Cook ground meat

Step 3

Add the taco seasoning and broth or water.

Add taco seasoning and broth

Mix to coat the meat. Simmer until liquid is mostly evaporated.

Mix and cook ground meat

Step 4

On the pre-baked crust, spread the refried beans in an even layer. Top with taco meat.

Add refried beans and taco meat

Step 5

Top with shredded cheese. Bake for 8 to 12 minutes or until the cheese is melted and bubbly, and the crust is golden brown.

Add shredded cheese

Step 6

Top with tomato and lettuce. You can also add other tasty toppings like sliced olives, crushed tortilla chips and chopped cilantro. The possibilities are endless!

Tip

If you plan to save leftovers, don't top the entire pizza with tomato and lettuce just yet. Once reheated in the microwave or oven, you can add these toppings just before eating.

Add lettuce and tomatoes

Serve with sour cream or hot sauce, if you'd like. Enjoy!

Taco pizza recipe

How to Make Pistachio Flour

0

Things You\’ll Need

  • Raw pistachios, dye-free and in the shell

  • Pot

  • Water

  • Food-storage container

  • Colander

  • Kitchen towel, optional

  • Rimmed baking sheet

  • Spice grinder

  • Mixing bowl

  • Powdered sugar or all-purpose flour

  • Whisk

  • Flour sifter

  • Sealable food-storage bag

23533995 Use only pistachios that have an open-ended shell to make flour. Image Credit: Zedcor Wholly Owned/PhotoObjects.net/Getty Images

A mild flavor redolent of avocados, a hint of tartness and an undercurrent of sweetness makes pistachios a higher class of nut. Pistachio flour adds a velvety mouthfeel and buttery texture to baked goods, and toasts up like caramelized gold when sprinkled on baked confections. These premium qualities, however, come at a premium price, as any pastry chef will tell you — yet another reason you should make your own pistachio flour. Pistachios are 46 percent fat, however, so you must add an absorbent ingredient, such as confectioner's sugar, to produce a dry, finely textured flour that elevates any confection to another level.

Video of the Day

Step 1

Shell the pistachios. One cup of shelled pistachios yields about 1 1/2 cups of pistachio flour.

Step 2

Fill a pot with water and bring it to a boil on the stove. Pour the shelled pistachios in a food-storage container or large mixing bowl. Heat the oven to 200 degrees Fahrenheit.

Step 3

Pour enough boiling water over the pistachios to cover them and let them blanch for about two minutes. Drain the pistachios in a colander and hold them under cold running water until they are completely cool, about four minutes.

Step 4

Slip the skins off the pistachios by rubbing them between your fingers or rubbing them in a kitchen towel. Transfer the pistachios to a rimmed baking sheet in an even layer and place them in the oven.

Step 5

Dry the pistachios in the oven for 12 to 15 minutes, then take them out. Let the pistachios cool to room temperature.

Step 6

Place the cooled pistachios in the bowl of the spice grinder and pulse them until they're broken up into 1/4-inch chunks. Empty the pistachios into a mixing bowl. Continue pulsing the pistachios in batches and adding them to the mixing bowl until you've ground them all to chunks.

Step 7

Sift powdered sugar or all-purpose flour into the mixing bowl with the pistachios to absorb the oil released during the grinding process. Add 1 tablespoon of powdered sugar or flour for every cup of pistachios. Whisk to combine.

Step 8

Add the pistachio mixture in small amounts to the bowl of the spice grinder. Pulse the pistachios again, this time to a fine powder or just until they start to feel moist.

Step 9

Transfer the pistachios to a flour sifter and sift them over a bowl.

Step 10

Return any larger pistachio pieces that are sifted out to the bowl of the grinder with the next batch of pistachios. Continue pulsing the pistachios and sifting them in the sifter until you have ground all of the pistachios to flour.

Step 11

Store pistachio flour in a sealable food-storage bag in the refrigerator for up to a month, or in the freezer for about three months.

Warning

Substitute no more than 1/4 of pistachio flour for wheat flour in baked goods.

Instant Pot Recipe: Monkey Bread

0

eHow may earn compensation through affiliate links in this article.

Are you craving gooey pull-apart bread, covered in cinnamon sugar and caramel? I thought so. This baked favorite can now be made without the use of the oven, making it an accessible recipe wherever you have an electrical plug. Say hello to Instant Pot monkey bread! This version is made in under 45 minutes, beginning to end. Grab the detailed instructions below.

Video of the Day

instant pot monkey bread

Things You\’ll Need

  • 6-quart or 8-quart Instant Pot

  • 1 can refrigerated large biscuits

  • 1 cup sugar

  • 2 teaspoons ground cinnamon

  • 1 stick unsalted butter

  • 1/2 cup brown sugar

  • 6-inch round cake tin

Step 1: Cut Biscuits and Make Sugar Cinnamon Mixture

Open biscuits and cut into quarter-sized pieces.

Mix together sugar and cinnamon in a gallon plastic bag and seal. Shake to mix together cinnamon and sugar. Add in biscuit pieces and shake until well coated. Pour sugared biscuits in a greased 6-inch round cake tin.

cut biscuits cinnamon sugar mix

Step 2: Make Caramel

In a microwave-safe bowl, melt butter and brown sugar together in microwave for 1 minute.

Mix continuously with a whisk until golden caramel color, about 2 minutes. Pour caramel mixture over sugared biscuits until well coated. Cover loosely with foil.

make caramel

Step 3: Cook Monkey Bread in Instant Pot

Pour 1 cup water in Instant Pot bowl. Place trivet in the bowl, and place the pan on top of the trivet. Lock lid, flip valve to "Sealing", and cook on manual high pressure for 25 minutes. Let it natural release for 5 minutes, then flip the valve to "Venting" to release remaining pressure. Open and remove from bowl.

Tip

Making monkey bread in the Instant Pot will make it more moist and gooey compared to baking in a traditional oven. If some crispiness is desired, broil the monkey bread in the oven for 2-3 minutes.

cook monkey bread

Step 4: Serve and Enjoy!

Let monkey bread set and cool for 5-10 minutes. Flip on a plate and serve while warm. Enjoy!

serve monkey bread

How to Cook or Steam Fresh Asparagus

0

Things You\’ll Need

  • Asparagus spears

  • Knife

  • Water

  • Olive oil

  • Salt

  • Pepper

... Asparagus is sold in bunches of about 15 to 20 spears.

Asparagus is a vegetable that appreciates simple preparation. Quickly steaming asparagus spears gives you the perfect tender-crunchy texture. However, there are other methods that produce great asparagus. Be vigilant when cooking asparagus. The tips can turn mushy in a matter of seconds, so test them with a fork every so often. When making asparagus, allow for about four to six stalks per person. Season asparagus lightly with salt and pepper, butter, olive oil, or lemon juice, if you wish.

Video of the Day

Steaming

Step 1

Rinse the asparagus under cold running water and cut off the bottom 1/3 of each spear.

Step 2

Place asparagus in a microwave-safe dish with a few tablespoons of water. Microwave on high for two to three minutes, depending on how soft or crunchy you like your asparagus.

Step 3

Fill a skillet with 1/2 inch of water to steam asparagus on the stove. Bring the water to a boil, then add the asparagus. Cook for two to three minutes, until the asparagus reaches your desired texture.

Sauteing

Step 1

Rinse the asparagus under cold running water and cut off the bottom 1/3 of each spear. If you like, you can cut the spears into smaller pieces for faster sauteing.

Step 2

Heat a few tablespoons of olive oil in a large skillet over medium high heat.

Step 3

Add the spears to the skillet and cook, stirring occasionally, until they have softened and turned bright green, about 4 to 5 minutes.

Roasting

Step 1

Rinse the asparagus under cold running water and cut off the bottom 1/3 of each spear. Toss the spears with a few tablespoons of olive oil, salt and pepper in a large bowl.

Step 2

Spread the spears onto a baking sheet in a single layer.

Step 3

Roast the asparagus in an oven preheated to 400 F for 10 to 15 minutes, depending on how many spears you are cooking. Test the spears periodically with a fork to prevent overcooking.

Tip

You can serve asparagus cold, as well. Once the spears have finished steaming, transfer them to a bowl full of ice water. Drizzle the cold asparagus with vinaigrette before serving.