Home Blog Page 10

Does Salt Cod Need to Be Refrigerated?

0

A Bowl of Cod Stew 
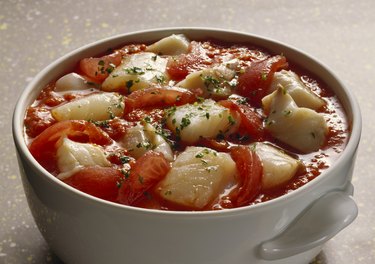
Use salt cod to make complex and comforting stews. Image Credit: Eising/Photodisc/Getty Images

Once considered a delicacy, salt cod has lost much of its favor with the age of refrigeration. This dried and salted fish predates refrigeration, and while it was traditionally stored at room temperature, modern sources recommend that you keep salt cod in your refrigerator for safety. Often called by its Spanish name, bacalao, salt cod's age-old preservation process lends a distinct flavor and texture to the otherwise bland cod.

Video of the Day

Salt Cod Basics

Before freezing became the most convenient and efficient way to preserve cod and other fish, salting was the predominant preservation method. The salting and drying of cod distinctly changes its character and makes it suitable for a wide range of simple, yet flavorful dishes. Salt cod is used widely in Spanish, Italian and Caribbean cuisine to create soups, stews, fritters and salads. Refrigerate salt cod in its original packaging for up to one year.

Sourcing and Storage

Find salt cod in the fish department at a grocery store serving Latin American, Caribbean or Italian clientele. Salt cod is also sold at fine fish markets. Sold in a wooden box, salt cod is typically deboned, although small bones may still be present. To minimize odors from the rather pungent-smelling fish, wrap the container in one or two layers of plastic storage bags before storage. If you lack refrigerator space for extended storage, store salt cod in the freezer, as it will not affect its quality.

Getting It Ready

Before using salt cod, it must be soaked for at least 24 hours and as long as 72 hours before cooking. Fill a large bowl with cold water and add the salt cod to it. Refrigerate the cod as it soaks, and change the water every eight hours. For quick soaking, run cold water over salt cod in a bowl for 15 minutes. Add the salt cod to a pan with cold water, slowly bring it to a boil, then pour off the water. Replace the water with cold water and repeat this process two to three times before using the salt cod in your recipe.

Cooking Salt Cod

Salt cod is typically poached after soaking. Bring the salt cod to a boil with water or other liquid and continue simmering for about 20 minutes until the cod is tender. Remove any bones in the fish before flaking it and using in a recipe. Once cooked, salt cod is perishable and must be refrigerated within two hours of cooking to prevent the growth of harmful bacteria. Refrigerate cooked salt cod for up to three days after cooking.

Instant Pot Seafood Boil Tutorial

0

Seafood boil season is back! It's as fun as it is delicious to share a meal, eat with your hands, and enjoy it all on the patio on a warm summer night. And can you get any easier than this version? With just five minutes of prep and 5 minutes of pressure cooking, you don't even need to start cooking until your guests arrive.

Instant Pot Seafood Boil

Video of the Day

Things You\’ll Need

  • 3 tablespoons butter

  • 1 cup chopped white onions

  • 4-6 small red potatoes, quartered

  • 2 cobs of corn, shucked and cut into 3-inch chunks

  • 1 lb andouille sausage, cut into 1 inch rings

  • 1 lb live Manila clams

  • 1 whole crab, cleaned

  • 1 lb frozen shrimp

  • 1 tablespoon Old Bay seasoning

  • 1 tablespoon Creole Seasoning (such as Tony Chachere's)

Instant Pot Seafood Boil

Step 1: Sauté

Add the butter to your Instant Pot and turn to the 'Sauté' mode. Add the onions and sauté until starting to brown.

Instant Pot Seafood Boil Instant Pot Seafood Boil

Step 2: Add Potatoes and Corn

Add the potatoes and corn in an even layer.

Instant Pot Seafood Boil

Step 3: Add Seafood

Add the crab, clams and frozen shrimp on top of the potatoes.

Instant Pot Seafood Boil

Tip

Frozen shrimp will take longer to cook than fresh, ensuring that you don't overcook them in the pot!

Step 4: Add Spices

Sprinkle the pot with the spices.

Instant Pot Seafood Boil

Step 5: Add Water

Add the water to the pot.

Instant Pot Seafood Boil

Step 6: Pressure Cook

Add the lid tightly onto the pot. Set the Instant Pot to 5 minutes. Allow to cook, then allow the pressure to release slowly.

Instant Pot Seafood Boil

Step 7: Serve & Enjoy

Drain, then add the seafood boil to a serving platter or a table covered with newspaper. Serve immediately and enjoy!

Instant Pot Seafood Boil

Sloppy Joe Stuffed Peppers Recipe

Sloppy Joes remind me of my childhood. It was one of my favorite weeknight meals that we all looked forward to. These days, I am a little more self conscious of my carb intake and always looking for new ways to make my favorite comfort food recipes a little lighter. Eliminating the bun means I can enjoy the same delicious flavors of sloppy joes without the guilt. Sloppy Joe Stuffed Peppers have quickly become one of my go-to weeknight meals that my whole family will gladly eat, and you are going to love making them too!

Sloppy Joe Stuffed Peppers

Video of the Day

Things You\’ll Need

  • 1 lb. ground beef

  • 1 onion, finely diced

  • 3 minced garlic cloves

  • 1 cup tomato sauce

  • 1/3 cup ketchup

  • 2 tbsp. tomato paste

  • 1 tbsp. brown sugar

  • 2 tbsp. Worcestershire Sauce

  • 1 tbsp. apple cider vinegar

  • 1 tsp. salt

  • 1/2 tsp. black pepper

  • 1 tbsp. olive oil

  • 3 green bell peppers, sliced in half and seeds and stems removed

  • 1/2 cup shredded Mozzarella or Monterey Jack cheese

  • 1/4 cup beef broth or water

  • 2 sliced green onions (optional)

Sloppy Joe Stuffed Peppers

Step 1: Preheat Oven

Preheat oven to 375 degrees.

Step 2: Brown Meat, Onions & Garlic

Heat a skillet to medium high heat and add oil. Add ground beef along with half of your salt and pepper, and cook until meat is broken up and browned slightly.

Add in the onion and garlic and continue to sauté for another few minutes until onions just become soft.

Sloppy Joe Stuffed Peppers

Step 3: Make Sauce

After your meat and onions have browned, reduce heat to medium and add in tomato sauce, ketchup, tomato paste, Worcestershire sauce, apple cider vinegar, brown sugar and the rest of the salt and pepper. Stir to combine well and then cook for 5 minutes until flavors have combined.

Sloppy Joe Stuffed Peppers

Step 4: Stuff Peppers

Spoon about 1/4 cup of the sloppy joe mixture inside of each pepper until they are full.

Sloppy Joe Stuffed Peppers

Step 5: Top with Cheese

Top each stuffed pepper with cheese and then pour beef broth into the bottom of the pan so that the peppers are sitting in the liquid (this will help steam the peppers). Cover and bake for 25 minutes, then remove cover and broil for 2 minutes until cheese is browned slightly to finish the cooking process. Sprinkle with green onions (optional) and serve immediately.

Sloppy Joe Stuffed Peppers Sloppy Joe Stuffed Peppers

I am getting hungry just talking about these delicious stuffed peppers and I know you are going to love them too!

Sloppy Joe Stuffed Peppers

The Best Hand Mixers in 2022

0

Woman using a kitchen mixer

When a task is too much for a whisk to handle but not big enough a job to bring out your stand mixer (if you even have one), an electric hand mixer is your friend. They're more compact and usually less expensive than stand mixers, but still designed to make quick work of whipping, blending and mixing a variety of foods, including cake batter, bread dough, egg whites and mashed potatoes.

Video of the Day

While food processors and immersion blenders can sometimes substitute for a hand mixer for certain tasks like emulsifying a salad dressing or whipping eggs, there are tasks that a hand mixer does better, like beating up a light and fluffy frosting. Really, when it comes to baking prep in general, a hand mixer comes out on top.

What to Consider When Purchasing a Hand Mixer

Speed and Power​: The whole point of a hand mixer is to be able to mix more quickly and more powerfully than whisking by hand, so how fast it operates and how many speed settings it offers is worth considering. Hand mixers can have as many as 12 speed settings so you can adjust the speed depending on the mixture you're making.

Corded Versus Cordless​: Corded models provide continuous power as long as they're plugged in, but cordless hand mixers offer much more freedom of movement. Some corded models use a swivel cord to avoid getting tangled, which is a plus.

Stability​: Some hand mixers feature an indentation under the handle, allowing them to rest comfortably on the edge of a bowl, which minimizes slipping and makes holding it less strenuous for you.

Attachments and Accessories​: Every hand mixer comes with a beater attachment, but some models offer additional attachments like wire beaters (instead of central post beaters), whisks, dough hooks and even immersion blender blades. Other models might include a storage container for all of the accessories or a measuring cup. These extras could raise the hand mixer's price a bit, but they make it more versatile.

Storage​: Some hand mixers include a built-in storage compartment for housing beaters, extra attachments and power cords, making it even more convenient to store.

With these considerations in mind, we've selected the best hand mixers in 2022.

Mix the dough in a bowl with an electric mixer. Selective focus.

The Best Overall Hand Mixer

Breville Handy Mix Scraper Hand Mixer

$139.95 at Amazon

Breville's hand mixer excels at pretty much everything when it comes to baking—whipping eggs, beating cake batter, mixing oatmeal for cookies, kneading bread dough, you name it. It boasts nine speeds and is advanced enough to recognize what type of attachment you've inserted and automatically adjusts its speed to the ideal level for each task. Its quiet scraper beaters are coated with silicone that minimizes noise while maximizing contact with the bowl. A light even turns on to illuminate your mixing bowl so you can see everything while mixing. Featuring an ergonomic handle that allows for a natural and comfortable hand position, the hand mixer comes with a detachable storage compartment for the power cord and attachments. In addition to two scraper beaters, it comes with two dough hooks and two balloon whisks.

Breville Handy Mix Scraper Hand Mixer

The Best Cordless Hand Mixer

KitchenAid 7-Speed Cordless Hand Mixer

$69.99 at Amazon

If you'd like to avoid potential power cord tangles entirely, KitchenAid's cordless hand mixer is incredibly easy to maneuver. It offers seven speeds, from a slow stir for chunky ingredients to medium for creaming butter and sugar to high speed for whipping egg whites and heavy creams. Its lithium ion battery takes two hours to fully charge, which will provide enough power to make up to four batches on a single charge. However, a quick 10-minute charge is enough to mix batter for a cake if you're pressed for time. The speed dial on top of the handle also lets you know the battery's charge level and when it's time to recharge it. Another nice feature is the hand mixer's flat bottom that allows it to stand upright on its own. The only downside is that this hand mixer doesn't come with any additional attachments beyond its twin beaters.

KitchenAid 7-Speed Cordless Hand Mixer

The Fastest Hand Mixer

Oster 270-Watt Hand Mixer With HeatSoft Technology

$43.99 at Walmart

For maximum efficiency, Oster's hand mixer with HeatSoft technology is our pick. It's perfect for last-minute baking when it seems like your butter couldn't melt any slower. The secret lies in the HeatSoft technology itself, which involves a built-in fan that blows warm air onto cold butter in your mixing bowl, gently softening the mixture for faster and more consistent results. The hand mixer offers five speeds, plus a one-touch turbo boost feature and comes with two full-size beaters that eject straight into the sink for easy cleaning. It also has a removable magnetic nozzle that's dishwasher-safe.

Oster 270-Watt Hand Mixer With HeatSoft Technology

The Best Budget-Friendly Hand Mixer

Hamilton Beach 6-Speed Electric Hand Mixer

$15.94 at Walmart

This affordable 250-watt model from Hamilton Beach touts six speed settings, as well as a "QuickBurst" function that adds an extra power boost with a single touch. For a budget-friendly hand mixer, it goes above and beyond the basics to include thoughtful features and extras; among them, a power cord that's been designed to stay out of the way for both right- and left-handed users, a built-in groove that conveniently stabilizes the mixer on the edge of a bowl, a whisk attachment, and a storage case for housing the power cord and attachments. It's the perfect example of "less can be more."

Hamilton Beach 6-Speed Electric Hand Mixer

The Most Versatile Hand Mixer

Cuisinart Power Advantage 9-Speed Hand Mixer

$79.95 at Amazon

If you're looking for a hand mixer that comes with pretty much everything you could want in one bundle, the Cuisinart Power Advantage hand mixer fits the bill. It boasts nine speeds, including three low-start speeds that help prevent splattering. The simple on/off button and one-touch speed control make it easy and intuitive to use, along with its ergonomic handle and swivel cord that allows for a high degree of freedom of movement. It comes with a slew of attachments, including two beaters, a whisk, two dough hooks and even a spatula. Talk about versatility! That's not all; it comes with a handy storage case so you can keep all the attachments in one place. Overall, it's lightweight, easy to handle and thoughtfully designed.

Cuisinart Power Advantage 9-Speed Hand Mixer

How to Know If Banana Bread Is Spoiled

0

Chicken dinners with banana bread Proper storage methods are key in preventing moldy banana bread. Image Credit: Jupiterimages/Comstock/Getty Images

With its rich, sweet banana flavor, banana bread is more like a baked dessert than traditional bread. Highly ripe bananas give this beloved sweet bread its strong banana flavor and signature moistness. However, that moistness is the very thing that makes banana bread highly perishable. Mold loves moisture and grows faster in moisture-rich baked goods. Even if you cannot see it on the surface, mold could be spreading inside of the banana bread, especially if it's been sitting out for a while. Check for visible signs of mold and consider how you stored your banana bread before you take another slice.

Video of the Day

Step 1

Look for visible signs of mold. The most obvious sign that the banana bread has spoiled is mold on the surface of the loaf. Fuzzy white or green mold, sometimes with other colors, may be present. Discard immediately and wash the loaf pan thoroughly in hot soapy water . Even if you cannot see mold on the surface, mold could still be growing inside the banana bread, so you may want to slice into the center of the loaf as well.

Step 2

Consider how you stored the banana bread. Banana bread should not be left out on the counter for more than two days because most room temperatures are ideal for mold and bacteria growth. If you placed the banana bread in the fridge, it should be thrown away after a week. If you placed it well wrapped in the freezer, banana bread can last up to three months. While mold will not grow in freezing temperatures, keep in mind that the quality and flavor will have degraded the longer you keep it in the freezer.

Step 3

Smell for a strong odor. Banana bread that has gone bad if left sitting out on a counter, especially if the temperature has been warm, may have an even stronger banana smell, or may give off a somewhat sour dairy smell. If the smell is particularly strong when you are close to it or when you unwrap it, toss it out. Do not stick your nose right up to the banana bread to sniff, however, because you could wind up sniffing up toxic mold spores, which can cause respiratory problems, according to the U.S. Department of Agriculture.

Step 4

Follow the "When In Doubt" rule. If you can't remember how long you've left the banana bread out, or something just doesn't seem right, even if it looks fine, don't take the risk of ingesting toxic mold by eating it anyway.. Remember the saying "when in doubt, throw it out," and save yourself — and your stomach — the hassle.

Warning

Stick to recommended storage and storage times, no matter what. Banana bread and other baked goods can produce mycotoxins when not properly stored, which are a particularly poisonous type of mold that can lead to a wide range of health problems.

Korean BBQ Chicken Lettuce Wraps Recipe

0

These Korean BBQ chicken lettuce wraps feature a wonderfully sticky, sweet and savory homemade sauce. It also has a spicy kick, thanks to red chili paste and fresh ginger. Once the sauce is tossed with chicken and paired with fresh vegetables, everything comes together in light lettuce wraps. Read on to make this easy and colorful meal.

Korean BBQ chicken lettuce wraps

Video of the Day

Korean BBQ Sauce

Things You\’ll Need

  • 3/4 cup brown sugar or maple syrup (or mix of both)

  • 1/2 cup low-sodium soy sauce or tamari

  • 3 teaspoons minced garlic

  • 2 teaspoons grated ginger

  • 1 teaspoon red chili paste

  • 1 teaspoon sesame oil

  • 1 tablespoon rice wine vinegar

  • 1 tablespoon cornstarch

  • 2 tablespoons water

Ingredients for Korean BBQ sauce

Tip

For a spicier sauce, use another 1/2 to 1 teaspoon of chili paste.

Step 1

To a small pan over medium-low heat, add the brown sugar, soy sauce, garlic, ginger, chili paste, sesame oil and rice wine vinegar.

Combine sauce ingredients

Step 2

Whisk until the brown sugar dissolves and the ingredients are fully combined.

Mix Korean BBQ sauce

Step 3

While the sauce is on the stovetop, combine the cornstarch and water in a small bowl. Whisk together to make a slurry.

Mix cornstarch and water

Step 4

Add the slurry to the pan. Stir well and bring to a boil, then reduce to the heat. Simmer for 5 to 7 minutes or until the sauce is thick.

Simmer Korean BBQ sauce

Korean BBQ Chicken Lettuce Wraps

Things You\’ll Need

  • 2 heads butter lettuce (or romaine lettuce)

  • 1 pound ground chicken

  • 1/2 cup cucumber, thinly sliced

  • 1/2 cup shredded carrots

  • 1/2 cup red bell pepper, deseeded and diced

  • 1/4 cup scallions, chopped

  • 1 cup brown rice, cooked

  • Korean BBQ sauce

  • Sesame seeds

  • Fresh cilantro or mint

  • Olive oil

Ingredients for lettuce wraps

Tip

For small, taco-like wraps, use butter lettuce. Typically, only the outer leaves are suitable for wraps. For bigger wraps, use the outer leaves of romaine lettuce.

Step 1

Warm olive oil in a large pan over medium-high heat. Cook the ground chicken until it's no longer pink, using a spatula to break it up.

Cook ground chicken

Step 2

Add the Korean BBQ sauce. Toss until the chicken is completely coated.

Toss chicken with Korean BBQ sauce

Step 3

Place the lettuce leaves on a flat surface. Scoop brown rice onto each leaf.

Arrange lettuce wraps

Tip

If needed, layer the narrow ends of two smaller leaves to make one wrap. The wider ends should fan outward.

Step 4

Top with chicken, cucumbers, carrots, bell peppers and scallions. Drizzle sauce on top and garnish with sesame seeds and fresh herbs.

Korean BBQ chicken lettuce wraps

For an extra kick, add a drizzle of sriracha. You can also add chopped peanuts for some crunch. Yum!

Korean BBQ chicken lettuce wraps

Homemade Holiday Crockpot Candy Recipe

0

Turn your slow cooker into a candy factory with this tasty holiday crockpot candy recipe! It's so easy and takes only a few minutes of active time to make yourself an entire batch of homemade candy. Put those suckers in cute little packaging and you've got DIY holiday gifts for days. Plus, you'll even have a stash of emergency candy (and we all need some of that).

Homemade Holiday Crockpot Candy Recipe

Video of the Day

Things You\’ll Need

  • 1 (12 oz) bag white chocolate

  • 1 (12 oz) bag semisweet chocolate chips

  • 1 (12 oz) bag milk chocolate

  • 1 tablespoon coconut oil or shortening

  • 4 cups dry roasted or cocktail peanuts

  • Sprinkles or crushed candy canes (optional)

Homemade Holiday Crockpot Candy Recipe

Step 1

Add the peanuts to the bottom of a crockpot in an even layer.

Homemade Holiday Crockpot Candy Recipe

Step 2

Add the white chocolate, semisweet and milk chocolate, as well as the coconut oil. Do not stir. Set the slow cooker for one hour on low.

Homemade Holiday Crockpot Candy Recipe

Step 3

Stir the chocolate and cook for an additional 30 minutes on low.

Homemade Holiday Crockpot Candy Recipe

Step 4

Using a cookie scoop, add mounds of chocolate peanut mixture to a sheet of parchment on a flat surface.

Homemade Holiday Crockpot Candy Recipe

Step 5

Add the sprinkles or candy canes, if using.

Homemade Holiday Crockpot Candy Recipe

Tip

Make it your own!​ Add flaked coconut, sea salt, toffee chips, or other toppings — the sky's the limit!

Step 6

Allow to rest until set, about 1 hour. Serve chilled or room temperature.

Homemade Holiday Crockpot Candy Recipe

How to Grind Coffee for a Percolator

0

... Grind coffee appropriately to make a good cup of percolator coffee.

Coffee percolators brew coffee by boiling water up through a basket containing coffee grounds. Because of its longer brewing process in comparison to drip or espresso machines, percolators require a coarser ground coffee to prevent it from tasting bitter. Use a burr grinder as opposed to a blade grinder for a more consistent grind when grinding coffee for a percolator. Blade grinders, usually the cheapest option, require you to grind the coffee beans until you think it is fine enough, while burr grinders grind the beans to your specified coarseness. Granules are also typically inconsistently sized when a blade grinder is used.

Video of the Day

Step 1

Remove the coffee bean hopper's lid.

Step 2

Fill the hopper with the chosen amount of coffee beans, but do not fill past the hopper's maximum level. Replace the hopper's lid.

Step 3

Turn the quantity selector on the outside of the coffee mill to select the amount of coffee to grind.

Step 4

Turn the fineness selector on the outside of the coffee mill to "Medium/Coarse."

Step 5

Plug the coffee mill into an outlet and press the "On/Off" switch to start grinding. The coffee mill will stop when the coffee is ground to the specified fineness.

Crispy Fried Green Tomatoes Recipe

0

In the Southern United States, crispy fried green tomatoes are a popular side dish, and it's easy to see why. They're crunchy, tangy and full of flavor. However, if you don't live in the South and love to cook at home, you'll be glad to know that this recipe can be made in just a few steps. To make it, you'll need green underripe tomatoes. The availability of green tomatoes depends on where you live. If you live in the North, green tomatoes are more common in the summer and fall. If you live in the South, you'll be able to find green tomatoes all year round! And if you own a tomato plant, you can simply pick the green tomatoes before they ripen.

Crispy fried green tomatoes

Video of the Day

Things You\’ll Need

  • 2 large green tomatoes (underripe and firm)

  • 1 cup white flour or cornmeal

  • 1/4 cup buttermilk

  • 2 eggs

  • 1 cup seasoned bread crumbs

  • 1 teaspoon fine sea salt

  • 1/2 teaspoon ground black pepper

  • 1/2 teaspoon garlic powder

  • 1/4 teaspoon chili powder (optional)

Ingredients for crispy green fried tomatoes

Tip

In the Northern United States, crispy fried green tomatoes are often made with white flour. In the South, they're often made with cornmeal. You can even use a combination of 1/2 cup white flour and 1/2 cup corn meal. Feel free to use whatever you prefer or have on hand.

If you want to cook more than two tomatoes, simply double, triple, etc. the entire recipe.

Step 1

Cut away the top and bottom of each tomato. Slice the tomatoes into 1/4-inch thick pieces.

Slice green tomatoes

Step 2

In a small bowl, whisk the buttermilk and eggs until combined. In a shallow dish, mix the breadcrumbs and spices together. Place the flour, buttermilk-egg mixture and breadcrumbs next to each other to create an "assembly line."

Prepare batter ingredients

Step 3

Work with one slice of tomato at a time. First, coat the tomatoes with flour.

Coat tomatoes with flour

Step 4

Dip the tomatoes in the buttermilk-egg mixture until covered.

Dip tomatoes in buttermilk and egg

Step 5

Coat the tomatoes in breadcrumbs. Shake off the excess and place on a plate.

Coat tomatoes with bread crumbs

Step 6

Once all the tomatoes are coated, fill a pan with 1/4 inch of oil. Set the burner to medium-high. Fry 3 to 4 minutes on each side or until golden brown.

Fry green tomatoes

Tip

If you have leftover batter ingredients, use the same process to make fried pickles.

Step 7

Remove the cooked tomatoes and place on a plate lined with a paper towel. Serve warm with your favorite dipping sauce.

Serve crispy fried green tomatoes

When it comes to dips, anything goes. Ranch dressing, ketchup, guacamole and garlic aioli sauce are delicious options. For a quick and creamy sauce, whip together mayonnaise or sour cream with spices of your choice.

Crispy fried green tomatoes

How to Wrap a Wine Bottle

... 1 of 15

Overview

A bottle of wine makes a welcome gift for birthdays, house-warmings and most holidays; it also works well as a thank you gift. Wrapping a bottle especially for the occasion goes one step further in letting the receiver know your gift is carefully chosen. Here are three basic wrapping techniques you can adjust to fit specific situations.

Image Credit: Jessica Begum ... 2 of 15

Butcher Paper Wrap

A basic butcher paper wrap is both modern and rustic. It's ideal for a themed party, such as a beach or holiday party, because you can change the look of the wrap simply by adding a different accent. A pine cone, a sprig of rosemary or a clipping of berries personalizes your gift for the occasion.

Image Credit: Jessica Begum ... 3 of 15

Butcher Paper Wrap: What You\’ll Need

A piece of butcher paper in blue, brown or white Scissors Clear tape Natural twine or ribbon Accent piece

Image Credit: Jessica Begum ... 4 of 15

Butcher Paper Wrap: Step 1

Begin by trimming the paper so it's about 3 inches longer than the bottle and 1 inch wider than the circumference.

Image Credit: Jessica Begum ... 5 of 15

Butcher Paper Wrap: Step 2

Position the bottle so the paper falls 1 inch below the bottom of the bottle. Roll the bottle up in the butcher paper. Secure it with a piece of clear tape. Fold the paper over the bottom of the bottle. Secure to the bottle with clear tape.

Image Credit: Jessica Begum ... 6 of 15

Butcher Paper Wrap: Step 3

Wrap a piece of natural twine or ribbon around the neck of the bottle and trim the top of the paper at an angle with a pair of scissors. You can personalize the wrap with an accessory such as a starfish, evergreen or berries.

Image Credit: Jessica Begum ... 7 of 15

Gift Wrapping Paper Wrap

This festive wrap uses regular gift wrapping paper and is appropriate for a festive event such as a birthday party or wedding shower. Personalize the presentation by choosing an appropriate wrapping paper for the occasion.

Image Credit: Jessica Begum ... 8 of 15

Gift Wrapping Paper Wrap: What You\’ll Need

Wrapping paper Scissors Twine or ribbon Tape A sprig of silk flowers

Image Credit: Jessica Begum ... 9 of 15

Gift Wrapping Paper Wrap: Step 1

Trim the wrapping paper so it's 3 inches longer than the wine bottle and 1 inch wider than the circumference. Position the bottle so the paper falls 1 inch below the bottom of the bottle. Roll the bottle up in the paper and secure with a piece of tape. Fold the bottom of the paper into the bottom of the bottle and secure to the bottle with tape.

Image Credit: Jessica Begum ... 10 of 15

Gift Wrapping Paper Wrap: Step 2

Tie a ribbon around the neck of the bottle and add some decorative silk flowers or branches. For a more festive look, fringe the top of the paper with scissors.

Image Credit: Jessica Begum ... 11 of 15

Tea Towel Wrap

This next method is perfect for a housewarming party or birthday party because the wrapping doubles as a gift for the receiver.

Image Credit: Jessica Begum ... 12 of 15

Tea Towel Wrap: What You\’ll Need

A set of tea towels Ribbon Scissors

Image Credit: Jessica Begum ... 13 of 15

Tea Towel Wrap: Step 1

Place the bottle on the inside of the towel so the top of the bottle lines up with the top of the tea towel. Fold the bottom of the towel over the bottom of the bottle forming a pocket.

Image Credit: Jessica Begum ... 14 of 15

Tea Towel Wrap: Step 2

Roll the bottle up in the tea towel.

Image Credit: Jessica Begum ... 15 of 15

Tea Towel Wrap: Step 3

Tie the bottle at the neck with a decorative ribbon. You can use the same ribbon to wrap around the rest of the tea towels in the set and give them alongside the wine as a gift.

Image Credit: Jessica Begum