Home Blog Page 99

What Are the Little White Fruits in a Chinese Buffet?

... Oval-shaped white lychees sometimes appear alongside other types of fruit, such as mangoes.

Chinese buffets often include small, white fruits known as lychees. Sometimes called lychee nuts, lychees resemble peeled grapes in shape, texture and flavor. Try them at ethnic restaurants or buy them for use at home. Soft, juicy and sweet, lychees are great for snacks, fruit salads and desserts.

Video of the Day

Trees

Lychees grow on dense evergreen trees that are native to parts of southern China. The trees appear in Chinese literature dating back to the 11th century. Since then, lychee trees have been cultivated in other parts of southeastern Asia and in many other countries with accommodating climates, according to Julia Morton's "Fruits of Warm Climates." In the United States, lychee trees now grow in California, Florida and Hawaii.

Fruit

Lychee trees display their fruit in clusters of up to 30. The oval- or heart-shaped fruits have a leathery skin that is sometimes bumpy and usually bright red, the color of strawberries. To get to the fleshy white fruit, you peel back the colorful skin. The fruit should be juicy and separate easily from the brown seed it encloses. The seed itself is inedible.

Nutrition Information

Like many fruits, lychees are low in fat and calories, high in vitamin C and a good source of fiber. One cup of lychees contains 125 calories and just 1 gram of total fat, according to the "Self" Nutrition Data website. It will give you 226 percent of your U.S. recommended daily allowance of vitamin C and 2 grams of dietary fiber, which is 10 percent of your recommended daily allowance of fiber.

Uses

Wherever lychee trees grow, fresh lychees are peeled, seeded and eaten straight off the tree. Lychees can be frozen or canned in syrup and sold in stores all around the world. Some people eat dried lychees, which are small and brown and have a concentrated sweetness the way raisins do. Occasionally, people use lychees to make jellies, preserves, wine and other fruit products.

Red Thai Curry Lentil Recipe

0

Lentils are a great addition to your regular weeknight meals. They are not only really easy to make, but they are also good for your body. Lentils can take on a variety of flavor profiles, and one of my favorites happens to be Red Thai Curry Lentils. The slightly spicy kick that comes from red curry pairs perfectly with lentils and coconut milk. Serve the lentils over rice for a meatless meal that is packed full of flavor. This recipe is perfect for any chilly night and you will love knowing that you are feeding your family something that is healthy and satisfying.

Red Thai Curry Lentil Recipe

Video of the Day

Note: Red Thai curry powder is a little spicier than regular yellow curry, so if you are looking for a completely non-spicy dish, yellow curry could be substituted here.

Things You\’ll Need

  • 2 cups of lentils, rinsed and picked over

  • 1 tablespoon oil (can be vegetable, olive, or whatever oil you have on hand)

  • 1 diced onion

  • 2 cloves of minced garlic

  • 1 tablespoon salt

  • 1 teaspoon cracked black pepper

  • 6 cups chicken broth or vegetable broth

  • 1 bay leaf

  • 2 tablespoon red Thai curry powder

  • 1 tablespoon water

  • 1 can of coconut milk

  • Cilantro for garnish

  • Fresh lime wedges for garnish

Step 1: Sauté Onion and Garlic

Add oil to a large pot and heat over medium heat. Add the onion, garlic, 1/2 tablespoon of salt and 1/2 teaspoon of pepper to the pan and sauté for about five minutes until the onions are translucent.

Red Thai Curry Lentil Recipe

Step 2: Add Spices

In a small bowl, make a paste by stirring together the red Thai curry powder with 1 tablespoon of water, and add into the pot with the onions. Add the bay leaf at this time and sauté the seasoning with the onions to bring out the flavors for 3 minutes.

Red Thai Curry Lentil Recipe

Step 3: Add in Lentils

Add the lentils to the pot with the seasonings and onions, and cook for two minutes to simply toast the lentils and give them good flavor.

Red Thai Curry Lentil Recipe

Step 4: Add Broth and Simmer

Add the broth at this time along with the rest of the salt and pepper. Bring to a boil and let the lentils simmer until tender about thirty minutes.

Red Thai Curry Lentil Recipe

Tip

Be sure to check your liquid during the cook time. If too much broth has evaporated, add some water and continue to cook until the lentils are tender.

Step 5: Add Coconut Milk

Once the lentils are tender and most of the broth has been absorbed, you will add the coconut milk and stir to combine. Heat through about five minutes.

Red Thai Curry Lentil Recipe

Step 6: Serve

Taste your lentils and adjust salt and pepper if necessary. Serve the lentils over rice or by themselves and garnish with cilantro and fresh lime juice.

Red Thai Curry Lentil Recipe

Why not take a break from meat protein every once in a while and add lentils to your grocery list? This red Thai curry recipe is so delicious, satisfying, and super nutritious!

Homemade Pastitsio (Greek Lasagna) Recipe

0

Pastitsio is a delicious Greek lasagna dish. It features layers of cheesy, tubular pasta and spiced meat sauce topped with a creamy béchamel. Needless to say, it makes for a hearty and flavorful meal. As with all traditional recipes, there are many ways to make it. Here's one version of the dish along with ideas for ingredient substitutions.

Finished pastitsio

Video of the Day

Spiced Meat Sauce

Things You\’ll Need

  • 2 pounds ground beef or lamb

  • 1 medium yellow onion, diced

  • 3 garlic cloves, minced

  • 28 ounces canned tomato sauce

  • 2 tablespoons tomato paste

  • 1 teaspoon white sugar

  • 2 bay leaves

  • 2 teaspoons ground cinnamon

  • 1 teaspoon salt

  • 1/2 teaspoon ground black pepper

  • 1/4 teaspoon ground nutmeg

Ingredients for pastitsio meat sauce

Step 1

In a large skillet over medium heat, add the ground beef and onions. Cook until the beef is browned, about 8 to 10 minutes, while breaking it up with a spatula. Add the minced garlic and cook for another 1 minute. Drain the excess grease if desired.

Cook ground beef, onions and garlic

Step 2

Add the tomato sauce, tomato paste, sugar, bay leaves and spices. Mix well and simmer until thick, about 15 to 20 minutes. Set aside.

Add sauce ingredients and simmer

Greek Béchamel Sauce

Things You\’ll Need

  • 8 tablespoons unsalted butter, cubed

  • 2/3 cup all-purpose flour

  • 3 1/2 cups whole milk

  • 1 teaspoon salt

  • 1/2 teaspoon ground black pepper

  • 1 cup grated Kefalotyri or Pecorino Romano cheese

  • 2 large eggs, lightly beaten

Ingredients for béchamel sauce

Step 1

In a large skillet over medium heat, melt the butter.

Melt the butter

Step 2

Add the flour. Whisk until thick and lightly golden.

Whisk flour and butter

Step 3

Slowly add the milk, 1/3 at a time, while constantly whisking. Whisk until no lumps remain.

Add milk and whisk until smooth

Step 4

Add the salt, pepper and grated cheese. Whisk until smooth and melted. Remove from the heat and let cool for 5 to 7 minutes.

Add cheese and whisk until melted

Step 5

If you haven't already, lightly beat the eggs. Add them to the sauce and stir until combined and thick. Set aside.

Add eggs to sauce

Pasta Layer

Things You\’ll Need

  • 1 package (500 grams) pastitsio noodles

  • 4 to 5 tablespoons olive oil

  • 1 1/2 cups shredded Parmesan cheese or crumbled feta

  • 2 eggs, lightly beaten

Ingredients for pastitsio pasta layer

Tip

You can substitute the pastitsio noodles with 16 ounces penne, ziti or macaroni. These options will change the appearance of the final dish but not the flavor.

Step 1

Bring a pot of water to a boil and then add 1 tablespoon of olive oil. Cook the pasta according to the package directions.

Boil pasta

Step 2

Drain the pasta. Add 3 to 4 tablespoons of olive oil and then gently toss to coat the noodles. This will keep the pasta from sticking together.

Toss pasta with olive oil

Step 3

If you haven't already, lightly beat the eggs. Add the cheese and beaten eggs to the pasta. Gently toss until evenly combined.

Add cheese and eggs to pasta

How to Assemble Homemade Pastitsio

Things You\’ll Need

  • Olive oil

  • Cooked pastitsio noodles

  • Spiced meat sauce

  • Greek béchamel sauce

  • Grated Kefalotyri or Pecorino Romano cheese for garnish

Step 1

Preheat the oven to 350°F. Grease a large casserole dish with olive oil. Place the cooked noodles in the dish, arranging them in the same direction.

Arrange noodles in a large casserole dish

Step 2

Spoon the meat sauce over the noodles. Spread the sauce in an even layer.

Spread meat sauce on top of noodles

Step 3

Pour the béchamel on top. Again, spread the sauce in an even layer. Top with extra grated cheese if desired.

Spread béchamel sauce on top

Step 4

Bake for 40 minutes or until the cheese is bubbly and slightly golden brown. Let cool for 15 to 20 minutes before slicing. Enjoy!

Finished pastitsio

10 Recipes Featuring Cheese

10 Melty, Gooey Cheese Recipes to Make America Grate Again 1 of 11

Cheese. Glorious, glorious cheese. Whether it's the main ingredient in a hearty bowl of macaroni, melted atop a slice of greasy pizza or sandwiched between two slices of golden bread, the magical power of cheese to bind together a tastebud-pleasing dish cannot be denied. Go ahead and break out your grater so we can chip away at America's cheese surplus with these melty, gooey, delicious recipes.

Image Credit: eHow How to Make Beer Cheese Sauce 2 of 11

Beer Cheese Sauce

What's more American than cheese and beer? This beer cheese sauce. Treat this as a dip for chips and pretzels, or as a condiment for topping hot dogs and hamburgers.

Image Credit: Jackie Dodd How to Bake Pizza on a Skillet 3 of 11

Cheesy Skillet Pizza

This skillet pizza recipe proves that you don't need any fancy bakeware to make pizza at home. We recommend opting for a four-cheese blend of provolone, mozzarella and manchego for optimal cheesy goodness.

Image Credit: Jennifer Farley How to Make Fully Loaded Grilled Cheese 4 of 11

Fully-Loaded Grilled Cheese

Sure, a traditional grilled cheese is great, but we'd argue that this fully-loaded version is even better. Swap cheddar cheese for brie and add a few strips of bacon, a handful of baby greens and a few pieces of thinly sliced apricots to customize your own.

Image Credit: Gina Matsoukas Homemade Macaroni and Cheese Recipe 5 of 11

Macaroni and Cheese

If you find yourself craving some good ol' comfort food, then this macaroni and cheese recipe is for you.

Image Credit: Charity Curley Mathews Easy, No-Fail Potatoes Au Gratin 6 of 11

Easy, No-Fail Potatoes Au Gratin

A decadent, creamy sauce lurks just below a cheesy layer of melty goodness in this potatoes au gratin recipe. Trust us, you need this in your life.

Image Credit: Leigh Ann Chatagnier Mozzarella-Stuffed Meatballs 7 of 11

Mozzarella-Stuffed Meatballs

Yes, mozzarella-stuffed meatballs. Need we say more?

Image Credit: Ashley Manila Chicken Broccoli Casserole Recipe 8 of 11

Chicken Broccoli Casserole

This chicken broccoli casserole is about to become one of your go-to weeknight meals. Gooey cheese binds together roast chicken, fluffy rice and fresh broccoli to create a flavorful dish that hits the spot any day of the week.

Image Credit: Ashley Manila The Only Fettuccine Alfredo Recipe You Need 9 of 11

Classic Fettuccine Alfredo

Fettuccine Alfredo may not be as cheese-filled as the other recipes on this list, but it's certainly just as flavorful. Freshly grated Parmigiano-Reggiano makes all the difference, so skip the pre-packaged cheese when making this dish.

Image Credit: Jennifer Farley Chile Relleno Casserole Recipe 10 of 11

Chile Relleno Casserole

This chile relleno casserole is an easy, crowd-pleasing vegetarian dish that doesn't skimp on the cheese. Don't you just want to grab a spoon and serve yourself a heaping plateful of this tasty looking casserole?

Image Credit: Charity Curley Mathews Cheese Potato Pie Recipe 11 of 11

Cheese Potato Pie

Serve this cheesy potato pie hot out of the oven while the cheese is still bubbling. Then, pair it with meatloaf for the ultimate comfort food meal.

Image Credit: Ashley Manila

How to Cook Honey Bear Squash

0

Things You\’ll Need

  • Knife

  • Baking sheet

  • Butter

  • Salt

  • Pepper

  • Spoon

  • Brown sugar (optional)

  • Ground ginger (optional)

  • Heavy cream (optional)

  • Raisins or chopped nuts (optional)

... True to its name, Honey Bear squash has a sweet flavor.

Honey Bear is an acorn squash, which is a type of winter squash. Winter squashes have hard-shelled skins and are sold from fall through early spring. Cooking acorn squash can be done in a variety of ways and eaten plain or mahed into a blend and combined with butter and other spices.

Video of the Day

Step 1

Preheat the oven to 375 degrees Fahrenheit.

Step 2

Pierce the squash in five places with the knife and place the squash on the baking sheet.

Step 3

Place the squash in the oven for at least 45 minutes, until the flesh is tender. This may take up to 90 minutes, depending on the size of the squash.

Step 4

Remove the squash from the oven and cut it in half through the stem end.

Step 5

Scoop out the seeds and strings. Serve immediately with butter, salt and pepper, or prepare as mashed squash.

Step 6

For mashed squash, scrape the squash from the skin with a spoon and mash it. Add 1 tbsp. butter for every cup of mashed squash. For additional flavoring, add 1 tsp. brown sugar, 1/4 tsp. salt, and 1/8 tsp. ground ginger.

Step 7

Mix in warm heavy cream until there is enough to beat the mixture into a smooth puree; the amount varies, depending on how much squash you have. Sprinkle in raisins or chopped nuts and serve.

Homemade Frozen Pizza Recipe

0

Frozen pizza is a guilty pleasure in my household. There are so many evenings (too many, if I'm being honest) where I'm simply too tired to cook dinner. We usually keep frozen pizzas on hand for these occasions. It's so brainless, and dinner is ready in less than 15 minutes. It's total comfort food. However, I recently figured out how easy it is to prepare homemade frozen pizzas from scratch! These are much more economical and the ingredients are less processed, especially if using homemade pizza dough and sauce. I love having control over the various ingredients and toppings. Let's get started.

Homemade Frozen Pizza | eHow

Video of the Day

Things You\’ll Need

  • 1 pound room temperature pizza dough, store-bought or homemade

  • 2 teaspoons extra virgin olive oil

  • 1 – 1 1/2 cups pizza sauce, store-bought or homemade

  • 1 1/2 – 2 cups shredded mozzarella cheese

  • Optional: additional toppings, such as pepperoni, banana peppers, mushrooms, sliced black olives, additional cheeses

Step 1: Gather your ingredients and tools.

The ingredients are all very straight forward. Some grocery stores have started carrying bagged pizza dough in the refrigerator section, which is a nice time saver if you don't want to make your own. Homemade pizza sauce is always going to taste better than jarred varieties, but this is entirely up to you.

For tools, you'll need a rolling pin and plastic wrap. A large baking sheet lined with parchment paper is an ideal way to pre-bake the dough.

Homemade Frozen Pizza | eHow

Step 2: Roll out the dough.

Preheat the oven to 425 degrees F. On a clean surface, roll out pizza dough to the desired size. You can also divide the dough in half or even quarters if you prefer single serving pizzas (note: this may decrease the cook times below). Pizza dough is very elastic. If you find that it's not holding its shape while you roll it, switch to stretching and letting it fall into the desired size (hold from the top and let the weight of the dough stretch it down while turning the circle). Place the dough on a large baking sheet lined with parchment paper and brush with olive oil.

Homemade Frozen Pizza | eHow

Step 3: Partially cook the pizza dough.

Bake the dough for approximately 8 to 10 minutes until solid but not golden. It will be back in the oven again at a later time, so there's no need to cook it completely. If any air bubbles form while baking, gently pop them with a fork to deflate. Remove from the oven and allow to cool.

Homemade Frozen Pizza | eHow

Step 4: Build the pizza.

Spread the pizza sauce evenly over the crust, leaving space around the edges. Top with the cheese.

Homemade Frozen Pizza | eHow

Step 5: Add optional toppings.

Add additional toppings, if desired.

Homemade Frozen Pizza | eHow

Step 6: Wrap and freeze.

Carefully wrap in two layers of plastic wrap. The goal is to enclose the pizza as tightly as possible to hold the toppings in place without disturbing or compressing them. Place in the freezer on as flat of an angle as your freezer will allow until the pizza is fully frozen. After that, you can store it upright.

Homemade Frozen Pizza | eHow

To Cook the Frozen Pizza:

  1. Preheat the oven to 425 degrees F.
  2. Remove the plastic wrap from around the pizza.
  3. Place on a baking sheet lined with parchment paper, or on a preheated pizza stone (see tip below).
  4. Bake for approximately 10 to 11 minutes, until cheese is fully melted and the crust is golden brown.

Tip

A pizza stone is an excellent way to achieve a crispy crust. If using, place in the oven during preheating.

Homemade Frozen Pizza | eHow

Rainbow Waffle Recipe Everyone Will Love

0

What's the quickest way to get your kids out of bed in the morning? You simply tell them that a unicorn made their breakfast, of course. After all, a golden waffle that's swirled with the colors of the rainbow must have been made by a mythical creature, right? Right. Turn a typical waffle into a beautiful masterpiece with nothing more than a few drops of food coloring and a hot iron, and you'll have the perfect breakfast for a weekday treat or lazy Sunday. Top the waffle with a whipped cream "cloud," and your kids might love this so-called kitchen unicorn more than Santa Claus. You're welcome.

waffles.

Things You\’ll Need

  • Waffle Mix (3 cups)

  • 2 Eggs

  • Vegetable Oil (1/3 cup)

  • Water (1 1/2 cups)

  • Food coloring

Step 1: Make the Batter

Blend all the waffle mix, eggs, vegetable oil and water together to make a smooth batter. Separate the batter into equal portions, depending on how many colors of food coloring you have.

mix ingredients.

Step 2: Add Food Coloring

Drop a few drops of food coloring into each bowl and mix together.

food coloring being added.

Step 3: Spray the Waffle Iron and Pour the Batter

Be sure to add oil to the heated waffle iron so that the rainbow doesn't stick. Add the waffle batter in any design you'd like!

rainbowl waffle mix.

Step 4: Cook the Waffle

Close the waffle iron top and flip it. It typically takes about 2 to 3 minutes before the waffle is ready.

cooked waffle

Step 5: Taste the Rainbow

Pop it off carefully with a spatula and decorate it with whip cream for a fluffy "cloud" at the end of your rainbow. Brunch of champions!

rainbow waffles.

What Kind of Red Wine Tastes Sweet?

...

In wine terminology, the sugar content of wine is referred to as residual sugar and is measured in percentages. All red wines, whether sweet or not, have a residual sugar level close to zero. The difference between a sweet and a dry red wine is the level of tannins. Tannins are the acidic agents produced by the grape skins that cause your mouth to pucker and feel dry. Wines with less tannins appear sweeter because the fruity flavors are more pronounced due to fewer tannins.

Video of the Day

Merlot

...

Any wine labeled Merlot is usually a sweet wine. Merlot is the variety of grape used to make the wine and is now grown all over the world. Merlot grapes are gentle in flavor and lower in tannins than most other grapes, giving off a smooth taste full of fruit flavors, including plum and berry.

While not overly sweet, Merlot is a much smoother wine than a highly tannic wine such as Cabernet Sauvignon. Merlot is a great accompaniment to both red meats and white meats such as turkey, pork chops and chicken.

Chianti

...

Chianti is a blended wine from Italy consisting mostly of Sangiovese grapes with variant styles mixed with Canaiolo, Colorino, Cabernet Sauvignon and Merlot grapes. Only Chianti made from grapes grown in the Chianti region can be marketed as Chianti.

Like Merlot, Chianti is fruity and low in tannins and is therefore sweeter in taste than dry red wines. While sweet, Chianti tends to have a spicy flavor wrought with hints of coffee and tobacco, with hints of cherry and plum. The spicy fruit flavors go well with most pasta and seasoned meat dishes.

Shiraz/Syrah

...

Shiraz, made from the Syrah grape, is produced solely in Australia, while the rest of the world refers to wine made from the Syrah grape simply as Syrah. Like Chianti, Shiraz is spicy with full-bodied fruit flavors yet low in tannins and soft on the tongue. Though light, Shiraz pairs well with a variety of bold foods including rich red meats and spicy cuisines such as Mexican or Middle Eastern.

Dessert Wines

...

Dessert red wines are among the sweetest wine varietals available due to the process of fortification. Most dessert wines like Port or Sherry are not pure wines but rather are blended with liquor.

Port, the sweeter of the two, is made from sweet grapes from Portugal's Douro Valley. After only a few days, the fermentation of the wine is stopped and brandy is added to create the distinct sweet, thick and rich characteristics along with the accelerated alcohol content. Due to the halt in fermentation, the natural sugars in the grapes do not fully ferment and thus remain in the wine.

Sherry is also fortified with brandy; however, the grapes ferment fully before addition and is thus less sweet than port. Dessert wines are usually served as an aperitif before a meal, alongside dessert, or after the meal as the digestif.

Cheesy Barbecue Bacon Meatballs Recipe

0

What if I told you that you can combine all the best parts of a barbecue into one simple dish? Yes, it's true! Say hello to cheesy barbecue bacon meatballs! The center is stuffed full of gooey cheese, wrapped in beef, placed inside an onion and snuggly wrapped in bacon topped with mouthwatering barbecue sauce. My mouth is salivating, too. Hashtag nom!

cheesy barbecue bacon meatballs

Things You\’ll Need

  • 2 large onions

  • 1 1/2 lbs ground beef

  • 2 to 3 cloves minced garlic

  • 1/2 teaspoon salt

  • 1 teaspoon ground pepper

  • 1 tablespoon barbecue seasoning

  • 2 tablespoons fresh chopped parsley

  • 4 cubes pepper jack cheese

  • 12 slices bacon

  • 1 cup barbecue sauce

ingredients

Step 1: Slice and Prep Onions

Cut off ends of both onions and peel off skin. Cut in half lengthwise and peel off top two layers of each onion, for a total of four onion shells.

onions

Step 2: Stuff Meat and Wrap in Bacon

Preheat oven to 425°F. Mix together garlic, spices, and parsley into the ground beef. Place a small amount of beef on a clean working surface, and place a large cube of cheese into the middle. Cover with another sheet of beef, and form into a ball, large enough to fit inside an onion shell. Place in the onion shell, and wrap with three slices of bacon.

Tip

Use toothpicks to secure bacon onto the onion so everything holds together. Bacon should be wrapped horizontally, vertically and diagonally over the onion ball.

wrap bacon

Step 3: Bake and Serve

Place onion meatballs in a baking dish and bake on 425°F for 30 minutes. Remove from oven, coat with barbecue sauce, and bake for another 10 minutes. Serve while warm. Enjoy!

serve

How to Make Dreidel Cake Pops

0

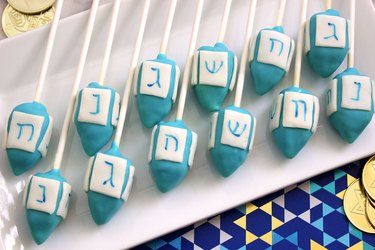
Spinning a dreidel is a fun Hanukkah tradition, and making these dreidel cake pops could be the newest tradition in your family. Resembling dreidels with their four sides, each with a different Hebrew letter, you can actually play with the cake pops. However, everyone will much prefer eating them.

dreidel cake pops

Video of the Day

Things You\’ll Need

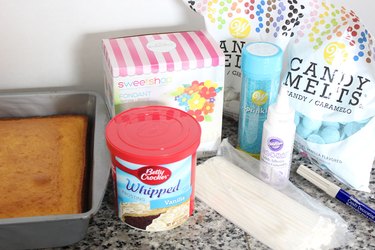
  • White or yellow cake

  • Knife

  • Vanilla frosting

  • 1-inch scoop

  • Blue candy melts

  • Vegetable shortening

  • 6-inch treat sticks

  • White fondant

  • Fondant roller

  • Knife

  • Blue candy decorating pen

  • Edible adhesive

  • Small paintbrush

materials

Tip

If you keep kosher, there are many brands like Wilton, Satin Ice and Betty Crocker that offer kosher choices.

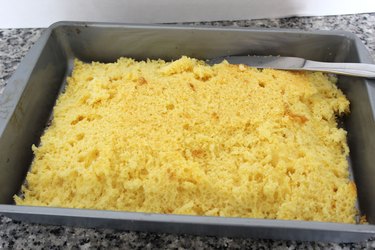
Step 1: Prepare the Cake

Bake a cake either from scratch or with a box mix. I used a yellow cake box mix. After it has cooled, take a knife and cut out the sides and top sections that have browned. (You can nibble on them while you're making the cake pops.) Your cake pops will be more uniform in look and texture by using just the inside part of the cake.

cake

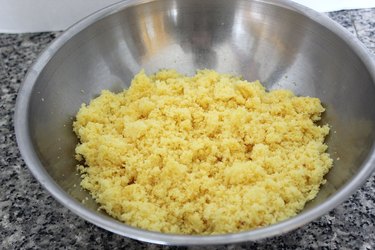
Step 2: Crumble the Cake

Use your fingers to crumble the cake into small pieces in a bowl.

crumble

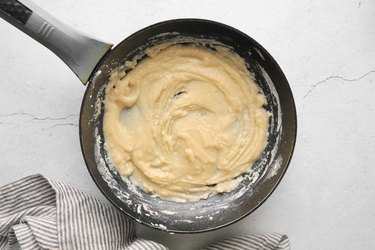
Step 3: Mix With Frosting

Add two heaping tablespoons of vanilla frosting to the crumbled cake. For convenience, I used a tub of frosting from the store rather than making my own.

frosting

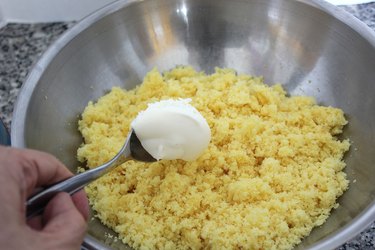
Mix the frosting and cake until it has the consistency of cookie dough. If you need to add more frosting as you mix, do so in small one-teaspoon increments. Chill the mixture in the refrigerator for 15 minutes to make it more firm.

dough

Step 4: Shape the Mixture

Scoop out some of the cake mixture with a 1-inch scoop. Using a scoop will help you make all your dreidels the same size.

scoop

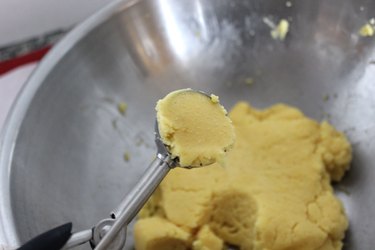
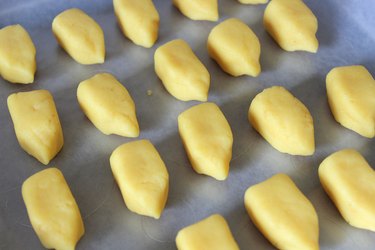
Shape the mixture into a rectangular prism using your fingers, leveling the sides on the tabletop.

rectangular

Pinch one end to make it pointy like the bottom of a dreidel.

pointy end

Place the dreidels on a parchment-lined cookie sheet and chill in the refrigerator for 15 minutes.

dreidels

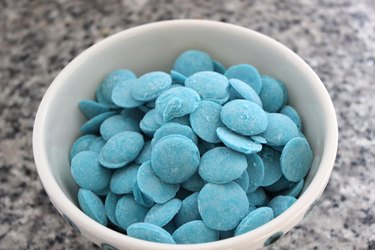
Step 5: Prepare the Candy Melts

While the dreidels are chilling in the refrigerator, pour a bag of blue candy melts into a microwave-safe bowl.

candy melts

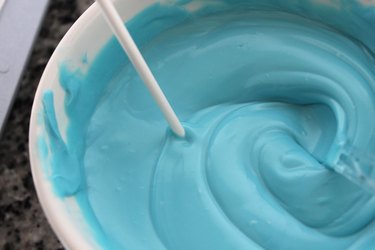
Heat the candy melts in the microwave in 30-second intervals, stirring after each round in the microwave. Also mix two teaspoons of vegetable shortening with the candy melts to thin it out. You want the candy melts to drip from a spoon that's dipped into it.

melted candy

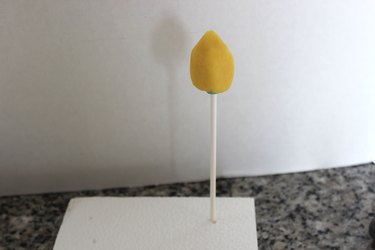
Step 6: Prepare the Handle

Dip a 6-inch treat stick about a half inch into the candy melts.

treat stick

Remove the dreidels from the refrigerator. Insert the dipped treat stick into the top of a dreidel. The candy around the stick will solidify when cooled and lock in the treat stick.

locked stick

Poke the end of the treat stick into a piece of styrofoam to allow the cake pops to stand upright.

styrofoam

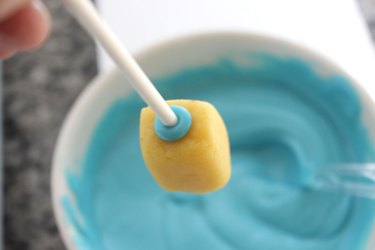
Step 7: Coat the Dreidels

Dip the dreidels in the candy melts, turning them to coat all four sides and the top.

dip dreidel

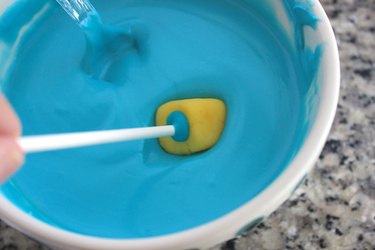
Tap the stick against the rim of the bowl to shake off excess melted candy. Rotate the stick as you tap it so an equal amount of melted candy is removed from all four sides.

tap stick

Tip

Now, while the candy melts are still liquid, would be a good time to add sprinkles if you want to give the cake pops some "bling." I ultimately decided against sprinkles because it became too ungapatchka, my favorite Yiddish term, meaning too over-decorated.

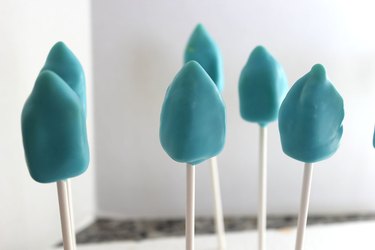
Let the cake pops stand upright in the styrofoam to allow the candy coating to harden.

dipped dreidels

Step 8: Roll the Fondant

Knead a ball of white fondant to soften it, and place it on a piece of parchment paper.

fondant

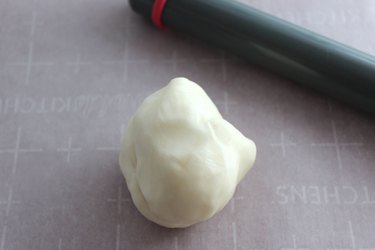
Flatten it with a fondant roller, making it as thin as possible. If your fondant roller has guides, use the guide for the thinnest depth.

rolled fondant

Step 9: Cut Fondant

Measure the size of your dreidels. Cut squares of fondant using a knife, making them smaller than one side of a dreidel. The ones in this example were about 3/4 inches.

Tip

Let the fondant air dry for about 15 minutes before cutting them. Dried fondant is easier to handle without stretching.

cut fondant

You'll need four squares of fondant for each dreidel.

fondant squares

Step 10: Draw Hebrew Letters

A dreidel has four Hebrew letters on the four sides — נ (nun), ג (gimel), ה (hei), and ש (shin). Draw one letter on each of the fondant squares with a blue candy decorating pen.

hebrew

Step 11: Glue Fondant to Dreidel

Squeeze some edible adhesive onto a plate. Dip a small paintbrush in the adhesive, and apply a thin coating of the adhesive onto the back of the fondant.

edible adhesive

Position the fondant squares on each of the four sides of the dreidel, making sure to have a different Hebrew letter on each side. The white rectangles help delineate the shape of the dreidels and stand out nicely from the blue background.

shin

Be sure to make a big batch of these dreidel cake pops. If they last more than eight nights, it really will be a Hanukkah miracle.
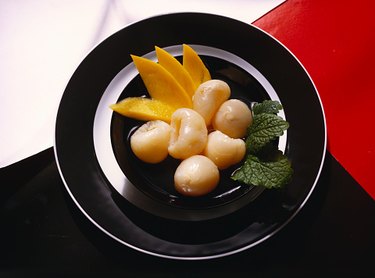
dreidel cake pops