Home Blog Page 95

Homemade Energy Bar to Save You From Afternoon Slumps

0

Sometimes the midday slump feels unavoidable no matter how many steps we take to keep it at bay! These homemade bars are the solution; they offer a nice energy boost without the caffeine. Prepackaged bars have a tendency to be overly cloying, and they're loaded with unnecessary ingredients. These bars, on the other hand, have only 6 ingredients and a delicious flavor balance. As an added bonus, they come together in no time.

Homemade Energy Bar to Save You From Afternoon Slumps | eHow

Video of the Day

Things You\’ll Need

  • 2 cups raw almonds

  • 2/3 cup unsweetened shredded coconut

  • 1 cup pitted dates (such as Medjool or Deglet)

  • 1/8 teaspoon kosher salt

  • 3 to 4 tablespoons coconut oil

  • 3 to 4 tablespoons almond butter

  • Food processor

  • Spatula

  • 8×8 baking dish

  • Parchment paper

Tip

Feel free to swap out the nuts and nut butter with your favorite variety! Cashews and peanuts are also a tasty option.

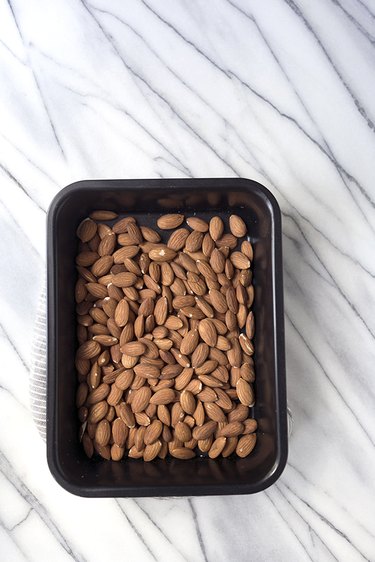
Step 1: Toast the almonds.

Preheat the oven to 350 degrees Fahrenheit. Toast the almonds until golden and fragrant, approximately 5 minutes.

Homemade Energy Bar to Save You From Afternoon Slumps | eHow

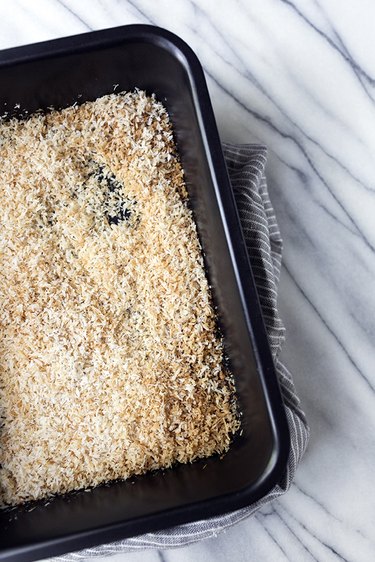
Step 2: Toast the coconut flakes.

Toast the coconut flakes until golden and fragrant, approximately 2 to 3 minutes.

Warning

Keep an eye on coconut while it's toasting in the oven. It can go from golden to burnt very quickly.

Homemade Energy Bar to Save You From Afternoon Slumps | eHow

Step 3: Add the dry ingredients to a food processor.

Place the almonds, coconut flakes, pitted dates, and salt to a food processor.

Homemade Energy Bar to Save You From Afternoon Slumps | eHow

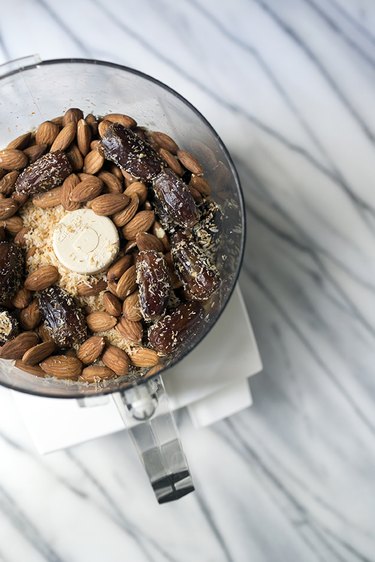
Step 4: Pulse the ingredients.

Pulse several times to start chopping and combining the ingredients. It's fine if there are larger pieces here and there.

Homemade Energy Bar to Save You From Afternoon Slumps | eHow

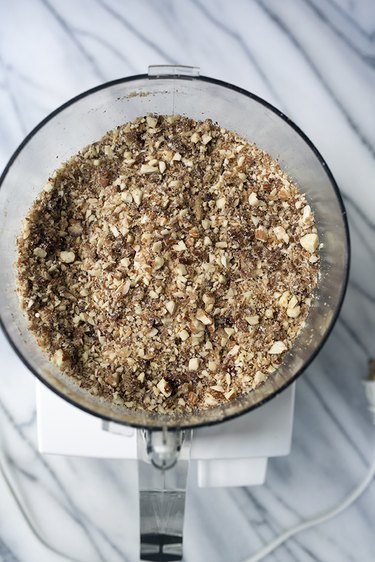
Step 5: Add the coconut oil and almond butter.

Add 3 tablespoons coconut oil and 3 tablespoons almond butter. Continue pulsing to incorporate the ingredients, using a spatula to scrape down the sides of the bowl periodically. The mixture is ready when you can press it together and it holds its shape. If it feels dry, add the remaining coconut oil and almond butter.

Homemade Energy Bar to Save You From Afternoon Slumps | eHow

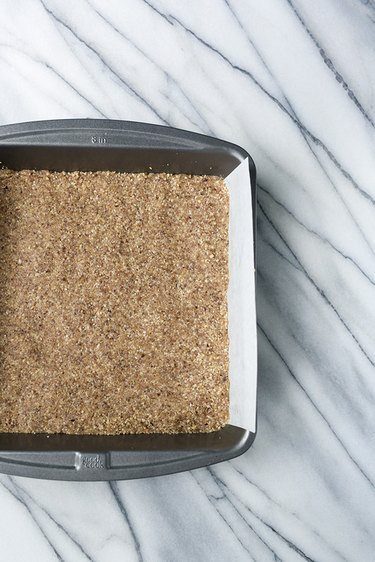
Step 6: Press the mixture into a baking dish.

Line an 8×8 inch baking dish with parchment paper, allowing two sides to hang over the side. (This will make it easier to remove the bars once they have chilled.) Transfer the mixture into the prepared pan, pressing down evenly to create dense bars. Place in the freezer and chill for 20 minutes.

Homemade Energy Bar to Save You From Afternoon Slumps | eHow

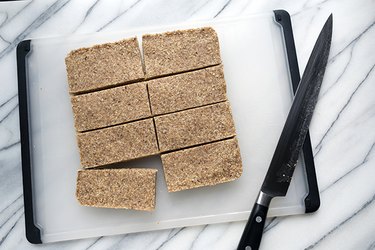
Step 7: Slice and store.

Lift the parchment paper to remove the bar from the pan and transfer to a cutting board. Slice into 8 rectangle or 16 square bars. Wrap individually with plastic wrap and store in the refrigerator or freezer.

Homemade Energy Bar to Save You From Afternoon Slumps | eHow

Mashed Potato Casserole Recipe

0

Equal parts creamy and cheesy, this mashed potato casserole is the ultimate comfort food recipe. The mashed potato base is thick and velvety thanks to a generous helping of sour cream. As if that isn't enough, it's also topped with shredded cheddar cheese, crispy bacon and vibrant parsley for a pop of color. Serve it in place of plain mashed potatoes and let the compliments roll in! Read on to make this sinfully delicious dish.

Mashed potato casserole recipe

Video of the Day

Things You\’ll Need

  • 3 pounds potatoes

  • 1/2 small yellow onion, finely diced

  • 4 tablespoons butter, melted

  • 1 cup full-fat sour cream

  • 1/3 cup milk or half & half

  • 1 3/4 cup shredded cheddar cheese

  • 1 tablespoon and 1 teaspoon salt, separated

  • 1/2 teaspoon ground black pepper

  • 1 teaspoon garlic powder

  • 4 to 6 strips bacon, cooked and chopped

  • 1 1/2 tablespoons chives, finely chopped

  • 1 1/2 tablespoons fresh parsley, finely chopped

Ingredients for mashed potato casserole

Tip

Omit the bacon to make the casserole vegetarian-friendly.

Step 1

Wash the potatoes, then peel and chop into 1 1/2-inch cubes.

Peel and chop potatoes

Step 2

Put the potatoes in a large pot. Cover with cold water, making sure all the potatoes are submerged. Add 1 tablespoon salt. Bring to a boil then reduce to a simmer, partially covering the pot. Simmer until the potatoes are fork-tender, about 20 minutes. Drain and let sit for 3 to 5 minutes.

Boil potatoes

Step 3

Preheat the oven to 350° Fahrenheit.

In a large bowl, mash the potatoes with a potato masher or ricer.

Mash the potatoes

Tip

Use a food processor to speed up the process.

Step 4

Add the butter, sour cream and milk. Stir well until combined.

Mix sour cream, milk and butter

Step 5

Mix in 1 cup of cheddar cheese and stir well.

Add cheddar cheese

Step 6

Transfer the potato mixture to a greased 9-inch pan or 2-quart casserole dish. Top with the remaining cheese.

Transfer to a baking dish

Step 7

Loosely cover the casserole with aluminum foil.

Cover with aluminum foil

Step 8

Bake for 25 minutes. Remove the aluminum foil, add the bacon and bake for another 10 minutes or until the cheese is melted and bubbly. Top with chives and parsley.

Top with bacon, chives and parsley

Your homemade mashed potato casserole is ready to enjoy. Serve it as an appetizer or side dish, depending on your menu.

Mashed potato casserole recipe

How to Store Cherry Bomb Peppers

Things You\’ll Need

  • Knife

  • Latex gloves or cling-form plastic wrap (optional)

  • For Freezing:

  • Baking dish or flat baking sheet

  • For Pickling:

  • Glass jars

  • Paring knife or toothpick

  • Vinegar

  • Herbs

  • Flavorings

  • Home canning kit

... Cherry bomb peppers can be frozen or pickled.

Though they resemble grape tomatoes, cherry bomb peppers are potently hot, with a Scoville rating of 2500 to 5000. Due to their heat level and bright color, cherry bomb peppers are a great addition to dishes such as chili and salsa. Harvesting a crop of these spicy peppers leaves the gardener with a yield of small, thick-fleshed peppers that can be stored as pickled peppers or as frozen pepper pieces.

Video of the Day

Freezing

Step 1

Sort the peppers and remove any disfigured or discolored ones.

Step 2

Wash the peppers in cold water. Remove any grit or dirt and shake off any excess water.

Step 3

Remove the stem and slice each pepper in half length-wise.

Step 4

Seed the peppers. Do this by scraping the seeds from the flesh with your knife or scooping the seeds out with a teaspoon.

Step 5

Chop the peppers into small pieces. Since cherry bomb are a small variety of peppers, you can quarter them.

Step 6

Spread pieces out onto a baking dish or any other flat metal surface that will fit in your freezer. Ensure that no pieces are touching or overlapping.

Step 7

Place the baking dish or tray in your freezer. Remove when pepper pieces are completely hardened. Store frozen peppers in a sealed zip-top bag for up to a year, using as needed.

Pickling

Step 1

Sort the peppers, discarding any odd-shaped or discolored ones.

Step 2

Wash the peppers under cold water. Remove any grit or dirt.

Step 3

Using a paring knife or toothpick, poke two small holes in each pepper. These holes will ensure that the pickling solution inundates the inside of each pepper.

Step 4

Make a pickling solution. Pickling solutions typically consist of water, some type of vinegar and other flavorings and herbs. Recipes for pepper pickling solutions can be found on the Colorado State University Extension website.

Step 5

Pack the peppers into your bottles. Pack them tightly, but allow some spaces between peppers for the pickling solution. Do not press the peppers down.

Step 6

Pour the pickling solution over the peppers, allowing the liquid to work its way down and throughout the peppers. Shake the jar to loosen the peppers if the pickling solution isn't draining well.

Step 7

Process your pepper-filled jars in your pressure canner or water canner. Different models of canners and home canning kits have different instructions, so review your kit's manual for specific details on canning pickles.

Step 8

Store lidded and sanitized pepper pickles for at least a month before opening to allow flavors to develop and the pickling solution to work.

Tip

For safety, you can wear latex gloves or handle the peppers with cling-form plastic wrap.

Warning

Wash your hands well after handling hot peppers. Never touch your face or eyes while working with hot peppers.

How to Put Grapes in a Juicer

0

Things You\’ll Need

  • Bunch of grapes

  • Colander

  • Knife

  • Juicer

  • Fine sieve

... Put grapes through a juicer for healthier juice.

Putting grapes through a juicer extracts the sweet flavor and vitamins from the juice, leaving behind the indigestible pulp. Homemade grape juice lacks the preservatives and added sugar found in many commercial varieties. Choose Concord grapes for a traditional flavor or Thompson seedless grapes for a tangy treat.

Video of the Day

Step 1

Pull individual grapes off the stems and transfer these to a colander.

Step 2

Rinse the grapes in a colander under running water to remove contaminants.

Step 3

Cut the grapes in half and pull out the seeds if using seeded grapes. Skip this step for juicing seedless varieties.

Step 4

Feed the grapes into your juicer through the chute of the juicer.

Step 5

Strain the grape juice again through a fine sieve or colander to separate out any leftover sediment.

Step 6

Drink the juice immediately to prevent separation.

Is Rump Roast Good if It Has Been Frozen Over a Year?

0

Woman looking in refrigerator A well-wrapped rump roast will keep for a long time in the freezer. Image Credit: Creatas Images/Creatas/Getty Images

It's inevitable that some things we put in our freezer will make their way to hidden recesses of the ice box, under a half-used bag of crinkle-cut fries and concealed in an unmarked wrapping of butcher paper. But once you unearth that rump roast you bought and froze so long ago, don't worry about a little freezer burn — whether the roast is safe to eat depends on when you put it in the freezer and how you defrost it, not on how long it's been frozen. Proper wrapping before freezing and proper defrosting are essential for best results.

Video of the Day

Freezer Life of Rump Roast

Anything kept constantly frozen at 0 degrees Fahrenheit will be safe indefinitely, but there are some guidelines to keep in mind for best quality. Cuts of raw beef, including rump roast, are best if defrosted and cooked within six months to one year of freezing. Cooked rump roast is best if frozen for only up to three months. In either case, it is essential to freeze the roast in a timely manner. Raw rump roast should spend no more than five days past the sell-by date in the refrigerator before freezing, while cooked roast should be refrigerated within two hours of cooking and frozen within four days.

Wrapping for Long-Term Storage

You can freeze meat in its original store packaging if you plan to use it within a few weeks, but since this packing isn't airtight, it's not ideal for long-term storage. Exposure to air and moisture will quickly deteriorate the quality of the meat, so if you plan to keep the rump roast in the freezer for several months, over-wrap the original packaging with plastic wrap or butcher paper followed by heavy duty aluminum foil. You could also place it an airtight freezer bag, removing as much excess air as possible.

Safe Methods for Defrosting

The ideal way to defrost your rump roast is to place it in the refrigerator and let it thaw gradually over a few days. This will allow you to keep it in the refrigerator until you're ready to cook it, or to refreeze it if necessary. To thaw the roast quickly you could put it in the microwave, but this is not recommended because it's difficult to defrost a whole roast evenly and without actually cooking the outside. A quick but gentler method is to submerge the package of beef in cold water until thawed, changing the water every 15 or 30 minutes to keep it cold. Whether microwaving or using the cold water method, you must cook the meat immediately once it's thawed and you cannot refreeze it. Finally, be sure to cook the roast to an internal temperature of at least 145 F.

When to Discard

No matter how well-wrapped your rump roast may be, long-term freezing will likely result in some freezer burn. If you see a few spots of freezer burn, feel free to cut it off and cook your roast as planned. However, if a large portion is freezer burned, it's best to cut your losses and discard the whole roast for quality purposes. Other indications you should toss your roast include signs of spoilage upon defrosting such as a slimy texture or sour odor. Color changes are to be expected in frozen beef, so don't assume it's bad if your rump roast has turned from bright red to dull or dark brown.

Cheesy Tuna Noodle Casserole Recipe

0

A cheesy tuna noodle casserole is a really interesting way to enjoy this fantastic fish — it combines several different tastes but does so very well. The result is a wonderfully simple yet filling meal that is absolutely packed with flavor. It comes together in only a few simple steps, making it an ideal dish to cook when you're short on time.

finished casserole Final Image Credit: Kristan Raines

Video of the Day

Things You\’ll Need

  • 1 tbs unsalted butter

  • ½ an onion, diced

  • 1 1/2 celery stalks, diced

  • 1 clove garlic, minced

  • 1, 10.5 oz can cream of mushroom

  • ½ cup + 2 tbs whole milk

  • ½ cup frozen peas

  • 5 oz extra wide egg noodles, cooked al dente and drained

  • 1 can tuna, 6oz drained

  • 1 cup shredded cheddar cheese, divided

  • ½ cup panko crumbs

  • 1/2 tbs unsalted butter, melted

  • salt and pepper, to taste

  • medium-large saucepan

  • whisk

  • 8×8-inch baking dish

Step 1

Heat oven to 400°F. Melt 1 tbs butter in a medium-large saucepan set over medium heat. Add the celery and onions and cook for about 6 minutes or until tender. Add the garlic during the last two minutes of cooking time.

cooking celery and onion Step 1 Image Credit: Kristan Raines

Step 2

Add the cream of mushroom and milk to the saucepan and whisk together until smooth and warmed through.

making sauce Step 2 Image Credit: Kristan Raines

Step 3

Remove the saucepan from heat and add the peas, noodles, tuna, and 3/4 cup cheese. Mix to combine. Taste, and add any additional salt and pepper as needed.

Mixing ingredients Step 3 Image Credit: Kristan Raines

Step 4

Pour the pasta mixture into an 8×8-inch baking dish that's been lightly greased. Top the noodles with the remaining 1/4 cup of cheese.

Topping with cheese Step 4 Image Credit: Kristan Raines

Step 5

Mix the melted butter and bread crumbs together and sprinkle over the pasta.

Topping with bread crumbs Step 5 Image Credit: Kristan Raines

Step 6

Place in the oven and bake uncovered until golden brown and bubbly, about 20 minutes. Top with freshly chopped parsley and enjoy while hot! Serves 4 -6.

Finished casserole Step 6 Image Credit: Kristan Raines

9 Highly Addictive Foods & Their Healthier Alternatives

0

Let's be honest. We all have ​at least​ one "junk food" that makes us go weak in the knees. While it's perfectly fine to enjoy these treats in moderation, many of them include ingredients that are proven to be highly addictive, making them pretty difficult to resist. But what if I told you there's a way you could enjoy all of these guilty pleasures without the guilt and potential health risks? Check out this list of the most common addictive junk foods and their healthier (yet still tasty) alternatives. You're welcome!

Plate with meal, chips, chicken wings and salad

Video of the Day

1. Cheese

A mouthwatering bowl of mac and cheese or fresh order of cheesy fries may be pretty hard to deny, but their high levels of calories, fat and sodium can cause high blood pressure, amongst other things. Consider trying this vegan cheese alternative on your next pasta meal, instead.

Macaroni and cheese

2. Pizza

Nothing beats pizza straight out of the oven, especially on a game day or movie night. However, a standard pizza is pretty loaded with sodium, refined carbs and saturated fat. This vegan spring garden pizza is made with more nutritious ingredients and will still satisfy your craving.

Sliced hot pepperoni pizza on a brown background.

3. French Fries

I get it. These crispy, thin, salty creations are almost impossible to turn down. Unfortunately, their delicious taste doesn't cancel out their potential to actually increase mortality risk. ​Yikes!​ Try these healthier baked veggie fries instead—the flavor combination possibilities are endless.

french fries on wood background

4. Ice Cream

What's not to love about a scoop (or two, or three) of refreshing ice cream on a hot summer day? High amounts of sugar and carbs, that's what. Occasionally substitute the sweet frozen treat with this dairy-free option that will still keep you nice and cool.

Chocolate ice cream

5. Potato Chips

Typical fried potato chips may seem like the perfect grab 'n go snack, but they contain lots of saturated fats, carbs and calories, which can increase risk of obesity. Avoid cutting chips out of your diet altogether and bake your own.

crispy potato chips snack texture background top view

6. Chocolate

Enjoying a nice bar of chocolate can truly be a therapeutic and pleasure-filled experience, but sugar and fat levels tend to be on the higher side. Get this—you can actually enjoy a cup of creamy chocolate mousse made with avocados!

Making chocolate mousse on a wooden table in a rustic kitchen

7. Cookies

When it comes to cookies, the reality is that they're just much better eaten in multiples. The next time you decide to whip up a dozen, skip the fatty ingredients like butter and eggs with these vegan cinnamon sugar cookies or these vegan thin mints.

Plate with chocolate chip cookies on grey background, closeup

8. Cheeseburgers

A juicy beef patty and ooey-gooey cheese slapped between two fluffy buns?—yes, please! However, excessive intake of red meat and saturated fats have been linked to serious health problems including diabetes and kidney failure. Instead of the traditional meat cheeseburger, try this spicy veggie burger recipe.

Delicious handmade burger on wooden background. Close view

9. Cake

I'm a firm believer that every special (and not so special) occasion deserves to be accompanied by a celebratory cake. However, commonly used ingredients such as butter and eggs aren't exactly good for our bodies in large quantities. Worry no longer—here's a gluten free, dairy free cake recipe to save the day.

Woman holding plate with slice of chocolate sponge berry cake on grey background, closeup

What Is Inside a Brita Filter?

... Filters can provide you with cleaner drinking water.

A Brita water filtration system is a plastic pitcher that is divided into top and bottom compartments. These two compartments are separated by a filter. Water is poured into the top reservoir and percolates through the filter into the bottom reservoir.

Video of the Day

Activated Charcoal

Activated charcoal is the main filtration component of the Brita filter. Chlorine, pesticides and organic impurities adhere to the charcoal, which eliminates foul tastes and odors from the water. In addition, an inhibitor is added to prevent the growth of bacteria.

Ion Exchange Resin

The ion exchange resin removes calcium carbonate, which causes "hard water" and limescale. Heavy metals, such as lead and copper, are also removed by the resin.

Mesh Filter

A fine mesh screen sits at the top of the filter opening to block any coarse material from entering the filter. Another mesh screen is located on the bottom and is used to keep the components of the filter in its plastic casing.

How to Cook Frozen Scallops in a Few Easy Steps

0

Scallops in a skillet There are a few steps to follow to cook frozen scallops. Image Credit: Julia Mueller

You don't need to pay an arm and a leg at a fancy restaurant in order to enjoy sea scallops. Scallops can be prepared easily at home using nothing more than a sturdy skillet, cooking oil, sea salt, a little garlic and maybe some butter. This is one seafood feast that doesn't hinge on having a fresh catch; a bag of frozen scallops from your grocery store's freezer section will thaw and cook beautifully. Once you get the hang of cooking scallops on the stovetop, you can get creative with flavors and sauces, or try bacon-wrapped scallops to take your seafood experience to the next level.

Video of the Day

Things You\’ll Need

  • 12-ounce bag frozen sea scallops

  • Cooking oil

  • Salt and pepper

  • Paper towel

Tip

If using freshly thawed sea scallops, skip to Step 2.

Step 1: Thaw the Frozen Scallops

Before cooking frozen scallops, be sure they are thawed all the way through. There are two easy ways to thaw frozen scallops, but first, remove the scallops from their outer packaging. If you have a good deal of time before you need to cook the scallops, you can place the vacuum-sealed package of scallops in a pan or bowl. Place it in the refrigerator for 4 to 6 hours, or until scallops are completely thawed.

As an alternative, if you're under a time crunch, place the vacuum-sealed package of scallops in a large bowl and cover with cold water. Thaw for 30 to 45 minutes, or until scallops are thawed through. Flip the package after 20 minutes to ensure all of the scallops thaw.

Tip

Do not thaw scallops at room temperature.

Step 2: Heat Oil and Prep Scallops

Heat 2 to 3 tablespoons of cooking oil over medium-high heat in a cast iron or stainless steel skillet. Use enough oil to generously coat the surface of the skillet. While the oil is heating, pat both sides of each scallop with a paper towel. Season the scallops with salt, pepper, and/or paprika.

Tip

You can also cook scallops in butter with fresh garlic, spices, and/or fresh herbs.

Step 3: Cook the Scallops

Once the oil is completely hot (but not smoking), place the scallops on the hot surface, leaving them a generous amount of room to ensure they cook evenly. Crowding the scallops prevents them from searing and browning properly, so cook them in small batches if necessary to give each scallop plenty of space. Cook for 1 ½ minutes, until the scallops are golden-brown and crispy on one side.

Tip

Cover the skillet with a splatter screen in order to avoid oil splatter.

Carefully flip the scallops and cook on the other side for 1 to 1 ½ minutes.

The scallops are finished cooking when they have about ¼-inch of golden-brown crust on each side with a translucent center. You can also cook scallops all the way through by cooking them for 2 to 3 minutes per side.

Step 4: Serve Finished Scallops

Once the scallops are cooked through, add fresh garlic and/or your choice of fresh herbs to the hot skillet and cook for 30 seconds to 1 minute, just until fragrant. Serve the scallops alongside your favorite side dishes, such as rice or roasted vegetables.

How to Make a Kombucha Starter

You could spend a small fortune buying ready-to-drink kombucha at the grocery or health food store, but why not save a few bucks while tailoring your booch to please your palate? Making kombucha at home requires minimal equipment and just a few ingredients, the most important of which are the starter culture and the starter tea. You can make the starter culture from store-bought unflavored, unpasteurized kombucha, or get some from a kombucha brewing friend with an extra baby culture.

Necessary Equipment

Whether you're making the starter culture or the starter tea, you don't need any special gadgets. In fact, you probably already have everything you need in your kitchen. If you don't, you can easily find the necessities at any store. To make a kombucha starter you need:

Video of the Day

  • Large saucepan
  • Large spoon with a long handle
  • Large glass canning jar
  • Paper towels, coffee filters or a tea towel
  • Rubber band.

Making a Starter Culture

Admittedly, the starter culture — better known as a SCOBY, or a Symbiotic Culture of Bacteria and Yeast — looks more like a science experiment gone wrong than the key to a tasty home brewed kombucha. This blob of yeast and beneficial bacteria continually renews as you brew your kombucha, making it possible to create your own scoby once for continual brewing thereafter. To get started making a starter, you need to brew a batch of sweet tea to feed the scoby as it grows.

Step 1

Bring 7 cups of water to a boil in a large saucepan. Take it off the heat; add 1/2 cup granulated sugar and stir the mixture until the sugar dissolves.

Step 2

Add 4 bags of green or black tea to the pot. Allow the tea to steep while the liquid cools.

Step 3

Pour the cooled tea into the canning jar and top it with 1 cup of unflavored raw kombucha — either store-bought or brewed by a friend.

Step 4

Place paper towels, coffee filters or a kitchen towel made with tightly woven fabric over the top of the jar, using a few layers to protect the starter culture from pesky fruit flies. Secure the cover with a rubber band.

Step 5

Place the jar in an out-of-the-way spot. Cultures for Health recommends keeping the growing starter culture away from direct sunlight in a spot where the temperature is between 68 and 85 degrees Fahrenheit.

Step 6

Keep an eye on the starter culture. Making a scoby can take two to four weeks. After a few days, you should see bubbles on the surface, followed by a thin film that thickens. Once the scoby is at least 1/4 inch thick, it's ready to use.

Warning

Signs that harmful bacteria have contaminated the scoby include green or black mold growing on the top or an off-putting rancid or cheesy smell. If you notice any of these signs, scrap the batch and start over.

Making Kombucha Starter Tea

Once you have the starter culture, you also need a small amount of starter tea. It needs the right level of acidity to kick off the kombucha brewing process. Starter tea can be come from store-bought kombucha, starter tea from a friend, or starter tea created from your own last batch. If you don't have access to starter tea, you can use a small amount of vinegar instead — approximately 2 tablespoons of vinegar for every quart of sweet tea.

Tip

After brewing your kombucha, reserve some of the mature tea to use as the starter for your next batch.

Getting Started

Once you have your scoby and starter tea, you can begin the brewing process. To make a 1-gallon basic batch, bring 4 cups of water to a boil; remove it from the heat and add six teabags. Let the tea steep for approximately 10 minutes before taking the teabags out. Stir 1 cup of sugar into the tea, mixing it well until the sugar dissolves. Transfer the sweet tea to a 1-gallon glass or ceramic jar, and top it with enough cold, purified water to fill the jar three-quarters to the top.

Add the starter tea and the scoby. Cover the jar with one or two layers of paper towels, coffee filters or a kitchen towel secured with a rubber band. Just like when you made the starter culture, move the jar to a warm spot away from direct sun exposure. Leave the jar alone for seven days before tasting it. Let it brew longer if it's too sweet.