Make It Egg-Cellent – in partnership with Eggland's Best, we asked our favorite chefs to take a breakfast, lunch, or dinner staple and make it better by adding EB eggs to it, and ended up with a few exclusive and delicious recipes that you can make at home.
Retelling the stories of my first visit to Vietnam wouldn't be complete without the mention of sizzling platter after sizzling platter of Bo Ne I consumed, better known as Vietnamese Steak & Eggs. If you're not alert when this dish is served to you, you'll catch the sting of spluttering hot grease and quickly learn why the Vietnamese name of the dish translates to 'dodging beef.'
This version is less modest than the ones I enjoyed street side squatting over a stool in Vietnam. My recipe calls for the careful caramelization of the onions, a chunky garlic-soy butter sauce that drapes the steak and eggs and sizzles table side, and the use of Eggland's Best Eggs for their superior taste and quality, compared to ordinary eggs. It's a bit more involved than your traditional steak and eggs, but well worth the effort.
If the sweet and savory contrast of the marbled steak and melt-in-your-mouth onions don't convince you to give this recipe a try; sopping up swirls of velvety egg yolk and fragrant butter sauce with a warm baguette will make sure this recipe is one you'll prepare time and time again.
Serves 2
For the Caramelized Onions:
-
1 medium sweet onion, ¼” slices
-
1 T grapeseed oil
-
A pinch of freshly cracked pepper
-
A pinch of kosher salt
-
A pinch of white granulated sugar
For the Garlic-Soy Butter:
-
½ C unsalted butter, clarified
-
¼ C garlic cloves, roughly chopped
-
⅛ tsp sesame oil
-
1 T soy sauce
For the Salt & Pepper Dipping Sauce:
-
½ T kosher salt
-
1 T freshly cracked black pepper
-
Lime juice, to taste
For the Vietnamese Steak & Eggland’s Best Eggs
-
2 – 6-8 oz steak of your choice, per person
-
1 garlic clove, cut in half
-
Freshly cracked pepper
-
Kosher salt
-
Grapeseed oil
-
1-2 Eggland’s Best large eggs, per person
-
Caramelized onions
-
Garlic-soy butter
-
Individual cast iron pans or fajita skillets
To Serve:
-
Cilantro sprigs, for garnish
-
Green onions, sliced, for garnish
-
Pate, for garnish, optional, but highly recommended
-
1 – 8” Vietnamese Baguette, toasted per person (can substitute for any light, airy Baguette)
-
Side salad of iceberg, romaine or green leaf, tomatoes, cucumbers & red onions, optional
-
Salt & pepper dipping sauce
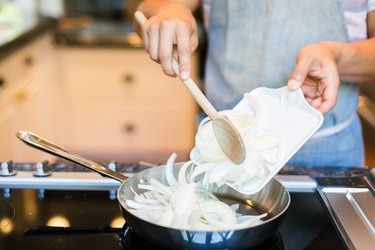
To Make the Carmelized Onions:
Step 1
Gently heat grapeseed oil over medium heat in a small saute pan. Add in the onions, salt, pepper and white sugar.
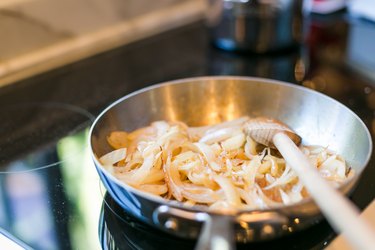
Step 2
Sweat the onions over medium heat, stirring every 2-3 minutes to prevent burning. The onions are done when they are soft and brown in color. About 10-15 minutes. Set aside until ready to use.
To Make the Garlic-Soy Butter:
Step 1
Combine the clarified butter and garlic cloves in a small sauce pot and simmer until the garlic is soft, about 10-15 minutes. Be careful not to burn the garlic. Turn off the heat and stir in the soy sauce and sesame oil. Set aside until ready to use.
To Make the Salt & Pepper Dipping Sauce:
Step 1
In a small mixing bowl, combine salt and pepper and squeeze in fresh lime juice to taste. Adjust the tartness by the amount of lime juice you add. I like the dipping sauce on the more acidic side to cut through all of the rich flavors found in this dish. Set the dipping sauce aside until ready to serve.

To Make the Steak & Eggs:
Step 1
To season the steak, rub a cut clove of garlic onto both sides. Season generously with salt and pepper.
Step 2
Heat a heavy bottom pan like a cast iron pan over high heat. Add in some grapeseed oil to cover the bottom until hot but not smoking.
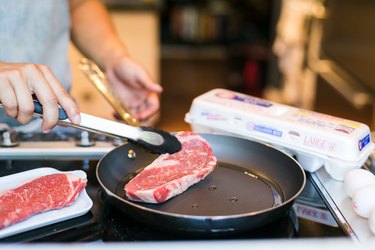
Cook the steak on both sides to your desired doneness. I like my steak on the rare side and cut thick to ensure enough cooking time to form a deeply browned crust. Be sure not to flip or agitate the steak unnecessarily during cooking to develop those coveted crispy edges. Set the steak aside to rest on a plate loosely covered with foil while you prepare the Eggland's Best eggs.
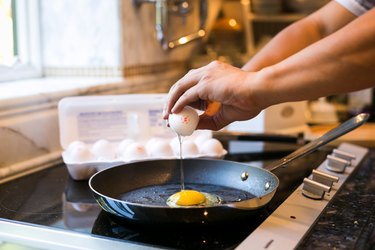
Step 3
In the same pan, add some additional oil if needed or use the rendered fat from cooking the steak. Cook 1-2 Eggland's Best eggs sunny-side up per person in the same pan over medium heat. Remove the pan from the heat to prevent the eggs from overcooking. The runnier the yolk, the better.
To Serve:
Step 1
Heat up individual cast iron pans or fajita skillets until nice and hot. Remove the pans from the heat onto a heat safe surface or plate. Create a bed for the steak with half of the carmelized onions. Give the onions a quick stir to warm it through.
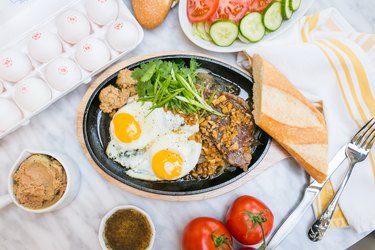
Place the rested steak over the bed of onions. Plate the Eggland's Best eggs off to the side of the steak in the same pan. Spoon a few tablespoons of the warm garlic-soy butter over the steak and eggs. Remove the pans from the heat onto a heat safe surface or plate to serve.
Step 2
To serve, garnish the steak and eggs with a dollop of pate, a few sprigs of cilantro and some sliced green onions. Serve the steak and eggs with a toasted Vietnamese baguette, salt and pepper dipping sauce and a side salad of iceberg, tomatoes, cucumber and red onions.

 A glass of beer. Image Credit: AnatolyTiplyashin/iStock/Getty Images
 Pour ingredients into a jar
 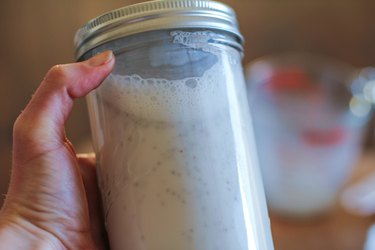 Shake well or stir to combine
 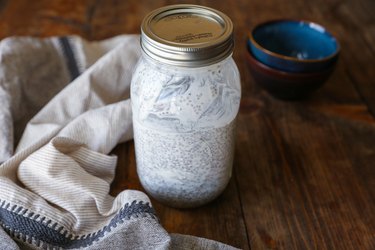 finished chia seed pudding
 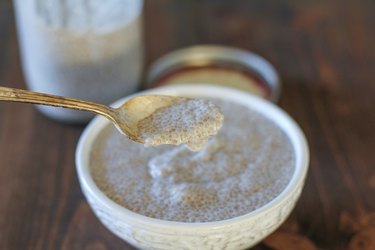 plain chia seed pudding
 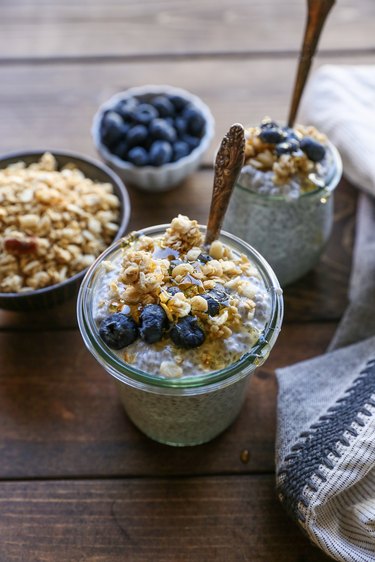 Chia Seed Pudding with blueberries, honey, and granola