Home Blog Page 87

How to Make French Press Coffee

0

Things You\’ll Need

  • Coffee beans

  • Water

  • Measuring cups and spoons

  • Pot or water boiler

  • Coffee grinder

  • Long spoon

...

Using a French press to make coffee is like buying a new wardrobe: It takes a little experimentation to figure out exactly what works for you. This method lets hot water soak the coffee grounds for deep, rich flavor you can't get from a drip maker. Starting out, you may need to play with ratios and brewing times before you find the combination that pleases you the most. Once you've found that combination, you'll get the same flavor from every cup you brew.

Video of the Day

Step 1

...

Inspect the mesh plunger of your pot for any oily residue or trapped grounds from previous use. Disassemble the plunger and wash the pieces if necessary.

Step 2

...

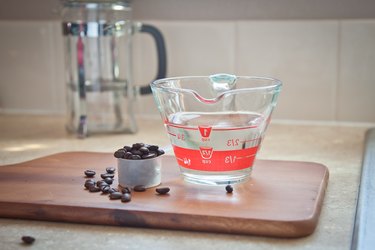
Measure out whole coffee beans and water. Most coffee brewers use a ratio of somewhere between 8 and 16 parts water to 1 part coffee, so to make a single serving of coffee you might use 1 cup of water and between 2 and 4 tablespoons of beans, depending on whether you prefer your coffee on the strong or weak side. Some recipes also call for the coffee to be measured after it's been ground.

Step 3

...

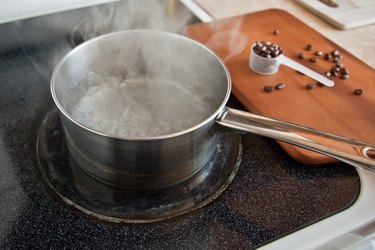
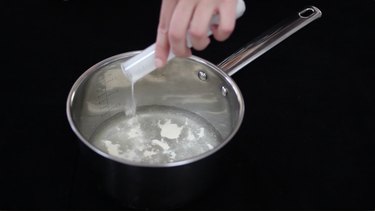
Boil the water on the stove or in a clean boiler. Use filtered water if your tap water has any distinctive taste.

Step 4

...

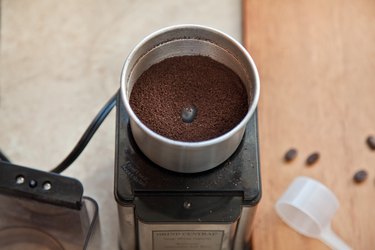
Grind the beans. If possible, use a burr grinder, which creates more uniform grounds than a blade grinder. Aim for a consistency resembling coarse sand or breadcrumbs; grounds that are too fine will seep through the mesh when you press the coffee.

Step 5

...

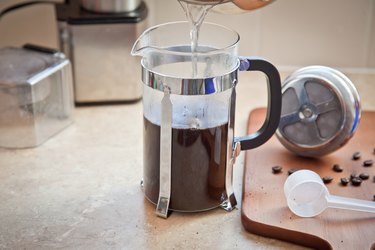
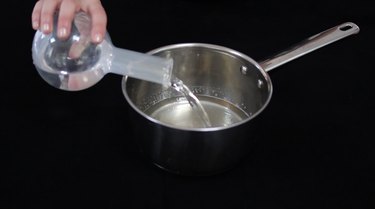
Pour the ground coffee into the French press pot. Pour the water over the grounds as soon as it boils. Gently stir the contents of the pot to combine them.

Step 6

...

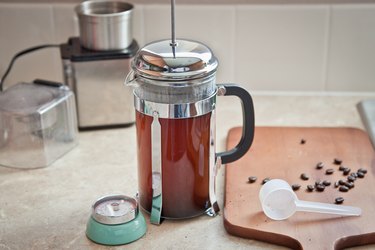
Place the lid on the pot, but don't push down the plunger yet. Watch the clock. Most brewers suggest letting the coffee brew for between 3 and 6 minutes. The longer it brews, the stronger the coffee.

Step 7

...

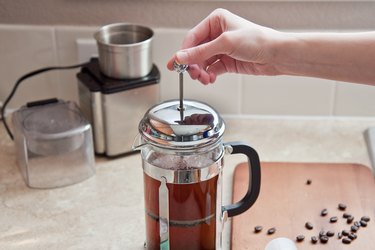
Push the plunger down slowly until it reaches the bottom of the pot. Pour the coffee immediately, keeping the plunger in place.

Tip

You may use pre-ground coffee in a French press, though the results won't taste as fresh. Look for grounds that are coarse and uniform in size.

Some brewers recommend measuring grounds and water by weight. If you have a kitchen scale, you may prefer this method. Roasting company Intelligentsia recommends using 25 grams of coffee to 400 grams, or about 14 ounces, of water.

Preheating your pot by filling it with hot water while you prepare the grounds will help the coffee stay extra hot. Dump this water out just before pouring in the grounds and boiled water.

How to Make Coffee the Old Fashioned Way

0

Things You\’ll Need

  • ¼ tsp. Kosher salt

  • 6 tbsp. coarsely ground coffee

  • 3 cups water

  • Saucepan

  • Reusable coffee filter (optional)

  • 3 coffee mugs

... Prepare coffee without machines.

Prepare coffee without an expensive electric coffee maker or a fancy French press by using the "old-fashioned" method. Author and chef Alton Brown recommends adding a pinch of salt to the coffee grounds to reduce bitterness in the finished brew without making the coffee taste salty. Make this old-fashioned coffee on your next camping trip or for a change of pace from the typical brewed coffee.

Video of the Day

Step 1

Combine the salt, coffee grounds and water in a saucepan.

Step 2

Bring the mixture to a boil over high heat on the stove or over a campfire.

Step 3

Remove the mixture from the heat and let sit for 10 minutes to steep the coffee and allow the grounds to settle.

Step 4

Carefully pour the liquid from the top of the saucepan into three coffee mugs to keep the coffee grounds at the bottom of the saucepan. Alternatively, set a reusable coffee filter on top of each of the coffee mugs before pouring the boiled coffee through the filter into the mug.

Frogs in Formaldehyde Jell-O Shot Tutorial

0

Kick off your Halloween party with a Jell-O shot that's frightfully fun. These frogs in formaldehyde may look like they belong in a mad science lab, but we promise they're totally tasty. Boozy and jiggly and creatively creepy, they'll be a surefire hit at your cocktail station.

Frogs in formaldehyde Jello shot

Things You\’ll Need

  • Unflavored gelatin (2 packets)

  • 1 cup vodka (optional — water can be substituted for a non-alcoholic version)

  • Baby food jars

  • Gummy frogs

  • Toothpick

  • Non-toxic metallic paint (optional)

Step 1

Sprinkle two packets of unflavored gelatin over 1 cup of cold water and set aside for five minutes. Then heat and whisk the mixture until the gelatin is fully dissolved.

Sprinkling gelatin into cold water

Step 2

Allow the mixture to cool and then whisk in 1 cup of vodka (replace with 1 cup of cold water for a non-alcoholic version).

Pouring vodka into gelatin mixture

Step 3

Pour the mixture into empty baby food jars and refrigerate until it's partially set.

Pouring gelatin mixture into baby food jars

Step 4

Use a toothpick to gently poke a gummy frog into the center of each jar.

Inserting a gummy frog into the gelatin

Step 5

Place the lids on the jars and marvel at how those froggies jiggle and wiggle!

Tip: Paint the jar lids with non-toxic metallic paint for a more authentic apothecary vibe.

Frogs in formaldehyde Jello shots

How Long Do I Bake a Thawed Raw Apple Pie?

0

Apple pie Pies premade for freezing should be baked in metal pans. Image Credit: Ablestock.com/AbleStock.com/Getty Images

Fruit pies are a great dessert any time of the year, but they can be time-consuming to make, particularly if you are on a tight schedule. Fortunately, premade homemade apple pies are freeze well, which means you can assemble several when you have time and store them in the freezer for future baking.

Video of the Day

Pie-Baking Basics

Compared to some desserts that call for a long list of ingredients, apple pies are amazingly simple. Homemade piecrust calls for four simple ingredients: flour, salt, shortening and ice water. Using a piecrust mix saves time, but for freezing purposes, avoid using frozen premade piecrust. Its flavor and texture will be affected if the baked pie is refrozen. The apple filling itself can be as simple or as elaborate as your recipe dictates, but at its most basic, it is essentially composed of apples, sweetener, spice and a thickener, which is usually flour or cornstarch.

Assembly Line

Whether assembling one pie or many for freezing, each pie will need a bottom and a top crust. Once they are rolled out and cut to fit the pie plate, you can set them aside on a board or on waxed paper until the filling is ready. You can also line your pie plates with the bottom crusts and set those aside as you prepare the apples and other ingredients used to fill them. Once the pies are filled, arrange the top crusts on top and cut any excess off, leaving about 1/2 inch for sealing the pie and crimping the edges. Remember to use metal pie plates or disposable aluminum pans for pies intended for freezing, as baking a frozen pie pre-assembled in a glass plate may cause it to break once it is exposed to the oven's high heat. This is not a concern if you plan on thawing the pie before baking it.

Baking the Pies

Thawed raw apple pies should be baked in the same manner as freshly made unfrozen pies in an oven that has been preheated to the correct starting temperature. Some recipes call for one temperature during the whole baking time, which can range from 350 to 425 degrees Fahrenheit, while others call for a starting temperature of 450 F for the first 10 to 15 minutes, and then a lower temperature of 350 to 375 degrees F during the last 30 minutes or so. Both methods call for total baking time of roughly 45 minutes.

Considerations

It is best to bake frozen apple pies by taking them directly from the freezer, and placing them immediately in an oven preheated to 450 F. You should bake the pies initially for about 20 minutes, then reduce the heat to 375 F and bake for 20 to 30 more minutes, or until the crust is light brown. Do not allow a completely thawed raw apple pie to stay at room temperature for longer than a few minutes to minimize the growth of bacteria in the crust and filling. After baking, let the pie cool for about 15 minutes and refrigerate. Dispose of leftovers after two or three days, as pie that has been thawed from the frozen state cannot be refrozen. If you are baking a store-bought frozen raw apple pie that has thawed, follow package directions for best results.

How to Make Red Wine From Fresh Grapes

Things You\’ll Need

  • granulated sugars (sucrose) or corn sugar (dextrose)

  • wines yeast

  • fining materials materials

  • siphon hoses

  • fermentation locks

  • hydrometer

  • acid-testing kits

  • plastic bucket for mixing

  • glass gallon jugs or barrels for fermenting

  • vinifera red grapes

  • sulphite crystals

  • grape crushers

  • grape press

  • Fermentation Locks

  • Fining Materials Materials

  • Grape Crushers

  • Grape Press

  • Sulphite Crystals

  • Hydrometer

  • Siphon Hoses

  • Granulated Sugars (sucrose) Or Corn Sugar (dextrose)

  • Vinifera Red Grapes

  • Wines Yeast

  • Glass Gallon Jugs Or Barrels For Fermenting

  • Acid-testing Kits

  • Plastic Bucket For Mixing

How to Make Red Wine From Fresh Grapes. People spend lifetimes perfecting the science of making wine. Here is an overview of the basic steps involved. Equipment and materials needed for this procedure can be rented or bought at a winemaking supply shop.

Before Fermentation

Step 1

Crush grapes into primary fermentor. Fill fermentor only 2/3 full.

Video of the Day

Step 2

Remove up to 80 percent of stems.

Step 3

Add sulfite crystals to fermentor. Use about .1 gram of sulfite powder per liter or 1 campden tablet per 10 liters. Dissolve into 1 cup of warm water and stir into fermentor using a wooden or plastic spoon.

Step 4

After adding sulfite, let the crushed grapes, or "must," sit for 2 hours.

Step 5

Check Brix (a measure of sugar content) of juice. It should be around 22 to 24 degrees, depending on varietal. (See "How to Monitor Brix of Fermenting Wine Must" in related eHows.)

Step 6

If Brix is lower than 21 degrees, add sugar to juice.

Step 7

Check and adjust acid level of juice, using an acid-testing kit found at a winemaking shop. Acid content should be about 5.5 to 6.5 g/liter.

Step 8

Check temperature of must and adjust if necessary. Temperature should be 70 to 75 degrees F (21 to 23 degrees C). Raise temperature by placing a heating pad underneath the fermentor or applying a heating belt. One way to lower temperature is to place a heavy object into a large freezer bag. Add ice to the bag, tie the bag securely and lower into the fermentor. Monitor the temperature for changes and remove the heating or cooling element when the proper temperature has been reached.

Step 9

When the proper Brix, acid level, and temperature are reached, dissolve 1 gram yeast pellets in 1 cup of warm water for every 3.8 liters of must. Let yeast solution sit for 10 minutes, then add to fermentor.

Step 10

Cover fermentor with cheesecloth.

Fermentation

Step 1

Check after 24 hours. Bubbles and gurgling noises indicate fermentation is taking place. As fermentation takes place, the temperature will rise, which is acceptable.

Step 2

Stir twice daily to keep the "cap" wet. The cap is the top layer of seeds and grape skins.

Step 3

Check Brix daily. There should be an average drop of about 2 degrees in Brix.

Step 4

When the cap stops pushing up to the top or when Brix is around 0 degrees, press the wine into gallon jugs and attach a fermentation lock. Save the cap material (pulp) to top up after initial racking.

Step 5

When sediment drops out, rack and top up with pulp. Add sulfite. (See "How to Rack Wine" in related eHows.)

Step 6

Add fining material right after racking, or later, when wine is clear. (See "How to Add Fining Material to Wine" in related eHows.)

Step 7

After sediment drops out, rack and add sulfite crystals. Continue racking as necessary when sediment drops out.

Step 8

Depending on varietal, age for appropriate amount of time.

Step 9

Bottle. (See "How to Bottle Wine" for details.)

Step 10

Depending on varietal, bottle age for the appropriate amount of time.

Tip

For more details and variations refer to related Web sites or ask vendors at winemaking shops.
Be careful about adding too much sulfite after racking. Too much sulfite can damage wine. Ask at a winemaking shop for necessary amounts.

Warning

Avoid carbon dioxide fumes during fermentation.

Can I Make Pickled Okra After it Has Been Frozen?

0

... Choose Okra that has a firm skin and no blemishes if storing it through freezing.

Okra, also called Ladies Fingers, is a staple vegetable in many South American and Asian cuisines, especially Indian. Begun in Egypt and initially cultivated there, the plant eventually spread over continents through trading and settlers. The plant is used in a variety of ways, from stews to braising it on its own. Okra can be used in a pickled form as an accompaniment to many dishes and is easily created at home. While fresh okra is optimal, frozen ones can be used as long as several aspects are taken in to account.

Video of the Day

Selecting

Choose frozen okra that has not been previously blanched — this will create an extremely mushy texture when they are canned. Select each okra the same way you would when choosing fresh — no blemishes on the skin, and the outside should be smooth with no wrinkles and smaller, younger okra should be chosen.

Defrosting

The okra cannot be canned while it is still frozen for it will hinder any long-term canning and add unwanted water to both the short- and long-term canning methods. Place the okra in a colander over the kitchen sink and allow it to defrost slowly over an hour, tossing it on occasion to allow all the okra equal access to the air. Shake the colander slightly to remove all moisture, and cut them up as desired for pickling when completely defrosted.

Processing

Process the previously frozen okra the same way you would with the fresh. Place the okra in to the jar and add the white vinegar, pickling salt, minced garlic and whatever other seasonings and spices you desire, leaving 1-inch head space. If wanting to create short-term pickles, place the jar in the refrigerator and let them stew for four to five days, and then consume them within a week to two of creation. Process them in a hot water canner or pressure canner if desiring to keep them for a long period of time.

Texture

The texture of the canned frozen okra will differ on the fresh pickles. The canned vegetable will have more of a mushy texture, although it is completely safe, whereas fresh okra creates a crunchy pickle that is often desired. Take this in to account when using frozen okra to create pickles. The same requirements apply to the fresh as they do to the frozen — unblemished, firm and young.

What to Do If Your Apple Butter Is Too Runny?

0

... Apple butter is best when its made with homemade applesauce.

Apple butter is a lush and tasty spreadable treat that is quite easy to make at home. It is essentially applesauce that has been seasoned and cooked slowly for a number of hours until it reaches a consistency similar to butter. While the process of making it is relatively straight-forward, the biggest challenge for first-time chefs is that the finished product looks runny. You can quickly correct this with a few minor alterations.

Video of the Day

Start with the Best Applesauce Available

Most recipes for making apple butter at home suggest using home-made applesauce if possible. Aside from the fact that homemade applesauce will likely taste better than the store-bought variety, homemade applesauce tends to be thicker and slightly chunkier than the commercial version. That thickness will lessen the eventual cooking time and help ensure the thickening of the butter takes place.

Use the Skin and Core

If you opt to make your own applesauce, use a recipe that allows you to use the entire apple. Use the skin and core of the apple in the first cooking process, then remove them before finishing the applesauce. The pectin that resides in the cores and skin encourage the applesauce to thicken and there is a lot of flavor in the apple peels.

Don\’t Cook the Applesauce Too Long

A common mistake when making homemade applesauce is to cook it until it has a consistency similar to the store-bought version. If you do that, you will end up with an applesauce that is runny and tasteless. Instead, cook the apples until they are soft, but still chunky. The apples will still have retained much of their taste, and the slight chunkiness makes it less likely your apple butter will contain too much moisture.

Store-Bought Applesauce

If you decide to use store-bought applesauce, the easiest way to correct the problem of a runny applesauce is to extend the cooking time for the apple butter recipe. While that should solve the problem, extra cooking time also makes it more likely you might burn the butter or cook it to the point where it has lost much of its apple taste.

Considerations

There is always a danger that you thicken the apple butter too much. The easiest correction is to add additional applesauce to the mix and continue to cook the mix until it reaches the desired consistency.

How to Make a Smartie Drink

Things You\’ll Need

  • 2 oz. grape schnapps

  • 2 oz. melon liqueur

  • 4 shot glasses

  • Drink shaker and strainer

  • Ice

... Smarties drinks are served in shot glasses.

Bars and pubs have traditionally offered beer, wine and liquor; however, many establishments are now turning to a new type of mixed drink crafted by a new type of bartender. The "mixologist" is a bartender who specializes in crafting drinks made with a variety of liquors, juices and liqueurs to create unique flavors. These drinks often taste like something else, typically a sweet fruit, candy or dessert. The Smartie drink is a shot designed to taste like the small, sweet, fruity Smarties candies.

Video of the Day

Step 1

Fill the drink shaker 2/3 full of ice. Place 4 shot glasses in a line on a flat surface. Chilling the shaker with ice as you prepare the shot glasses allows it to become cold enough to chill the drinks.

Step 2

Pour 2 oz. of grape schnapps into the drink shaker.

Step 3

Pour 2 oz. of melon liqueur into the drink shaker. Place the lid back on the drink shaker.

Step 4

Shake to mix the grape schnapps and melon liqueur.

Step 5

Remove the lid of the drink shaker and place the strainer on top of the shaker.

Step 6

Pour the drink through the strainer into the shot glasses. Each glass should be filled with 1 oz. of the Smarties drink.

Tip

If a drink shaker is not available, simply stir the ingredients together, remove the ice and pour into the glasses.

Chilling the liqueurs prior to use will eliminate the need for ice.

Warning

Ensure alcoholic beverages are consumed only by persons of the legal age.

Does Duck Sauce Need to Be Refrigerated?

0

Duck with plum sauce The sweet and sour flavor of duck sauce pairs well with Peking duck. Image Credit: Jupiterimages/Stockbyte/Getty Images

An Americanized Chinese dipping sauce traditionally paired with duck and fried rolls, duck sauce, or plum sauce as it is also known, is a sweet, sour and sometimes spicy sauce. To prevent spoilage, get the most out of the product and retain the best quality, refrigerate duck sauce after opening.

Video of the Day

Into the Fridge

Once opened, duck sauce that has been continuously stored refrigerated can last for up to two years. While color, flavor and texture may change slightly over time, the sauce is safe to use if stored properly. Unopened bottles or jars of duck sauce can safely be stored in a pantry, but their quality will begin to deteriorate over time regardless of whether they are opened or not. Always store unopened duck sauce in a cool, dark and dry location for the best quality.

Check the Label

All commercially packaged products sold in the U.S. have a "best by" or "use by" date on the label. While this date does not reflect safety, but instead quality, it can give you a good idea to the shelf life of your duck sauce. Commercially packaged duck sauce will have a shelf life of two years if properly stored. The quality stamp begins from the time the sauce is manufactured, not when you open it. For the best quality, always use duck sauce before the date on the label.

Signs of Spoilage

Even with proper storage, duck sauce can potentially go bad. Always use clean utensils when serving duck sauce to prevent cross contamination that can lead to spoilage. If your duck sauce develops an off-smell, flavor or color, throw it out without tasting and buy another jar. If your jar of duck sauce has any mold, throw it out. These quality and spoilage issues are uncommon with this sweet sauce, but you should always inspect condiments before serving to ensure safety.

Homemade Duck Sauce

Avoid preservatives and overly sugary duck sauce by making it at home. Plums, apricots, brown sugar, rice wine vinegar, apple juice, soy sauce, ginger, mustard powder and red pepper are the key components that make up this tangy sauce. Simmer the ingredients until they are thickened, puree the sauce in a blender and use it immediately or refrigerate it until you are ready to use it. Store homemade duck sauce in an airtight container for up to three weeks.

How to Wash Fruits & Vegetables With Vinegar

0

Things You\’ll Need

  • Spray bottle

  • White vinegar

  • Vegetable brush

... Clean produce spreads less harmful bacteria.

Fruits and vegetables, whether from the garden or from the store, may have bacteria and other illness-causing pathogens on their surface. Many stores sell expensive sprays meant to disinfect the produce safely, but you can use plain white vinegar instead. The acids in vinegar kills up to 98 percent of bacteria, according to a test performed by Cook's Illustrated. Washing the produce properly also prevents the vinegar from leaving behind a sour taste.

Video of the Day

Step 1

Fill a spray bottle with three parts water and one part white distilled vinegar. Combine thoroughly then screw the spray bottle top back on the bottle.

Step 2

Rinse any visible soil off the fruit or vegetable before disinfecting. Use vegetable scrub brush if necessary. Pat dry.

Step 3

Spray the produce down with the vinegar solution, completely coating it. Allow the vinegar solution to sit on the produce's skin for one to two minutes.

Step 4

Rinse the fruit or vegetable under cool, running water to remove any vinegar flavor. Serve immediately.

Tip

Sprays may not work well on textured vegetables like broccoli. Instead, fill a bowl with the vinegar solution and soak the vegetable for three to five minutes.