Home Blog Page 86

The Best Way to Clean & Store Iceberg Lettuce

0

Things You\’ll Need

  • Lettuce

  • Flat surface

  • Resealable plastic bag

... Iceberg lettuce keeps up to two weeks in the refrigerator.

The key to a great-tasting salad is using fresh ingredients. The most important ingredient in salad is lettuce, so it is critical that your lettuce is fresh and crisp. Old, wilted lettuce is unattractive and unappetizing. To keep your salads tasting great without the expense of buying fresh lettuce every single day, you should learn the best ways to clean and store fresh iceberg lettuce and other greens.

Video of the Day

Step 1

Hit your head of iceberg lettuce against a flat, hard surface, stem-side down.

Step 2

Hold the end of the lettuce's core and twist and pull until it comes out.

Step 3

Rinse the cored lettuce thoroughly under cold water.

Step 4

Allow the head of lettuce to dry completely.

Step 5

Seal the lettuce in a plastic bag and place it in the refrigerator.

Tip

Properly stored iceberg lettuce can last up to two weeks in the refrigerator. For easy salads, chop your lettuce, rinse thoroughly and use a salad spinner to spin it dry before storing in a plastic bag. Place a sheet of paper towel in the plastic bag to absorb any moisture and remove it after the first day. Lettuce will wilt more quickly when you store it this way but it is more convenient to use. Restore slightly wilted lettuce by soaking it in ice cold water for a few minutes before making your salad.

Warning

Keep lettuce away from fruits in the refrigerator. Fruits give off ethylene gas as they age, which will spoil your lettuce and other vegetables more quickly.

Healthy Seed & Nut Crispbread Cracker Recipe (Gluten Free)

0

Are you a grain-free eater who really, really misses being able to eat your favorite cheeses, dips, and spreads atop a crisp, hearty whole-grain cracker? Well, drop that lonesome piece of cheese and weep no more, because we've got a 100% grain-free, gluten-free, and guilt-free crispbread recipe that'll give you that toasty, wholesome crunch that you crave.

Healthy Seed & Nut Crispbread Crackers

Things You\’ll Need

  • 1/2 cup chopped nuts of your choice (recommended: almonds, walnuts, pecans, hazelnuts)

  • 1/4 cup raw sesame seeds

  • 1/4 cup raw pumpkin seeds

  • 1/4 cup raw sunflower seeds

  • 2 tablespoons chia seeds

  • 2 tablespoons flax seeds

  • 1 tablespoon flax meal

  • Dash of salt

  • 2 tablespoons coconut oil

  • 1 1/4 cup warm water

  • Parchment paper

  • Baking sheet

  • Rotary pizza cutter or long knife.

  • Seasonings of your choice (optional, e.g. dried herbs, spices, seasoning salts)

Step 1

Preheat your oven to 325 degrees Fahrenheit. In a mixing bowl, add all nuts, seeds, and a dash of salt, then whisk to thoroughly combine.

Mixing nuts and seeds for healthy seed and nut crispbread crackers. healthy seed and nut crispbread crackers.

Step 2

In a separate bowl, add 2 tablespoons of coconut oil to 1 1/4 cup of warm water. If the coconut oil is solid, stir the water until it's melted.

Adding coconut oil to water for healthy seed and nut crispbread crackers.

Pour it into the nut and seed mixture.

Adding water and coconut oil to seed and nut mixture.

Step 3

Stir until thoroughly combined.

Stirring batter for healthy seed and nut crispbread crackers.

Set aside for 8 to 10 minutes to allow the mixture to thicken.

Thickened batter for healthy seed and nut crispbread crackers.

Step 4

Line a baking sheet with parchment paper. Pour the thickened mixture onto the parchment-lined baking sheet and spread into a rectangle approximately 11 x 12 inches.

Spreading batter for healthy seed and nut crispbread crackers.

Step 5

Bake at 325 degrees Fahrenheit for 45 minutes.

Baking healthy seed and nut crispbread crackers.

Step 6

Remove from oven and reduce the heat to 170 degrees Fahrenheit. Score the crackers using a rotary pizza cutter or long knife. Be gentle, as the centermost crackers will still be soft and easily torn.

Scoring healthy seed and nut crispbread crackers.

If desired, sprinkle with extra salt and your choice of herbs, spices, and/or seasoning blends.

Step 7

Return to the oven and bake at 170 degrees Fahrenheit for approximately 1 1/2 hours, give or take, until the crackers are crisp.

Tip

The crackers around edges tend to bake faster than the center crackers, so I recommend removing the outermost crackers from the sheet when they're finished, and return the sheet to the oven to allow the rest to completely crisp.

Remove from the oven, let them cool, then break apart at the score lines.

Breaking apart healthy seed and nut crispbread crackers.

Enjoy as you would any cracker. They're especially yummy topped with crabmeat salad.

Healthy Seed & Nut Crispbread Cracker

Happy grain-free eating!

Healthy Seed & Nut Crispbread Cracker

Crescent Roll Pizza Mummy Recipe

0

There isn't an easier way to get a fun dinner whipped up for Halloween than this. This crescent roll pizza mummy recipe is perfect for Pre-Trick-or-Treat moments, a Halloween party, or even just a quiet little dinner at home. It's as adorable as it is delicious. It might just become a family tradition.

Crescent Roll Pizza Mummy Recipe

Video of the Day

Things You\’ll Need

  • 1 sheet pre-made crescent rolls or crescent dough sheets

  • 1/4 cup pizza sauce or marinara

  • 1/3 cup shredded mozzarella cheese

  • 8-10 pepperoni slices

  • Egg wash (1 egg plus 2 tables water, beaten)

  • 2 black olive slices

Crescent Roll Pizza Mummy Recipe

Step 1: Unroll

Unroll the dough, add to a baking sheet that's been covered with parchment paper. Press together any seams in the dough with your fingers.

Crescent Roll Pizza Mummy Recipe

Step 2: Filling

Add the filling down the center third of the dough, avoiding the outer 1 inch edge on the ends.

Crescent Roll Pizza Mummy Recipe

Step 3: Slice

Slice 1 inch strips along the sides, down the length of each side.

Crescent Roll Pizza Mummy Recipe

Step 4: Fold

Fold the ends over the filling.

Crescent Roll Pizza Mummy Recipe

Step 5: Wrap

Wrap the strips over the filling alternating between sides.

Crescent Roll Pizza Mummy Recipe

Step 6: Egg wash

Brush with egg wash.

Crescent Roll Pizza Mummy Recipe

Step 7: Eyes

Add the black olives at one end to resemble eyes.

Crescent Roll Pizza Mummy Recipe

Step 8: Bake

Bake at 375°F for 20-25 minutes or until the dough is golden brown.

Crescent Roll Pizza Mummy Recipe

Step 9: Serve

Serve and enjoy!

Crescent Roll Pizza Mummy Recipe

How to Repair Glass Stemware

Things You\’ll Need

  • Water

  • Dish soap

  • Soft cloth

  • Clear glass glue

  • Thin paintbrush

  • Diamond file

  • Water

... Cracked glass stemware can easily be repaired.

Glass stemware includes delicate pieces that can crack or chip at any time for any reason. Both of the occurrences require immediate repair so the damage does not get worse, preventing a repair from being possible. Collect the materials you will need and take your time fixing the delicate glasses.

Video of the Day

Repair Chipped and Broken Stemware

Step 1

Wash and dry the stemware.

Step 2

Locate the cracked or chipped area, and then apply the clear glass glue. Use a thin paintbrush to get the glue deep into the groves of the damage. Allow the glue to dry for an hour. Carefully fill in any chipped areas with the clear glue if the chipped piece cannot be found.

Step 3

File the glued area and other sharp, rough edges with the flat side of the diamond file.

Step 4

Even out the repaired area with the rounded part of the file.

Repairing the Glass Stem

Step 1

Place the bottom of the stem on a flat surface. Turn the top part of the stemware upside down, the opening of the glass face down, on a flat surface so that it does not roll around the table.

Step 2

Add a dab of clear glue to the top of the broken surface, and then quickly place the top part of the stemware on the stem base so it appears whole again. Hold it tightly to help the glue bond the two pieces of the stemware together.

Step 3

Release the glass after several minutes and allow the glue to continue to set.

How to Make Pear Nectar

0

Things You\’ll Need

  • Paring knife or vegetable peeler

  • Cutting board

  • Saucepan

  • Immersion blender, blender or food processor

  • Fine-mesh strainer

  • Wooden spoon or silicon spatula

  • Sugar or lemon juice (optional)

pears Once fully ripened, pears can be pureed for nectar. Image Credit: Zoryanchik/iStock/Getty Images

A perfectly ripe pear is one of the sweetest and most fragrant of all fruits, but that moment of perfect ripeness is cruelly brief. Turning the ripened fruit into pear nectar is one way to extend your enjoyment of their brief season. Pears don't release their juice as readily as do oranges and other fruit, but pear nectar — a pear puree thinned to drinking consistency — is easy to make and requires no special equipment.

Video of the Day

Step 1

Peel your pears with a paring knife or vegetable peeler, taking care to remove as little flesh as possible with the skin. Place the cut pears on a cutting board and quarter them lengthwise; then use a paring knife to cut out the core, seeds and blossom end.

Step 2

Chop the pears coarsely; transfer them to a heavy-bottomed saucepan, and add 1/4 cup of water. The water provides steam to soften the pears and help release their natural juices, and it helps keep them from sticking to the pot during the first few minutes of cooking.

Step 3

Simmer the pears until they're just barely tender. The less they're cooked, the fresher their flavor will remain.

Step 4

Puree the pears with an immersion blender or in small batches in a conventional blender or food processor. Press the puree through a fine-mesh strainer with a wooden spoon or silicon spatula to remove any stray seeds or pieces of core or skin.

Step 5

Thin the puree with cold water until it reaches a drinkable consistency; then taste it. Add fine, quick-dissolving sugar or an alternative sweetener if the nectar is tart or a splash of lemon juice if it's cloyingly sweet. Refrigerate the puree immediately, or package it and freeze it for later use.

Tip

If you're preparing a large quantity of pears for storage and long-term use, don't thin the puree. It will take up less space in your freezer if it's frozen in its concentrated form.

The pear puree can also be canned in sterilized canning jars and then stored in your pantry or any other cool, dark place. This eliminates the need for freezing and thawing, so you can quickly turn your puree into pear nectar whenever the mood should strike.

Nectar is not 100 percent juice, and commercial versions can't be sold as "juice" for that reason. In some jurisdictions, they can contain as little as 25 percent juice. Homemade versions are a healthful beverage, but commercial fruit nectars can be high in sugar or other sweeteners.

How to Cut Shortening Into Flour

0

Things You\’ll Need

  • Bowl

  • Pastry blender

  • Table knives (optional)

  • Food processor (optional)

  • Electric hand mixer (optional)

... Short dough products, such as pie crust and biscuits, are made using shortening.

The best pie crusts and biscuits are ones that are flaky, tender and melt in your mouth. The key to making short doughs (made without yeast) such as these is to cut in the proper amount of fat, such as butter or shortening, so that pockets form when the dough is baked, creating the desired pastry. Shortening, which is almost always hydrogenated vegetable oil, can be cut into dough in several ways, including with the use of a pastry blender, knives, or even your fingers.

Video of the Day

Step 1

Chill the shortening in the refrigerator if time allows. Use the correct amount of shortening for your recipe.

Step 2

Cut the shortening into fingertip-size pieces and add to the mixing bowl with the dry ingredients. Shake the bowl well or gently mix with your fingers to get the shortening pieces covered in the flour mixture.

Step 3

Hold the pastry blender around the handle and press the blades into the flour/shortening mixture. Use the pastry blender in this manner all the way around the bowl until the shortening resembles flour-covered pieces of rice — the dough should look crumbly at this point.

Step 4

Use two table knives if you do not have a pastry blender. Hold a knife in each hand and make slicing motions into the flour/shortening mixture. Continue cutting until the dough appears crumbly.

Step 5

Mix the dough mixture gently using your fingers as an alternate way to cut the shortening into the flour. Hold your hand in a claw shape and swirl it around the bowl quickly until a crumbly dough appears. Work fast so as to not melt the shortening from the heat of your hand. Run your hand under cold water for a few seconds, then dry thoroughly before mixing the dough.

Step 6

Use a food processor to cut the dry ingredient blend with the shortening. Add your flour to the food processor bowl, then add the shortening in small chunks. Pulse the food processor a few times until the dough turns crumbly.

Step 7

Use an electric hand mixer to cut the shortening into the flour mixture. Place the flour into a bowl. Turn the hand mixer on low speed and slowly add the shortening, one fingertip-size chunk at a time. Mix slowly until a crumbly dough appears.

Can You Refry Chicken Wings?

0

23546865 Chicken wings can be re-fried if they haven\’t been coated in sauce, batter or breadcrumbs. Image Credit: Zedcor Wholly Owned/PhotoObjects.net/Getty Images

Frying chicken wings then re-frying them might be the key to perfect wings. J. Kenji Lopez-Alt took chicken wings to the Serious Eats Food Lab and found that cooking them once at a lower heat, then frying them again at a higher heat produced wings that were juicy inside and crispy outside. The double-fry may produce great results on plain, raw wings, but it's likely to be a disaster if you're looking to reheat leftover wings that have been seasoned, breaded or sauced. In that case, the oven is the best way to go.

Video of the Day

Plain Wings

Plain wings are wings with no sauce, breading or spice rubs added to them. You can re-heat plain wings by frying, but the process can be hit or miss. If you don't cook the wings at just the right temperature for just the right length of time, you'll get either greasy, soggy wings or tough, dried-out ones. For best results, submerse the wings in 350-degree Fahrenheit oil for as long as it takes them to reach 165 F inside — about five to 10 minutes. You can cook them longer if you like crispier wings. Just be sure to check on them every two to three minutes to make sure they're not drying out.

Breaded or Battered Wings

Breaded or battered wings may cook up golden and crisp on the first fry, but that's where the frying magic ends. If you decide to re-fry these types of wings, the batter will likely just mop up grease and lose flavor in the bubbling oil. You also run the risk of burning the coating before the chicken reaches a safe internal temperature of 165 F. The moisture inside the chicken can cause the batter or coating to break apart and shed as well. Reheating them in a 400 F oven is the way to go. Skip the microwave because you'll get soggy and rubbery wings.

Sauced or Glazed Wings

Wings that have been coated in a sauce or glaze, such as barbecue sauce or honey mustard glaze, should not be re-fried. If you chose to re-fry them, most of the sauce or glaze will come off of the chicken wings and spread out into the oil. Both the sauce in the oil and the sauce that remains on the chicken wings will likely burn before your chicken wings are heated through. If frying in a shallow pan, such as a skillet, the sauce could burn on the bottom. Even if you cook the wings until they're hot throughout, they'll have a charred or burned flavor. These wings are also best reheated in a 400 F oven until they reach an internal temperature of 165 F. Once they're heated to the proper temperature, you can remove them from the oven and add additional sauce. Use fresh sauce, not sauce than has been in contact with raw chicken.

Seasoned or Dry-Rubbed Wings

Seasoned or dry-rubbed wings are a coin toss. In some cases, the wings are so lightly seasoned that they can be re-fried just like plain wings. Heavy seasoning rubs can act like breading and either pull away from the chicken and burn or remain on the chicken and burn. You may be able to bake them in a 400 F oven until they're warmed through, then re-fry them for a brief period at 350 to 400 F to crisp them up. If you choose this option, keep a constant eye on the wings to make sure they don't burn.

Mason Jar Football Brownie Treats

... 1 of 10

Overview

It's Super Bowl Party time! Enjoy the big game with this mason jar brownie sundae! Brownies in the shape of footballs top layers of luscious buttercream and fudge brownies for a tasty, football treat!

Image Credit: Courtney Dial Whitmore ... 2 of 10

Brownies and Buttercream

Whip up two batches of your favorite brownies (or opt for semi-homemade with your favorite brownie mix) and a big batch of vanilla buttercream frosting. Reserve a small bowl of the white buttercream for the football laces, and tint the rest a grass green!

Image Credit: Courtney Dial Whitmore ... 3 of 10

Brownies & Buttercream

Let both your brownie pans cool before cutting. One pan will become the mini squares for layering and one pan will become the mini footballs.

Image Credit: Courtney Dial Whitmore ... 4 of 10

Fudge Brownie Squares

To start, chop one pan of brownies into 1/2" squares. These will be layered in the mason jars.

Image Credit: Courtney Dial Whitmore ... 5 of 10

Football Shaped Brownies

Next, using a football cookie cutter (or oval shaped cutter), create mini football-shaped brownies. Make one football to top each mason jar treat.

Image Credit: Courtney Dial Whitmore ... 6 of 10

Piping on Football Brownies

Give the football-shaped brownies their final touch by piping vanilla buttercream laces onto the brownies. Use a small round piping tip and piping bag to create the white lace lines.

Image Credit: Courtney Dial Whitmore ... 7 of 10

Layering Mason Jar Treats

Time to put it all together. Start with a layer of your brownie squares. Next, add a layer of buttercream tinted green for "grass." Repeat layers until full.

Image Credit: Courtney Dial Whitmore ... 8 of 10

Piping "Grass"

To complete this recipe, use a "grass" tip by Wilton to pipe buttercream on top of the brownie layer. Sprinkle with green jimmies for an extra touch of color.

Image Credit: Courtney Dial Whitmore ... 9 of 10

Mason Jar Football Brownies

Complete your mason jar treat by setting a football brownie into the buttercream "grass." And feel free to add your own twist to these: sprinkle with chopped nuts, use ice cream instead of frosting, or choose your team's colors for extra fan spirit!

Image Credit: Courtney Dial Whitmore ... 10 of 10

Mason Jar Football Brownies

Serve with a mini fork during the big game or display on a halftime dessert bar. These sweets are certainly a fantasy for any football fan!

Image Credit: Courtney Dial Whitmore

The Best Indoor Grills in 2022

Grilled sausage and vegetables on the electric grill. Top view. Flat lay.

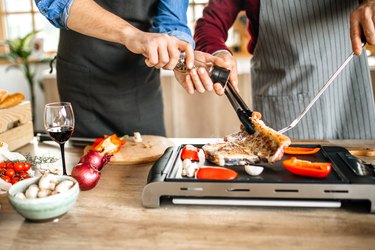
Whether unexpected inclement weather brings the barbecue indoors or you simply don't have an outdoor grill, owning an indoor grill can solve a lot of problems. Indoor grills are more compact and considerably less expensive than outdoor grills (not to mention, they don't require heavy and bulky propane tanks because they're electric). While some indoor grills may not be equipped to do everything advanced outdoor grills can, you'll be surprised by how versatile some models are. The best indoor grills can grill a delicious burger or chicken breast that tastes just like a sunny summer barbecue—even if you never leave your kitchen.

Video of the Day

What to Consider When Purchasing an Indoor Grill

Type​: There are two main types of indoor grills: open grills and contact grills.

  • Open grills​ are most similar in design to outdoor grills and have one flat grilling surface, requiring you to flip most foods in order to cook them thoroughly and evenly. They have a fairly wide grate that sits over a drip pan. Open grilling tends to take longer, but works better for certain foods like eggs, bacon, fish and vegetables.
  • Contact grills​ feature two cooking surfaces, allowing your food to be grilled from the top and bottom simultaneously (think of a panini press). A contact grill cooks more quickly than an open grill and leaves a nice crust on foods like paninis and grilled cheese sandwiches.

Capacity​: How much do you want to be able to grill at once? And how large of a cooking surface do you really need? If you're normally cooking for just one or two people, 80 square inches is already plenty. Cooking for a family of five? Some indoor grills offer up to 150 square inches of cooking surface area (but rarely more). One thing to keep in mind is that certain contact grills can double your cooking surface area by opening the lid and using it as a second cooking surface (you will have to flip your food, however).

Power​: The higher the wattage of your indoor grill, the faster it will cook. Higher wattage is particularly useful for searing, which requires very high temperatures. Generally, the higher the wattage, the more you'll pay, though.

Heat​: Some indoor grills come with a button or dial to adjust the temperature so you can cook using the right level of heat for whatever foods you're grilling. This gives you the option to grill vegetables at low heat, for example, or sear thick cuts of meat at high temperatures reaching up to 500 degrees Fahrenheit. Cheaper models may take a one-size-fits-all (or more accurately, one-heat-cooks-all) approach and not offer temperature adjustments.

Features​: Despite their smaller size, indoor grills can generate a lot of smoke (even "smokeless" grills usually produce at least some smoke). To avoid setting off your kitchen's fire alarm, if possible, look for a grill with a built-in filter that will drastically reduce smoke levels. Removable grill plates—especially ones that are dishwasher-safe—are another useful feature that make cleanup easier. Any extra feature that makes your grill more versatile or convenient may be worth the likely added cost.

With these considerations in mind, we've rounded up the best indoor grills in 2022. So, when's the barbecue?

Grilling t-bone steak and adding ingredients for better taste.

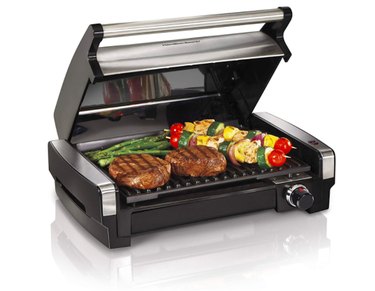
The Best Overall Indoor Grill

Hamilton Beach Electric Indoor Searing Grill

$74.99 at Amazon

The Hamilton Beach indoor searing grill offers the best mixture of quality and affordability while being capable of reaching up to 450 degrees Fahrenheit for high-heat searing. But searing certainly isn't all it's able to do; use the temperature dial to adjust the heat depending on what food you're grilling. The grilling grate provides118 square inches of grilling surface area—enough to grill six servings at once. The close-down hood (perfect for locking in juices and flavors), grilling plate and extra-large drip tray are all removable and dishwasher-safe. Helpful power and preheat lights eliminate guesswork while you're grilling and the grill boasts an impressive 1,200 watts of power.

Hamilton Beach Electric Indoor Searing Grill

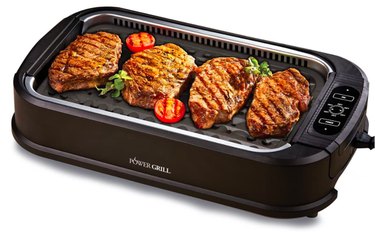
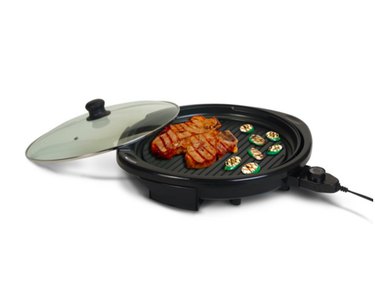
The Best Indoor Open Grill

Power XL Electric Indoor Smokeless Grill

$80.42 at Amazon

This smokeless open electric grill enables you to achieve the charcoal-style flavor of outdoor grills while remaining indoors. The grill utilizes turbo-speed smoke extractor technology to suck smoke back into the grill via electric fans that evaporate it into water vapor that collects inside. It also comes with a glass lid to keep smoke contained, as well as prevent hot oil splatters. The grilling surface is ceramic-coated, which makes it super resistant to sticking and eliminates the need for extra fat or oil. The grill also features an LED smart adjustable temperature control that reaches up to 450 degrees Fahrenheit.

Power XL Electric Indoor Smokeless Grill

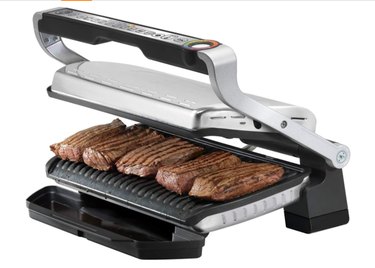
The Best Indoor Contact Grill

T-fal OptiGrill XL Electric Indoor Grill

$174.99 at Amazon

Not only is this grill excellent for contact grilling, but it's also great for parties since it can cook up to eight servings at once. It features nine preset cooking programs for grilling burgers, sandwiches, poultry, red meat, sausages, fish, pork, bacon and shellfish, and automatically adjusts its temperature depending on the thickness and size of your meat. When your food is ready, an indicator light turns on and the grill audibly beeps so you can entertain your guests without worrying about overcooking your food.

T-fal OptiGrill XL Electric Indoor Grill

The Best Budget-Friendly Indoor Grill

Elite Gourmet Indoor Electric Grill

$39.30 at Walmart

At first glance, this electric grill looks more like a regular cooking pan, but upon a closer look, you'll find that it has a grooved grilling surface capable of grilling everything from burgers to fish to vegetables. It measures 14 inches in diameter and includes a temperature-safe glass lid to help contain smoke. The dial lets you adjust to five different temperature settings and the grill reaches up to 450 degrees Fahrenheit. The handles and base remain cool to the touch so you can safely move the grill for cleaning, while its removable drip tray is dishwasher-safe.

Elite Gourmet Indoor Electric Grill

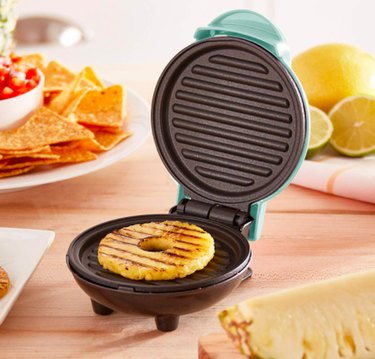
The Best Compact Indoor Grill

Dash Mini Maker Portable Grill

$12.99 – $13.99 at Amazon

This compact and portable grill is ideal for solo-dwellers, college students or anyone with a tiny kitchen. Its 4-inch, non-stick cooking area provides just enough space for cooking one serving at a time, be it a hamburger, sausage patty or breakfast sandwich. It's not a lot of room, but it's still possible to grill certain vegetables and even paninis. The entire grill clocks in at under 1 pound and includes a recipe book and one-year manufacturer's warranty. The Dash Mini Maker is small and simple but also extremely affordable.

Dash Mini Maker Portable Grill

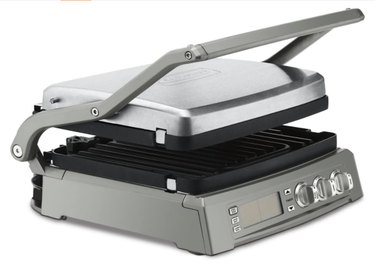
The Most Versatile Indoor Grill

Cuisinart Griddler Elite

$185.49 at Amazon

It's quite ingenious how many cooking functions Cuisinart were able to pack into this model, all while remaining far more compact than an outdoor grill. It boasts six (you read that correctly) cooking options, including a contact grill, a panini press, a full griddle, a full open grill, a half-grill/half-griddle and a top melt. While they were at it, Cuisinart threw in helpful features like dual-zone temperature control for cooking different foods simultaneously and removable, reversible non-stick griddle plates. It reaches up to 500 degrees Fahrenheit, so searing is definitely an option. While it's a bit bulkier than most indoor grills, when you consider how multi-functional it is, you'll be quick to forgive it.

Cuisinart Griddler Elite

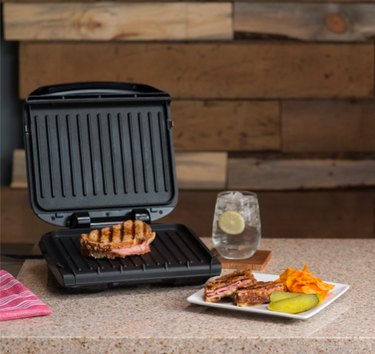
The Best Panini Press

George Foreman Removable Plate Grill & Panini Press

$24.96 at Walmart

If paninis were the first thing you thought of when reading the words "indoor grill," this George Foreman grill and panini plate is for you. It perfectly toasts, grills and even sears, whether you want a classic panini, the ultimate grilled cheese sandwich, a juicy burger or roasted vegetables. Its 60-square-inch surface area provides enough room to make four servings at once. The grilling surface's advanced George Tough non-stick coating is twice as durable as on previous models and removes the need for butter and oil. The grilling surface also slopes to remove up to 42% of fat from meats for a healthier meal. As if that weren't enough, the removable grilling plates are removable and dishwasher-safe so cleanup is fast and easy.

George Foreman Removable Plate Grill & Panini Press

How to Stop Bottles From Leaking During Shipping

Things You\’ll Need

  • Shrink wrap

  • Tape

  • Bubble wrap

  • Packing peanuts

... Keep bottles from leaking when you ship.

When shipping liquids and beverages it is important to make sure the bottles don't leak during shipping, especially homemade beverages and sauces intended as gifts. Most manufactured products are commercially sealed to prevent leakage. However, if you don't have the equipment to professionally seal bottles, there are other ways to make sure your bottles don't leak by the time they get to the recipient. Although heavier, glass bottles are an excellent choice for shipping liquids. They cannot be punctured, but they can be broken if not packaged correctly. Plastic bottles can also be used, as long as there are no other objects that can puncture the bottles.

Video of the Day

Step 1

Wrap each bottle cap and neck tightly with shrink wrap and secure it with tape.

Step 2

Wrap each bottle entirely with bubble wrap. This will prevent glass bottles from breaking and plastic bottle from being punctured.

Step 3

Add packing peanuts to the shipping box and add bottles.

Step 4

Tape the box with shipping tape and write the words "Fragile" or "Handle with Care" on the top and sides of the box.

Step 5

Ship the package as usual.