Home Blog Page 71

Chicken Gyros With Fresh Tzatziki Sauce Recipe

0

If you're looking for a flavorful meal that's both healthy and delicious, try these homemade chicken gyros. From the creamy tzatziki to the crispy veggies, this easy recipe will make your taste buds sing! This particular variation even features a Greek yogurt chicken marinade that can't be beat. Read on to make your own batch of chicken gyros with fresh tzatziki sauce.

Chicken gyros with fresh tzatziki sauce

Video of the Day

Marinated Chicken

Things You\’ll Need

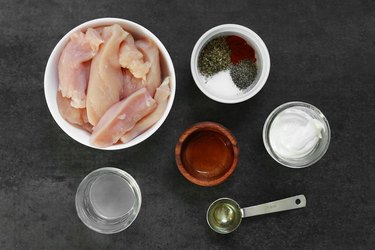
  • 1 1/2 pounds boneless and skinless chicken breast, sliced

  • 1/4 teaspoon paprika

  • 2 teaspoons dried oregano

  • 1/2 teaspoon ground black pepper

  • 1 teaspoon salt

  • 1 tablespoon red wine vinegar or apple cider vinegar

  • 1 tablespoon olive oil

  • 2 tablespoons lemon juice

  • 1/4 cup plain Greek yogurt

Ingredients for marinated chicken

Step 1

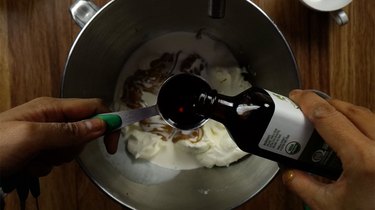
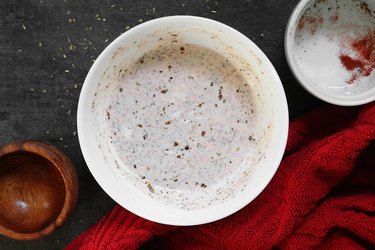
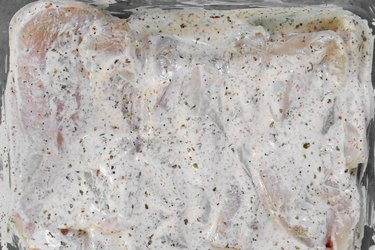
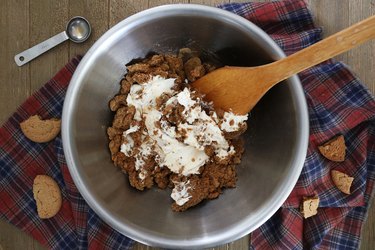
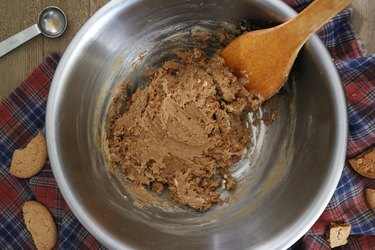
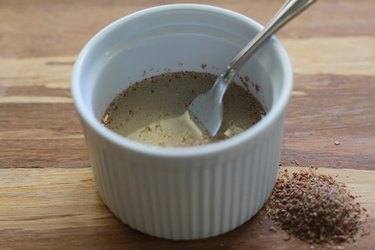
In a bowl, combine the spices, vinegar, olive oil, lemon juice and Greek yogurt. Mix well.

Mix marinade ingredients

Step 2

Place the chicken in a resealable bag or casserole dish with a lid. Pour the yogurt marinade on the chicken, making sure both sides of each piece are completely drenched. Cover and let sit in the refrigerator for at least 2 to 4 hours. If you're in a rush, 30 minutes will do the trick.

Marinated chicken

Step 3

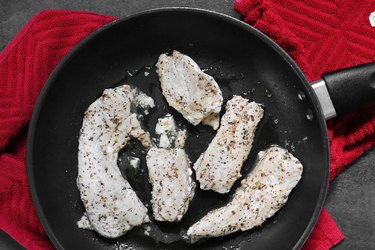
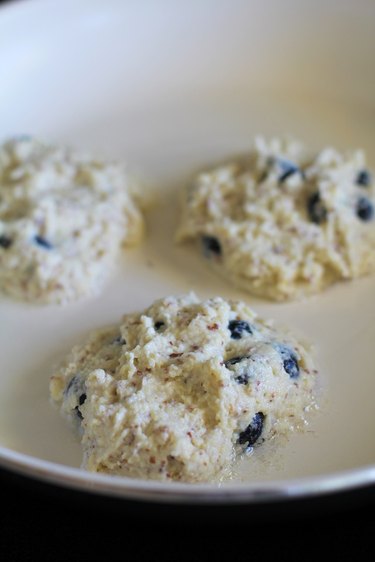
Over medium heat, cook the chicken 4 to 5 minutes on each side. The chicken is ready when it is no longer pink inside.

Cooked chicken

Step 4

If necessary, slice the chicken into strips.

Sliced chicken

Tzatziki Sauce

Things You\’ll Need

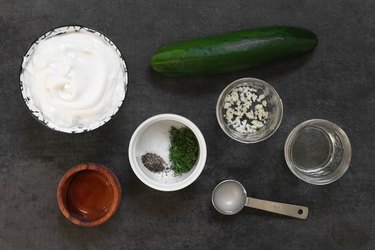
  • 1 1/4 cup plain Greek yogurt

  • 1 medium cucumber

  • 1 tablespoon fresh dill, chopped

  • 1 teaspoon salt

  • 1/8 teaspoon ground black pepper

  • 2 garlic cloves, minced

  • 1 tablespoon red wine vinegar

  • 1 tablespoon olive oil

  • 1 tablespoon lemon juice

Ingredients for tzatziki sauce

Step 1

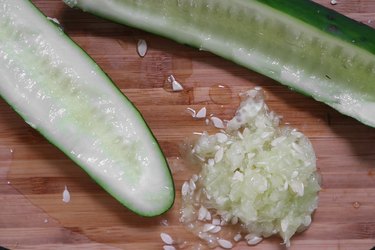
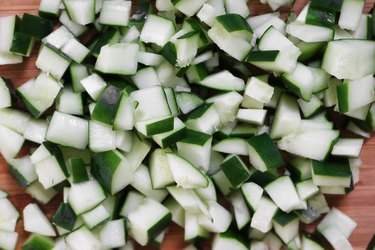
Slice the cucumber lengthwise and scoop out the seeds.

Scoop out cucumber seeds

Step 2

Roughly chop up the cucumber.

Chop cucumber

Step 3

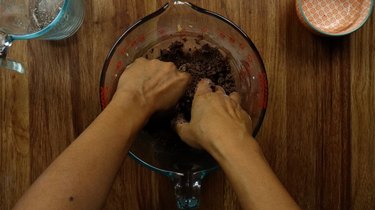
Place the cucumber in a strainer or colander. Sprinkle a liberal amount of salt and place it in a bowl. Let sit for 20 minutes.
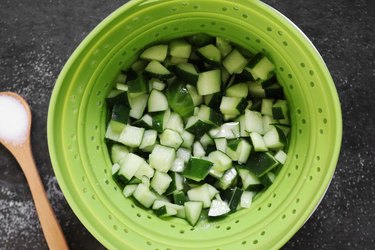
Add salt to cucumber

Tip

This is an important step. Cucumbers hold a lot of water, which can make your tzatziki sauce very watery. Adding the salt will help draw out excess moisture. Don't worry, though — the cucumber won't taste salty.
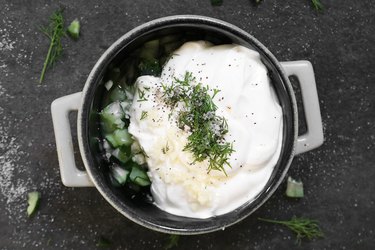
Step 4

After about 20 minutes, wrap the cucumber in a paper towel and give it a squeeze. Add the cucumber to a bowl and combine with the remaining ingredients.
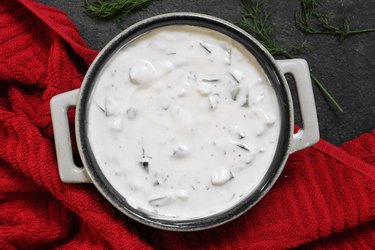
Tzatziki ingredients

Step 5

Chill in the refrigerator for 20 to 30 minutes to let the flavors develop.
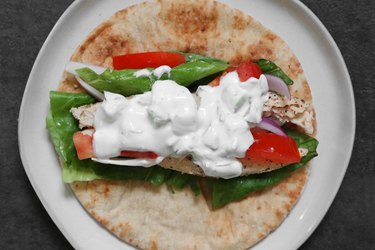
Tzatziki sauce

Chicken Gyros

Things You\’ll Need

  • 6 pitas

  • Sliced cooked chicken

  • 2 small tomatoes, sliced

  • 1/2 red onion, sliced

  • 1 cup romaine lettuce, tightly packed and chopped

  • Tzatziki sauce

Ingredients for chicken gyros

Step 1

Briefly warm up the pitas in the microwave or in a pan over low heat.

To construct the gyros, add the lettuce, red onions and tomatoes on a pita. Add the sliced chicken and top with tzatziki sauce. Garnish with extra dill or chopped cucumbers, if desired.

Make the gyros

Step 2

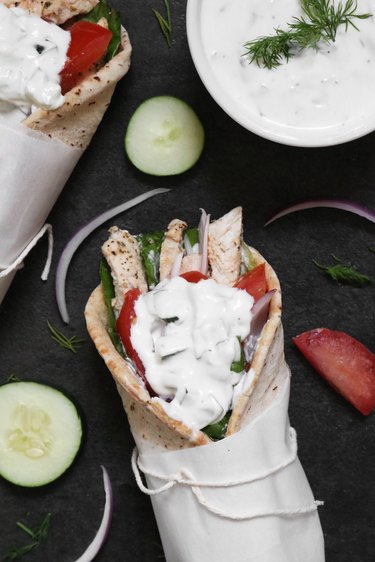
Wrap the pita and secure with aluminum foil or parchment paper with twine. Enjoy!

Chicken gyros with fresh tzatziki sauce

Pumpkin Bread Cake Pops Recipe

0

eHow may earn compensation through affiliate links in this article.

Pumpkin spice is undoubtedly the favorite flavor of the fall season. And while there are many ways to get your pumpkin spice fix, these pumpkin bread cake pops could very well be the ultimate, most perfect mouthful of pumpkin goodness imaginable. Shaped like miniature pumpkins, they're filled with an irresistible mixture of pumpkin bread and cream cheese frosting. And instead of standard treat sticks, we're using pretzel sticks to complement the sweetness with a salty snap. These cake pops will change your life. You're welcome.

Video of the Day

pumpkin cake pops

Things You\’ll Need

  • Pumpkin bread from scratch or mix

  • Cream cheese frosting from scratch or mix

  • Cookie scoop, 1.5-inch diameter

  • Wood skewer

  • Orange-colored candy melts

  • Pretzel sticks

  • Green cookie icing

  • Autum leaf sprinkles

materials

Step 1: Bake Pumpkin Bread

Using your own recipe or a box mix, bake a loaf of pumpkin bread. There are so many mixes available during the fall season, you won't have trouble finding one. I used a mix in which I had to add a can of pumpkin, so it felt like I was cooking from scratch.

pumpkin bread

Step 2: Crumble the Bread

With your hands, crumble the pumpkin bread into a fine texture. I recommend donning rubber gloves, not only for sanitation reasons, but also because the color of the pumpkin can stain your hands.

crumbs

Step 3: Add Cream Cheese Frosting

Add cream cheese frosting to the crumbled pumpkin bread. Start with three heaping tablespoons to moisten the bread. Now, should you choose homemade or store-bought frosting? I prefer store-bought frosting because it's shelf stable. As the cake pops will be left unrefrigerated, I did not want to use real cream cheese in the frosting.

frosting

Step 4: Knead the Mixture

Knead the pumpkin bread and frosting mixture with your hands, and keep adding frosting until it becomes the consistency of cookie dough. I used six tablespoons of frosting in total. The exact amount you use will depend on how moist your pumpkin bread is.

knead dough

Step 5: Form Balls

Form uniform amounts of the pumpkin bread mixture using a 1.5-inch diameter cookie scoop.

scoop

Roll the mixture between the palms of your hands to create a ball.

ball

Step 6: Make a Pumpkin Shape

Using a wood skewer, make four to five vertical indentations in the pumpkin ball to mimic the ridges of a pumpkin.

skewer

Flatten the top and bottom of the sphere to make it more pumpkin-like.

pumpkin shape

Line up the little pumpkins on a parchment-lined tray, and place in a freezer for 15 minutes.

freeze pumpkins

Step 7: Prepare the Candy Melts

Place orange-colored candy melts in a microwave-safe bowl, and heat them at 20-second intervals. Keep heating and stirring until the candy melts are creamy without any lumps.

candy melts

Tip

If your candy melts feel stiff even when completely melted, add a teaspoon of vegetable shortening. It will smooth out the consistency.

Step 8: Insert the Pretzel Stick

Dip the tip of the pretzel stick in the candy melts, going about a half-inch deep.

dip pretzel stick

Remove the pumpkins from the freezer. Insert the candy-dipped pretzel sticks halfway into the pumpkins. The candy will harden and lock the pretzel sticks in place. The pretzel sticks look like pumpkin stems, don't they?

insert sticks

Step 9: Dip the Pumpkins

Holding the pretzel sticks as handles, dip the pumpkins in the candy melts, turning them as you immerse them until they are entirely covered. It helps if your container of candy melts is deep. If it's not, tip the bowl so one end has a deeper reservoir.

dip pumpkins

Place the cake pops on a parchment-lined tray. Because they have been in the freezer, the candy will harden quickly. You'll notice that the deep grooves you created on the pumpkins have largely been filled in by the candy melts. However, the general pumpkin shape remains.

pumpkins

Step 10: Top With Sprinkles

Drizzle a bit of green cookie icing around the top of the pumpkin.

cookie icing

While the cookie icing is still wet, add some autumn leaf sprinkles on top of it. When the icing dries and hardens, it will secure the sprinkles in place. Plus, any green cookie icing that still shows through will look like more leaves, or even the vine of the pumpkin.

leaf sprinkles

What a way to kick off the fall season. If there ever was a Great Pumpkin, this is it.

pumpkin spice cake pops

Gingersnap Cookie Truffles Recipe

0

If you love gingersnap cookies, you'll adore this gingersnap cookie truffle recipe. It calls for simple ingredients like gingersnap crumbs, cream cheese and spices. Together, they create a flour-less, dough-like filling that's hard to resist. You can also take it up a notch and add even more spices for a stronger flavor. And, like most truffle recipes, the finished product looks fancier than it really is. This easy holiday recipe is perfect for parties, potlucks and gifts!

Gingersnap cookie truffles

Video of the Day

Things You\’ll Need

  • 4 cups gingersnap cookies, broken

  • 8 ounces cream cheese, room temperature

  • 1 teaspoon ground ginger

  • 1 teaspoon ground cinnamon

  • 1 teaspoon ground nutmeg

  • 1 teaspoon vanilla extract

  • 1 tablespoon olive or coconut oil

  • 1 1/4 cup chocolate chips of choice

Ingredients for gingersnap cookie truffles

Step 1

Crush the gingersnaps into crumbs. You can do this with a coffee bean grinder, high-powered blender or food processor.

Tip

The compact space of a coffee bean grinder and blender is ideal for crushing cookies. However, you'll have to work in batches. On the other hand, if you use a food processor, it might just toss around the cookies in the open space. Feel free to experiment according to your preference and the equipment you have on hand.

Gingersnap cookie crumbs

Step 2

In a large bowl, combine the gingersnap crumbs with cinnamon, ginger and nutmeg. Mix well.

For an extra kick, add more spices.

Mix gingersnap crumbs with spices

Step 3

Add the softened cream cheese and vanilla extract. Mix well.

Mix with cream cheese and vanilla

Step 4

Continue mixing until the ingredients form a dough-like consistency.

Gingersnap truffle filling

You should be able to form a large ball. If the mixture is too crumbly, add more softened cream cheese or butter, one tablespoon at a time. If it's too creamy, add more gingersnap crumbs.

Gingersnap truffle filling

Step 5

With clean hands, roll the dough into 18 balls. Each one should be about the size of a standard meatball.

Place on a metal baking sheet lined with parchment paper. Chill in the refrigerator for at least 30 minutes.

Chill gingersnap truffles

Step 6

Meanwhile, melt the chocolate chips. Fill a small pot about 1/3 full with water. Bring to a boil, then reduce to a simmer.

Place a stainless steel bowl on top of the pot, making sure the bottom does not touch the water. Place the chocolate chips and oil in the bowl. Stir occasionally until melted and smooth.

Tip

Keep an eye on the chocolate. Make sure it doesn't bubble or burn.

Melt chocolate in double boiler

Step 7

Insert a toothpick into each gingersnap ball. Dip into the melted chocolate, making sure to cover all sides.

Return to the parchment-lined baking sheet. You can use a second toothpick to push the truffle off of the first toothpick.

Dip truffles in melted chocolate

Step 8

Repeat with the remaining truffles. Let the chocolate set completely.

To speed up this step, pop the truffles in the refrigerator.

Let chocolate harden

The truffles are ready to eat once the chocolate has set.

You can leave the truffles as they are, or decorate them. One idea is to drizzle melted white chocolate on top.

For one batch of truffles, 1/4 cup of white chocolate chips is enough. Once melted, place the white chocolate in a plastic sandwich bag, cut off the tip and drizzle onto the truffles. You can also use microwavable candy melts and a piping bag.

Gingersnap cookie truffles

For a more festive touch, add sprinkles or edible glitter before the chocolate melts. The possibilities are endless with these sweet and simple treats!

Gingersnap cookie truffles

7 Iron-Rich Foods Your Kids Will Actually Want to Eat

0

Iron-rich Food for Kids 1 of 8

You already know nutrition is key for your child's well-being, but iron is especially important. Iron helps boost proper blood flow (which means it supplies your child's cells and tissues with essential oxygen!) and low iron levels can leave your child cranky and fatigued. And that's not the only issue — kids with low iron levels also tend to perform worse at school, a recent study found.

Thankfully, including just a few iron-rich foods a day makes it easy to meet the recommended iron intake, which is 10 mg for kids age 4 to 8, and 8 mg for kids age 9 to 13. Reach for these iron-packed staples at snack time and include them in your meals to supply your kids with iron.

Image Credit: Getty dried fruits 2 of 8

1. Raisins and Dried Fruits

Dried fruit is ultra-portable and lunchbox-friendly, and it's also packed with iron. A half-cup of dried apricots, for example, has about 4 mg of iron, while raisins and dried pears offer about 2 mg of iron per half-cup. Dried fruit also supplies fiber to prevent hunger pangs — which might otherwise distract your child at school — plus vitamin A for healthy eyesight.

Limit your kid's sugar intake by picking up sugar-free dried fruits (check the ingredient list — anything ending in "-ose" is sugar!).

Try this: Serve 'em on their own as an easy snack, or add dried fruits to homemade granola.

Image Credit: Memedozaslan/iStock/Getty Images Spinach 3 of 8

2. Spinach

You already know spinach is great for your kids — but did you know it's loaded with iron? And spinach also supplies vitamin A for immunity and vitamin C for healthy bones. But, unfortunately, spinach doesn't have a reputation as kid-friendly. Let's change that!

Try this: Make spinach delicious by serving it with your child's favorite flavors, like cheese. Since spinach loses so much volume as it cooks, you can add several cups to your child's favorite pasta dishes without affecting the flavor. Try adding it to this delicious homemade mac and cheese recipe.

Or try this: Make easy, cheesy roll ups by stuffing a tortilla with spinach, cream cheese, ham and shredded cheddar. Or make "green monster" smoothies featuring spinach and your child's favorite fruits.

Image Credit: Getty Images Roast beef and meat fork on white wooden background 4 of 8

3. Roast Beef

Beef packs a serious one-two punch of ironnot only is the meat itself high in iron, but the iron is in a form that's easily absorbed by the body. Your child will also get protein for strong bones, vitamin B-12 for cognitive function and niacin for nerve health.

Try this: Pick up deli roast beef to make kid-friendly roll ups. Simply wrap thin slices of beef around a dill pickle spear and add a touch of mustard (or mayo). Each 3-ounce serving of beef has about 3 mg of iron — roughly one-third of your child's iron needs for the day!

Image Credit: Lisovskaya/iStock/Getty Images Three golden cheese crackers on white. With cheese. 5 of 8

4. Crackers and Cheese

This kid-friendly staple not only supplies calcium (thanks to the cheese) but it's also a great source of iron. The flour used to make wheat crackers typically contains added ironsometimes enough to cover your child's entire daily iron needs in a single serving!

Keep this snack healthy by opting for whole wheat crackers paired with low-fat cheese, like low-fat cheddar or mozzarella.

Try this: Use the opportunity to sneak in fruits and veggies, too. Crackers and cheddar cheese works well with thinly-sliced apple, while mozzarella pairs perfectly with tomato or cucumber.

Image Credit: etienne voss/iStock/Getty Images white and portobello mushrooms 6 of 8

5. Mushrooms

Mushrooms, like spinach, aren't typically thought of as kid-friendly — but that doesn't mean they can't be. They're among the best sources of plant-based iron, and supply about 2 mg per cup. Your kids will also get fiber to keep them full between meals, plus antioxidants to support healthy growth.

Try this: Make iron-rich mushroom "pizza" your kids will crave, using large portabello mushrooms as the "crust." After washing, use a spoon to remove the gills from the underside of the mushroom. Add a spoonful of tomato or pizza sauce, a sprinkle of cheese and your child's favorite pizza toppings, then bake until the cheese is melted and golden brown.

Image Credit: Sarah Vantassel/Demand Media Edamame soy beans in  bowls on white background 7 of 8

6. Edamame

You might not think of edamame beans (green, immature soybeans) as kid-friendly, but their crunchy texture makes them totally lunchbox-friendly — as long as you add a bit of flavor. Each cup has about 5 mg of iron, and soybeans are also one of the best plant-based sources of protein around.

Try this: Make a crispy and satisfying snack by thawing hulled edamame and draining to remove excess moisture. Spread the beans on a baking pan and sprinkle with sea salt and malt vinegar, then bake at 375 degrees Fahrenheit for 20 minutes, stirring every few minutes, or until golden brown.

Image Credit: sommail/iStock/Getty Images chocolate granola bars 8 of 8

7. Chocolate

This one shouldn't be a hard sell! The same nutrients that make dark chocolate great for you — including copper, fiber and antioxidants — are great for your child, too. And opting for dark chocolate means your kid will get over 2 mg of iron per ounce. In general, the darker the chocolate, the more iron they'll get.

If your child doesn't like very dark chocolate, start with darker varieties of milk chocolate (it still has some benefits!) and gradually shop for darker versions to help your child get more iron.

Try this: Add teaspoon of cocoa powder to their favorite smoothie, mix cocoa powder into homemade almond butter or use dark chocolate chips in granola bars for extra iron.

Image Credit: Ashlae Warner/Demand Media

The Healthiest Blueberry Pancakes Ever

0

Up the health benefits of blueberry pancakes by using protein-packed almond flour (or nut flour of choice), non-dairy milk, and serve the stack with pure maple syrup. This recipe is vegan, dairy-free and gluten-free, and provides a few options for egg replacements. You'll love the fluffy texture and naturally sweet flavor!

Plate of blueberry pancakes

Video of the Day

Before preparing this recipe, make sure you view the notes below the post for ingredient substitution options.

Things You\’ll Need

  • 1 cup blanched almond flour

  • 1/2 cup tapioca

  • 1 cup unsweetened almond milk

  • 3 tablespoons almond butter

  • 1/3 cup fresh blueberries

  • 2 tablespoons coconut oil for cooking

Step 1: Blend the Ingredients

Add all ingredients except for the blueberries to a blender and blend until smooth.

Pancake ingredients in a blender

Tip

If you're using a "flax egg" or "chia egg" instead of almond butter, you can mix the ingredients in a bowl. See notes at the end for instructions on how to make alternate egg replacers.

Step 2: Fold in the Blueberries

Transfer the pancake batter to a bowl (or leave it in the blender), and gently fold the blueberries into the batter until well-combined.

Pancake batter in a bowl with blueberries

Step 3: Cook the Pancakes

Heat 2 tablespoons of coconut oil (or canola or olive oil) in a large non-stick skillet or griddle over medium heat. Measure a scant 1/4 cup of pancake batter and pour onto the preheated skillet. Cook until sides firm up and air bubbles appear on the surface, about 1 to 2 minutes. Carefully flip and cook on the other side until golden brown, about another 1 to 2 minutes. Repeat with remaining batter.

three pancakes in a skillet

Serve pancakes with butter (or vegan butter spread/almond butter) and pure maple syrup.

How to Make a Vegan "Egg" Replacer

Instead of using almond butter in this pancake recipe, you can use one large chicken egg, or a vegan egg substitute. To make the equivalent of one egg, combine 1 tablespoon of ground flax seed or chia seed powder with 3 tablespoons of water. Stir well, and allow the mixture to sit and thicken for 10 to 15 minutes, stirring occasionally. The mixture should thicken and resemble the texture of a lightly beaten egg. Proceed as directed in the instructions above.

Flax egg in a bowl

Options for Ingredient Substitutions

  • Replace the almond butter with 1 large egg, or one vegan flax or chia egg (instructions above).
  • Omit the blueberries or substitute them for chopped strawberries.
  • The almond flour can be replaced with hazelnut meal or cashew flour.
  • Tapioca flour is interchangeable with arrowroot flour, so arrowroot can be used in place of tapioca.
  • Full fat or lite canned coconut milk, cashew milk, cow's milk or soy milk can be used in place of almond milk.

How to Make BBQ Jackfruit

0

For those looking for meat alternatives, jackfruit is a marvelous plant-based, soy-free meat substitute. Jackfruit comes from a tree that is native to Southeast Asia, and has been a part of Asian cuisine for centuries. It can be found in the produce section of some grocery stores, and it looks like an over-sized green spiky mango.

To minimize some work, you can buy pre-packaged jackfruit from a can, or even pre-marinated jackfruit. Best served as a mock "tuna salad" or barbecue "pulled pork," jackfruit will help you get your meat fix in a healthful way. This easy barbecue jackfruit recipe has the same consistency as (and similar flavor to) pulled pork, and can be adapted using any of your favorite store-bought or homemade barbecue sauces.

Video of the Day

Sweet potato chips with barbecue jackfruit How to make barbecue jackfruit Image Credit: Julia Mueller

Things You\’ll Need

  • 2 (14-ounce) cans jackfruit, drained

  • 2/3 cup barbecue sauce

  • 2 teaspoons chili powder

  • Sea salt to taste

Tip

Try making this Basic Barbecue Sauce recipe, or even use a homemade Spicy Taco Sauce.

Ingredients for barbecue jackfruit 
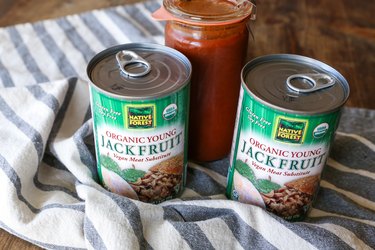
All you need for this easy recipe is jackfruit and barbecue sauce! Image Credit: Julia Mueller

Step 1: Drain the Jackfruit

Open the can (or package) of jackfruit and drain it in a colander.

One open can of jackfrui 
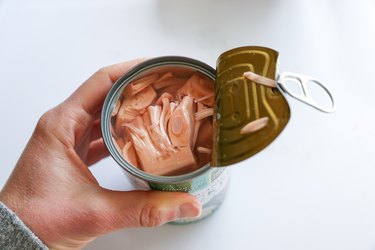
Open the cans of jackfruit
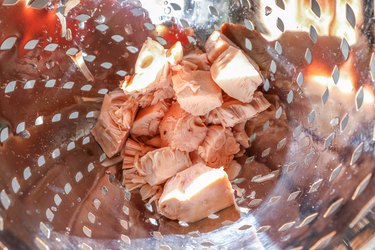
 Image Credit: Julia Mueller Jackfruit in a colander Drain the jackfruit Image Credit: Julia Mueller

Step 2: Separate and Discard the Bulbs

Upon inspection, you'll notice there is a hard bulb-shaped mass in the center of each jackfruit.

two hands holding different parts of jackfruit Separate the jackfruit bulbs from the stringy flesh Image Credit: Julia Mueller

For best results, remove these garlic-shaped bulbs and discard them. The flesh around the bulbs will be stringy and have the consistency of pulled or shredded meat. This is what you will use for your barbecue jackfruit dishes.

A pile of jackfruit bulbs and a pile of jackfruit "meat" 
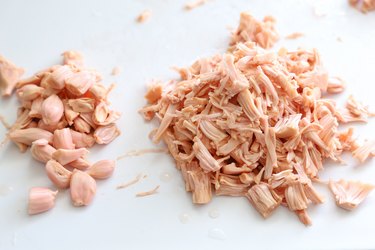
Discard the hard bulbs for best results Image Credit: Julia Mueller

Step 3: Prepare Barbecue Jackfruit

Add the stringy jackfruit "meat" to a mixing bowl, along with your favorite barbecue sauce, chili powder, and sea salt. Mix well until all of the barbecue jackfruit is coated.

Barbecue jackfruit in a bowl 
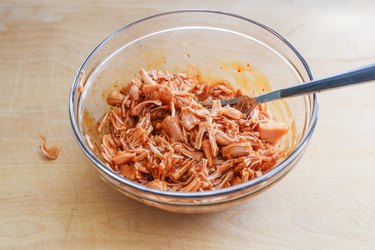
Combine all of the ingredients for barbecue jackfruit. Image Credit: Julia Mueller

Step 4: Heat the Jackfruit

Drizzle 1 to 2 tablespoons of olive oil in a medium-sized non-stick skillet and heat to medium-high. Once hot, add the barbecue jackfruit mixture. Cook, stirring occasionally, until much of the moisture has burned off and the jackfruit is golden-brown and caramelized with barbecue sauce, about 8 to 10 minutes. Taste the jackfruit for flavor and add more sea salt and/or barbecue sauce to taste.

Step 5: Serve!

Get creative with your jackfruit recipes. You can serve it as an appetizer with homemade sweet potato chips, or store-bought crackers.

Two plates of barbecue jackfruit bites on sweet potato chips Barbecue Jackfruit Bites on Sweet Potato Chips Image Credit: Julia Mueller

You can also serve barbecue jackfruit on a toasted bun, just like a pulled pork sandwich. The recipe pictured below is The Roasted Root's Pulled Jackfruit Sandwiches with Peach Bourbon Barbecue Sauce.

Two barbecue pulled jackfruit sandwiches 
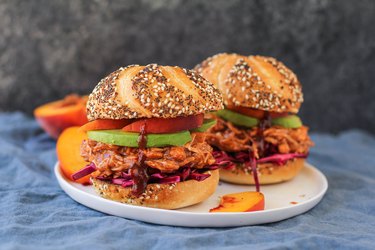
Barbecue pulled jackfruit sandwiches Image Credit: Julia Mueller

Serve barbecue jackfruit on a bed of rice with cabbage slaw and green onion for a delicious vegan bowl.

Bowl of rice with jackfruit, cabbage, and green onion Vegan Barbecue Jackfruit Bowl with Cabbage Slaw Image Credit: Julia Mueller

How to Clean Kale With Vinegar

0

Things You\’ll Need

  • Colander

  • Plastic container

  • White vinegar

  • Paper towels

... Kale is a green leafy vegetable that is related to cabbage.

Kale is a type of cabbage with green or purple leaves. It is in the same family as broccoli, cauliflower, brussels sprouts and collard greens. Before you eat kale it needs to be washed to remove debris and bacteria. However, you should wait until just before you plan to use it to wash it, otherwise it will be too limp to consume. Leafy vegetables like kale should be soaked for optimal disinfection. Vinegar is a natural disinfectant and it is safe for human consumption so it is a natural choice when cleaning vegetables.

Video of the Day

Step 1

Put kale in a colander. Rinse it under a stream of cold water to remove any sand, dirt and debris from the field.

Step 2

Pour 3 cups of cold water into a plastic container. Add 1 cup of white vinegar to the water. Use a spoon to mix the water and vinegar together so they are blended.

Step 3

Submerge the kale into the container. Allow the kale to soak for two to three minutes.

Step 4

Dump the kale back into the colander. Drain the vinegar and water from the kale.

Step 5

Rinse the kale once more under a steady stream of cold water to remove any remaining traces of vinegar.

No-Bake Peanut Butter Cream Cheese Pie (Low Carb)

0

When it come to pie recipes, there are three elements that immediately rope me in: 1) peanut butter 2) chocolate 3) no-bake. Sold — just tell me how to get started. This recipe has all three of these magical elements — plus it's grain-free and low carb! Also, unlike other so-called "no bake" recipes that require you use a pre-baked crust, this pie features a bake-free, fudge-like chocolate almond crust. So give your oven a rest and make this rich, decadent, and surprisingly simple PB cream cheese pie.

No-bake low-carb peanut butter cream cheese pie with a chocolate almond crust, garnished with sugar-free ganache, whipped cream, and peanut-butter cup.

Things You\’ll Need

  • 1 cup blanched almond flour

  • ¼ cup melted butter

  • ¼ cup cocoa powder

  • 1 or 2 pinches of salt

  • 20 ounces cream cheese

  • 1 cup creamy salted peanut butter

  • ½ cup heavy cream

  • ¾ cup powdered sweetener plus ⅛ cup for crust (I prefer Swerve)

  • 1 tablespoon vanilla extract

  • Optional toppings: sugar-free semi-sweet chocolate, sugar-free ganache, sugar-free chocolate peanut butter cups (see recipe below for brand suggestions)

Prepare the Crust

Step 1

In a large bowl, mix the almond flour, butter, cocoa powder, and salt until moist and crumbly. It's easiest to use your hands.

Mixing ingredients for gluten-free no-bake chocolate almond crust by hand.

Step 2

Put crumbly mixture into a 9-inch pie pan and press into the pan evenly to form a crust about ⅛ of an inch thick.

Pressing no-bake gluten free chocolate almond crust into pie pan.

Tip

This recipe yields a fudge-brownie like crust that’s soft but holds its shape after setting. If you’d like a firmer crust and are not averse to a little bit of baking, you can throw it in the oven at 350° Fahrenheit for about 8 minutes and allow to cool before pouring in your filling.

Step 3

Chill your pie crust in the fridge while you make your filling.

Gluten free chocolate almond no-bake pie crust.

Make the Peanut Butter Cream Cheese Filling

Step 1

In a mixing bowl, combine cream cheese, salted peanut butter, heavy cream, powdered sweetener, and vanilla extract. Use an electric mixer to blend until smooth, thick, and creamy.

Mixing ingredients for no-bake peanut butter cream cheese pie filling.

Step 2

Put your filling into your prepared pie crust, then even out the top with a spatula.

Pouring filling for no-bake peanut butter cream cheese pie into prepared pie crust. Evening out the top of pie filling for no-bake peanut butter cream cheese pie into prepared pie crust.

Step 3

This is an optional step, but will bump your presentation up a notch. Take a piece of sugar-free semi-sweet chocolate and grate your desired amount over the top of your pie, concentrating on the center.

Grating sugar-free semi-sweet chocolate over peanut butter cream cheese pie.

Step 4

Chill your pie in the fridge for about 2 hours to set, and it's ready to enjoy!

No-bake peanut butter cream cheese pie -- chilled and ready to eat or further garnish.

Additional Toppings (Optional)

Although your pie looks (and tastes!) fab as is, you can choose to further gussy up your pie (or individual slices just before serving, like I did) by drizzling some sugar-free ganache over the top. (Find a recipe for ganache here — simply sub regular bittersweet chocolate with a sugar-free version, like ChocoPerfection, to keep your pie low carb.)

Drizzling ganache over no-bake low carb peanut butter cream cheese pie.

For an even more dressed-up slice, add a dollop of unsweetened whipped cream, and/or insert a half of a sugar-free chocolate peanut butter cup (I used Russell Stover brand).

No-bake low carb peanut butter cream cheese pie with ganache, whipped cream, and peanut butter cup.

Voilà! All the rich, peanut-buttery goodness your heart desires without any of the baking or the carbs. Can't beat it.

How to Make Monkey Bread With King\’s Hawaiian Rolls

0

When you need something special for breakfast but don't have a lot of time, try this monkey bread. It's delicious and can be ready in less than 30 minutes, start to finish.

Things You\’ll Need

  • Bundt pan (mini or standard size)

  • Baking spray

  • 1 package King's Hawaiian Rolls

  • 4 eggs

  • 1/2 cup milk

  • 1/2 teaspoon cinnamon

  • 1/2 stick butter

  • 3/4 cup brown sugar

  • 2 Tablespoons milk or cream

Step 1: Prepare the Pan

Preheat the oven to 375 degrees Fahrenheit. Thoroughly spray the Bundt pan with baking spray, covering the sides and center tube all the way to the top.

Coating a Bundt pan with baking spray.

Tip

It takes about a dozen rolls to fill a mini-Bundt pan like the one shown here. If you’re feeding a crowd, use a full-sized Bundt pan and two packages of rolls.

Step 2: Soak the Rolls

Whisk together 4 eggs, ½ cup milk and ½ teaspoon cinnamon until combined thoroughly. Tear off the top crust of a roll and break it in half. Dip rolls in egg mixture, then roll into rough balls and place in Bundt pan. Continue adding layers of rolls until Bundt pan is filled.

Dipping rolls is egg mixture. Bundt pan filled with layers of rolls coated with egg mixture.

Tip

Add chopped pecans, raisins, or dried cherries between layers, if desired.

Step 3: Add the Caramel Sauce

Melt half a stick of butter in a small saucepan over medium heat. Add ¾ cup brown sugar and 2 Tablespoons milk or cream. Cook until the sugar is dissolved and the sauce is smooth, stirring frequently. Pour sauce over the rolls, filling all the crevices.

Pouring caramel sauce over rolls in prepared pan.

Step 4: Bake and Serve

Bake at 350 degrees Fahrenheit for 20 minutes. The monkey bread is ready when the caramel sauce is bubbling and the crusts of the rolls are golden brown.

Baked monkey bread is golden brown.

Let the monkey bread rest for 5 minutes, then use a knife to loosen the outside and inside edges. Place a plate over the Bundt pan, then invert the plate and pan. The monkey bread should slide right out.

Bundt pan inverted on plate. Pulling rolls apart from finished monkey bread.

List of Brazilian Fruits & Vegetables

0

... There are many fruits and vegetables available for consumption in Brazil.

Brazil, known for its warm weather and delectable cuisine, also produces a wide variety of fruits and vegetables. The availability of these ingredients varies between different regions of the country. Their high nutrient content make them excellent additions to any meal, or as snacks all by themselves.

Video of the Day

Acai Fruit

The juice of Acai berries, found at many juice and smoothie bars, contains generous amounts of omega six and omega nine fatty acids, as well as a variety of vitamins, minerals and antioxidants. Acai berries are about the size of cherries and feature a deep purple in color. Due to their restorative properties, Acai berries make great post-training and exercise food. But beware, if that purple juice spills, it can easily stain your favorite shirt.

Jaca Fruit

The Jaca fruit, also known as the Jack fruit, is larger than the average watermelon and could cause severe head trauma if it fell on someone's head. This fruit grows off the trunks of trees in Brazil, falling off the tree when ripe. The edible portion of the fruit features a fleshy, off-white pulp.

Chuchu Vegetable

This vegetable original came to Brazil from the French Antilles. The term "chuchu" doubles as a term of endearment in Brazil. This pear-shaped vegetable grows on a vine and features a green color and fuzzy exterior. Chuchu vegetables grow everywhere in Brazil, but if you wish to purchase them in the U.S., visit the foreign vegetable section of your local grocery store.

Cassava Vegetable

The Cassava is a very tall perennial plant, sometimes reaching a height of fifteen feet or more. We often consume it in tapioca pudding without even realizing it. Only the Casava's roots and leaves are edible. Its nutritional value is comparable to a potato, although Cassava contains more potassium and twice the fiber.