Home Blog Page 68

5 Must-Have Baking Tools for the Best Holiday Cookies

0

As the late Barbara Johnson once said: "A balanced diet is a cookie in each hand." And, if you ask us, there is no wrong time to enjoy a cookie! With the holiday season approaching, you can bet that cookies will be a popular sight and smell. However, not all cookies are created equal. While most cookies turn out all right, not all reach the elusive heights of cookie perfection: firm enough not to fall apart, but with a soft, slightly gooey center, and certainly not dry and crumbly (though preferences vary). But, there is hope. With the best baking tools, you wield your greatest secret weapon in the unofficial Best Homemade Cookie Challenge. If cookie making is baked into your very soul, give these must-have baking tools a try.

Plate with a big selection of Christmas cookies

Video of the Day

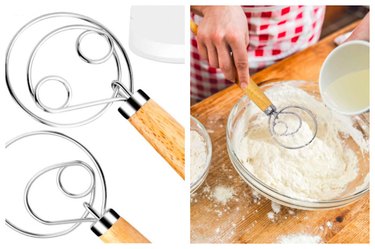
1. Best Cookie Dough Hand Mixer: FUANRTK Danish Dough Mixing Whisk

$8.99 on Amazon

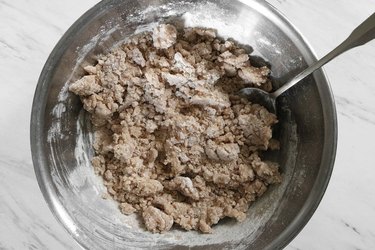
If you've ever struggled to get butter, flour and milk to combine properly, this traditional Danish-style mixing utensil makes mixing dough by hand so much easier. Its unique design mixes dough three times faster than a traditional spoon or spatula. You get not one, but two mixing whisks—one with a single-eyed hook and another with a double-eyed hook. Both mix the wet and dry ingredients in your dough much better than a regular spoon can. Hand-mixing is also great if you don't want to over-mix the dough, especially for cookies. They're also much easier to clean than a traditional whisk since you can easily reach both sides. Each whisk features a handle made of oak wood and an eye hook made of stainless steel.

Not only can you use this tool for mixing cookie dough; it works equally well for making bread, brownies and pizza, too. Poor souls without this gem may sadly be left with dry dough that falls apart. That's just the way the cookie crumbles—but your cookies don't have to.

FUANRTK Danish Dough Mixing Whisk

Tip

You can use this tool to get a nice, even cookie dough mix, but be careful not to overdo it—the more you mix the dough, the more you activate the gluten, which is good for chewy breads, but not the best for cookies and cakes. So it depends on what you’re making.

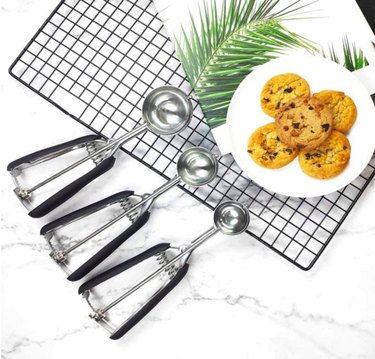
2. Best Cookie Dough Scooper: HOMURE H 3-Piece Cookie Dough Scoop Set

$20.98 on Amazon

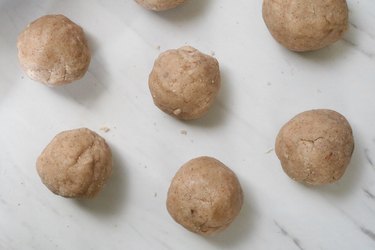
Once you're satisfied with your dough, it's time to scoop it. This cookie dough scoop set from HOMURE H features three different sizes for scooping one, two or three tablespoons. Made of stainless steel, the ergonomic design and spring trigger system relieve pressure on your wrist and hand, and it squeezes easily to release the dough in a perfect little ball. Each scoop is also stain-resistant and dishwasher-safe. Though this scoop set is perfect for cookie dough, you can also use it for scooping ice cream, melon balls, and muffin or cupcake dough just as effectively. You can get the perfect scoop each time.

Tip

Keep in mind that the bigger the scoop, the bigger the cookie, so you may need to space your cookies out farther apart to allow for room as they bake and expand in the oven.

HOMURE H 3-Piece Cookie Dough Scoop Set

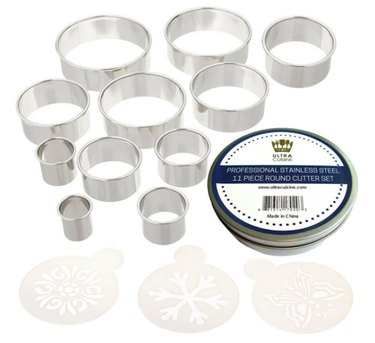
3. Best Round Cookie Cutter: Ultra Cuisine 11-Piece Round Cookie Cutter Set

$16.98 on Amazon

If you'd prefer to make flatter, perfectly round cookies made from rolled-out dough (which this stainless steel rolling pin is perfect for), this 11-piece cookie cutter set from Ultra Cuisine is for you. Made of stainless steel, the set comes with 11 cookie cutter rings ranging from 1 inch to 3 inches in diameter and approximately 1 inch to 3 1/3 inches in depth, allowing you not only to cut cookie dough to a variety of thicknesses, but also shape dough for scones, biscuits, fondants, miniature pies and more. You can even place a smaller cutter inside of a larger one to make donut rings. Each piece is dishwasher-safe and BPA-free.

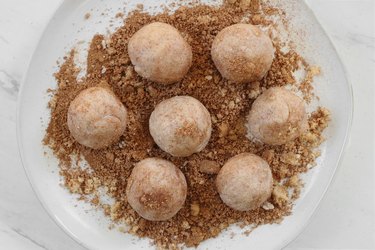
As a bonus, you get three ornate cookie stencils, including a snowflake pattern—well-suited for the holiday season, and excellent for designs using powdered sugar, cocoa or a mix of both.

Ultra Cuisine 11-Piece Round Cookie Cutter Set

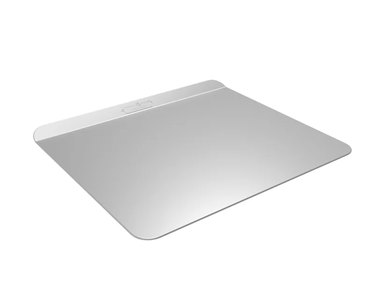
4. Best Baking Sheet: Nordic Ware Cookie Slider Aluminum Sheet

$25.50 at Wayfair

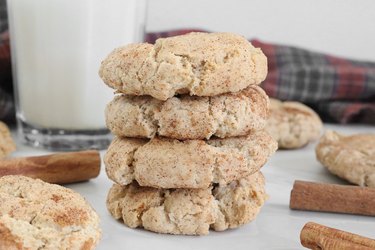
Nordic Ware created this baking sheet specifically with cookies in mind. Featuring a cushion of air between two layers of aluminum, it provides added insulation as protection against over-browned cookie bottoms (or burnt pizza crusts). It measures 16 1/4 inches long and 14 1/4 inches wide, and unlike other baking sheets with a raised rim forming the edges, the majority of the cookie sheet lies flat, offering ample baking room. It also makes cookie removal a cinch, as you can simply slide the cookies onto a wire rack to cool and avoid over-baking.

The only caveat is that it's not non-stick. If your recipe necessitates it, you may want to line the sheet with parchment paper or spray it with oil, but in general, this won't be an issue for cookies.

Nordic Ware Cookie Slider Aluminum Sheet

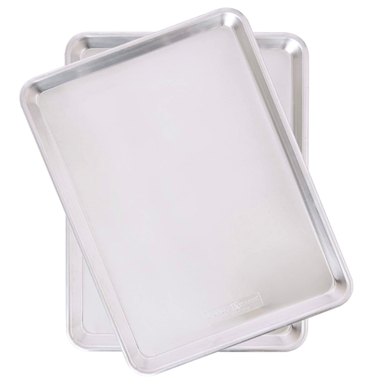
Honorable Mention: Nordic Ware Commercial Baker’s Natural Aluminum Half Sheet (2-Pack)

$27.50 on Amazon

However, if you do want a non-stick baking sheet, this commercial baker's half sheet (actually, you get two) from Nordic Ware is another of our picks. Made from pure aluminum that will never rust, each sheet has a baking interior of just over 12 inches by 17 inches. Due to the aluminum's superior heat conductivity, cookies (and other foods) will bake and brown evenly, and the reinforced steel rim prevents warping in high temperatures. It's one tough cookie (but your own cookies won't be). Though it's already non-stick, it's also compatible with parchment paper and silicone baking mats.

Nordic Ware Commercial Baker’s Natural Aluminum Half Sheet (2-Pack)

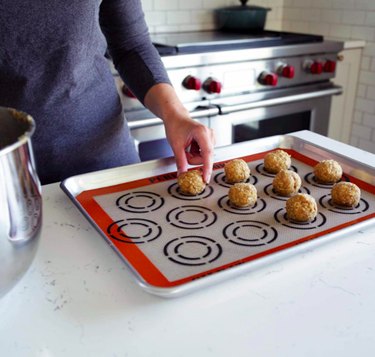
5. Best Baking Mat: Silpat Perfect Cookie Non-Stick Baking Mat

$22.25 on Amazon

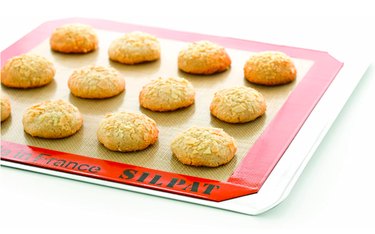
This reusable, non-stick baking mat is your secret weapon against burnt cookie bottoms. Plus, it's ideal for those looking to reduce one-time use items in their kitchen, such as parchment paper. Made in France using food-grade silicone, each mat features outlined spots to make a baker's dozen (13) of cookies: The smaller, interior circle serves as guide for placing the right-sized ball of dough, while the outer ring gives each ball of dough just enough space to bake perfectly without melding into neighboring cookies.

Measuring 11 5/8 inches wide and 16 1/2 inches long, it's intended for use on 13-by-18-inch pans. It's also safe up to 500 degrees Fahrenheit, down to -40 degrees Fahrenheit, making it oven-, microwave- and freezer-friendly. It's really built to last—unlike your cookies, which will surely disappear quickly once you offer them to friends and family! This mat is your secret weapon to baking consistent and superior cookies.

Silpat Perfect Cookie Non-Stick Baking Mat

Honorable Mention: Silpat Nonstick Silicone Baking Mat

Half Sheet – $23.49 on Amazon

Full Sheet – $37.75 at Food52

We also like this other silicone baking mat from Silpat. You can certainly bake cookies on it, but it doesn't come with the outlines of the other mat, in case you find them distracting when baking other items. Other than that, the half sheet is virtually identical to the Perfect Cookie Baking Mat. However, if you want a full sheet, it measures 16 1/2 inches wide and 24 1/2 inches long. The more, the merrier! Cookies, we mean.

Silpat Nonstick Silicone Baking Mat

Delicious Vegan Lasagna Recipe

0

It's hard to say no to homemade lasagna. This classic dish is right up there with spaghetti and meatballs! Fortunately, eating a vegan diet doesn't mean you can't chow down on this fan favorite. With ingredients like tofu and cashews, it's possible to make all the fixings for a dairy-free lasagna. Top things off with a protein-rich, plant-based tomato sauce and you're good to go. Ready to try it yourself? Check out the step-by-step tutorial below.

Vegan lasagna

Video of the Day

Tofu Cheeze

Things You\’ll Need

  • 14 ounces firm tofu

  • 1 tablespoon lemon juice

  • 2 tablespoons nutritional yeast

  • 1 teaspoon dried minced garlic (or garlic powder)

  • 1/2 teaspoon onion powder

Ingredients for tofu cheeze

Step 1

Drain the tofu. Using a fork or knife, break up the tofu into small pieces.

Break up tofu

Step 2

Place all of the ingredients in a food processor. Blend until combined, pausing every now and then to scrape down the sides.

If using a high-powered blender, you may need to add the ingredients in smaller batches.

Blend tofu cheeze ingredients

Tip

For silkier tofu cheeze, slowly add dairy-free milk or oil, one tablespoon at a time.

Step 3

Continue blending until you have reached the desired consistency.

Tofu cheeze

Cashew Spinach Ricotta

Things You\’ll Need

  • 1 1/2 cups cashews (soaked in water overnight)

  • 1 cup frozen chopped spinach, thawed and drained

  • 1/4 cup nutritional yeast

  • 2 tablespoons dried minced garlic

  • 1/4 cup oat milk

  • 1 tablespoon lemon juice

Ingredients for cashew spinach ricotta

Tip

For best results, soak the cashews in water for at least 6 hours, or overnight.

Step 1

Roughly chop up the soaked cashews.

Chop cashews

Step 2

With a paper towel, squeeze the spinach to remove as much water as possible. Repeat as necessary.

Squeeze frozen spinach

Step 3

In a food processor or high-powered blender, process all of the ingredients until combined. Again, if using a blender, you may need to work in batches.

Cashew spinach ricotta

White Bean Tomato Sauce

Things You\’ll Need

  • 28 ounces crushed tomatoes

  • 2 tablespoons tomato paste

  • 1 tablespoon olive oil

  • 1/2 medium yellow or white onion

  • 2 tablespoons minced garlic

  • 1 cup white kidney beans

  • 1 tablespoon brown sugar

  • 1 teaspoon dried oregano

  • 4 bay leaves

  • Salt and pepper, to taste

Tomato sauce ingredients

Tip

The beans offer a delicious source of plant-based protein. If you don't have white kidney beans on hand, feel free to substitute with chickpeas, seitan, or another plant-based protein.

Step 1

Chop the onion. In a pan over medium heat, warm the olive oil. Cook the minced garlic and onions until soft, about 10 minutes. Make sure the garlic does not burn.

Cook garlic and onions

Step 2

Without removing the onions and garlic, add the remaining ingredients.

Cook tomato sauce

Step 3

Mix well and add the bay leaves. Let the sauce simmer for 30 to 35 minutes, adding the kidney beans halfway through.

Once the sauce is done, remove the bay leaves.

White bean tomato sauce

Vegan Lasagna

Things You\’ll Need

  • Tofu cheeze

  • Cashew spinach ricotta

  • White bean tomato sauce

  • 1 package lasagna noodles, boiled and drained

  • 1 cup shredded dairy-free cheese

Vegan lasagna ingredients

Tip

Do you eat a gluten-free diet? Use thinly sliced zucchini or gluten-free noodles. If using zucchini, bake for an extra 10 to 15 minutes.

Step 1

Pre-heat the oven to 350 degrees Fahrenheit.

Add a layer of tomato sauce to the bottom of a lasagna dish.

Layer tomato sauce

Step 2

Continue building the lasagna, alternating between layers of tomato sauce, pasta noodles, tofu cheeze, and cashew spinach ricotta. Make sure you have enough sauce left over for the top layer.

Layer vegan lasagna ingredients

Step 3

For even more flavor, sprinkle shredded dairy-free cheese on top. Bake for 30 to 35 minutes.

Vegan lasagna

This vegan lasagna recipe is as simple as it gets. Feel free to add extra ingredients like sausage crumbles, fresh vegetables, or even chopped veggie burgers.

Vegan lasagna

Once you've mastered homemade tofu cheeze and cashew ricotta, keep them in mind for future recipes. They can be used to "veganize" classic meals like stuffed shells and sandwiches. Bon appétit, friends!

Vegan Cinnamon Sugar Cookies Recipe

0

Whether you're hosting a party or attending a potluck, you can't go wrong with these vegan cinnamon sugar cookies. They're delicious, flavorful and surprisingly easy to make. Plus, since this vegan recipe doesn't include ingredients like eggs and butter, you can be sure that everyone can enjoy your tasty treats. Read on to learn how to make vegan cookies in less than 30 minutes.

Vegan cinnamon sugar cookies

Video of the Day

Things You\’ll Need

  • 1 cup white sugar

  • 1/2 cup olive oil

  • 2 cups all-purpose flour

  • 1 teaspoon baking powder

  • 1 teaspoon baking soda

  • 1/4 cup non-dairy milk

  • 1 tablespoon vanilla extract

  • 1/4 teaspoon salt

  • 2 tablespoons brown or white sugar

  • 3 tablespoons ground cinnamon

Ingredients for vegan cinnamon sugar cookies

Step 1

Pre-heat the oven to 350° Fahrenheit.

In a large bowl, combine the sugar and oil.

Mix sugar and oil

Step 2

Add the non-dairy milk and vanilla extract. Mix well.

Add non-dairy milk and vanilla extract

Step 3

In a separate bowl, combine the flour, baking powder, baking soda, salt and 1 tablespoon of cinnamon.

Set aside the remaining 2 tablespoons of cinnamon.

Mix dry ingredients

Step 4

Add the dry ingredients to the wet ingredients. Combine until the mixture forms a dough.

It will seem dry and crumbly at first; this is normal. As the the dough clumps together, use your hands to roll the pieces together. The warmth of your hands will help soften the dough.

Vegan cinnamon sugar cookie dough

Step 5

Roll the dough into balls the size of standard meatballs.

Vegan cinnamon sugar cookie dough

Step 6

Combine the brown sugar and leftover cinnamon in a bowl or on a plate.

Coat each ball with the mixture. To evenly disperse the cinnamon sugar, re-roll each ball in between your hands.

Roll dough in cinnamon sugar

Step 7

Place the balls on a greased metal baking sheet. Bake for 12 to 14 minutes or until light golden brown. The cookies will naturally crack as they bake.

Once the cookies are cool, they are ready to eat.

Vegan cinnamon sugar cookies

For best results, store the cookies in a sealed airtight container. Enjoy!

How to Dehydrate Leeks

0

Things You\’ll Need

  • Cutting board

  • Sharp knife

  • Colander

  • Dehydrator

... Cut leeks into round slices before dehydrating them.

Leeks belong to the same family as garlic and onions, but are a much more mildly flavored cousin. They work well in many dishes containing potatoes such as potato leek soup or potato leek gratin. They can also stand in for onions in many recipes in which the onions are cooked, as leeks are not generally eaten raw. If you enjoy leeks, dehydrate some for later use. You can either rehydrate these leeks later or add them, still dehydrated, to very wet recipes such as soups.

Video of the Day

Step 1

Place one of your leeks on the cutting board and slice crosswise. Each slice should be between 1/8 and 1/4 inch thick, but consistency in size between the slices is more important than the exact thickness. Stop slicing when you approach the part of the leek where the first leaves branch away from the main stem. You should notice a difference in the ease of slicing or the sound your knife makes while slicing around this point. Stop as soon as this occurs. Repeat this for each leek you wish to slice.

Step 2

Put the leek slices into your colander and run cold water over them for several minutes. Leeks tend to accumulate dirt between their rings, so a thorough rinsing is very important. Separate the rings as you do this by pushing on the center of each ring. This will allow the layers to come apart so the water can thoroughly clean each leek piece.

Step 3

Lay the leek rings flat on your dehydrator trays, then stack the trays on your dehydrator.

Step 4

Turn the dehydrator to 100 F and dehydrate your leek slices until they are completely dry. This should take 18 to 20 hours depending on your dehydrator. Rotate your trays if and when necessary according to your particular dehydrator.

The Best Electric Composters in 2022

0

Pela Lomi Kitchen Composer

If you're familiar with traditional composting, you know that it's a slow process. It also takes up space in your yard and tends to smell bad. Even if you get a composting bin that keeps the worst odors at bay, the composting process still can take anywhere from four weeks to as much as a year. Fortunately, an electric composter (also known as a food recycler) solves some or even all of those problems.

Video of the Day

The Advantages of Electric Composters

Nearly all electric composters use a three-part process of drying, grinding and cooling to make compost, which is highly effective and requires much less effort on your part. Electric composters offer several advantages over conventional composting methods:

  1. They're fast:​ Instead of taking weeks, most electric composters turn your food scraps into nutrient-rich compost in a matter of hours—often in half a day or less. Some slower-working models may take two weeks, but that's still much faster than traditional composting methods.
  2. They're compact:​ Electric composters usually have a pretty small footprint, typically taking up less than three square feet of space on your kitchen counter. Using an electric composter instead of a traditional compost pile can help you save space in your yard and keep it neat and clean.
  3. They're versatile:​ Electric composters aren't also known as food recyclers for nothing! They'll take pretty much anything—fruits, vegetables, meat, dairy, processed foods, egg shells and even some bones. Conversely, traditional compost piles or composting bins aren't as all-encompassing. Food recyclers are a great way to reduce food waste in your home.
  4. They reduce or eliminate odors:​ Electric composters largely eliminate odors using activated carbon filters. They also eliminate methane. While pure methane has no odor of its own, when combined with the sulfur compounds present in many of the foods you're probably composting, it can reek.
  5. They eliminate methane:​ Methane emissions also drive climate change. Compost piles and composting bins release methane into the atmosphere, which contributes to global warming. Electric composters, however, eliminate methane through their aeration process.
  6. They reduce food waste:​ Instead of throwing away food scraps that will eventually take up space in landfills (which are already overflowing), you can repurpose your food waste by turning it into fertilizer. The drying and grinding process of an electric composter already shrinks your food waste considerably, so even if you do end up occasionally throwing out a batch of compost, it makes a difference.

Whether you're experienced with composting or new to the concept, if you've got a home garden, investing in an electric composter can help your green thumb thrive. Have you botany new plants lately?

Kitchen waste recycling in composter

What to Consider When Purchasing an Electric Composter

Size:​ While most electric composters are designed to be compact, if you plan on setting it on your kitchen countertop, how much space it takes up is worth considering. Many electric composters take up about as much space as an air fryer and have a footprint of less than 2.5 square feet, but some high-capacity models can be larger.

Amount of Time It Takes:​ All electric composters will be considerably faster than a traditional compost pile or compost bin, but there is still some range in how quickly they work. Some models produce compost in as little as three hours, but some may take a couple of hours longer. A matter of hours likely won't affect your gardening plans, but keep in mind that some electric composters make noise while in operation, so being able to work quickly is a plus.

Capacity:​ Most electric composters can process between 2 pounds and 5 pounds of food waste at a time, with an average of around 3 pounds. The ideal capacity mostly depends on how much food waste you produce and how much you want to compost at once.

Aeration System:​ Look for an electric composter with an excellent aeration structure. It should provide sufficient room for your food scraps to turn and break down while releasing the gases.

Costs:​ Electric food composters typically fall within the $300 to $700 price range, with some models even exceeding $700. More expensive doesn't necessarily mean better. Another thing to keep in mind is the potential cost of buying enzymes or additives, if needed.

With these considerations in mind, we've rounded up some of the best electric composters in 2022.

Peeled vegetables on chopping board, white compost bin on wooden background. Top view of kitchen food waste collected in recycling compost pot.

The Best Overall Electric Composter

Vitamix FoodCycler FC-50

$299.95 at Amazon

The FoodCycler FC-50 is our top choice for its unbeatable mixture of convenience, versatility and value. Measuring just over 12 1/2 inches long, 11 inches wide and 14 1/5 inches tall, it takes up less than one square foot of your kitchen countertop. Despite its compact size, it boasts a 2-liter capacity (approximately 4.4 pounds) and cuts down the volume of food waste by up to 90%. It accepts all types of food waste, including meat, fish, eggs, dairy and bones so it will be easy to cut down on what goes into the trash.

It's also extremely easy to use. Simply pour in your food scraps, close the lid and press the power button—no enzymes or additives required. Plus, it's virtually odorless and noiseless, thanks to its carbon filter lid and quiet cycle. Its removable waste bucket and bucket lid are dishwasher-safe. Each composting cycle takes between 4 to 8 hours, so it may be a good idea to let it run overnight. Overall, the FoodCycler sets a high benchmark for its ease of use and affordability.

Vitamix FoodCycler FC-50

Other Great Electric Composters

beyondGREEN Electric Tumbler Composter

$429.99 at beyondGREEN

Another excellent choice is the beyondGREEN electric composter. It's a bit larger than the FoodCycler model, measuring 19 inches long, 11 inches wide and 19 inches tall, but still occupies less than 1.5 square feet. It takes considerably longer to produce compost than the FoodCycler (two weeks), but still produces results much more quickly than a compost pile or traditional compost bin, which can take months. One benefit you get in exchange for the longer processing time is that it's very quiet. How? Its motor turns on for only 15 minutes. The rest of the time, the composter uses heat to cure your food waste and turn it into compost.

The beyondGREEN electric composter is also versatile in that you're not limited to using traditional composting scraps like fruits and vegetables; it also composts meat, dairy, pet waste, biodegradable bags and yard waste. It can process up to 5 pounds of food and pet waste per day. It's constructed from waterproof polypropylene (PP), so you can even leave it outside after the motor turns off. For home gardeners who want to speed up their composting process but don't need the extremely quick results of the FoodCycler, this is a great option.

beyondGREEN Electric Tumbler Composter

Compostology GG-02 Automated Composter

$999.00 at Compostology

For those willing to splurge, Compostology's GG-02 model is sleek, modern and offers a high output of compost. You can input up to 8 pounds of food waste per day (up to 240 pounds a month and 2 tons a year), thanks to its larger size. While it's not exactly countertop-friendly, it still occupies relatively little space, measuring approximately 18 inches square and 30 inches tall, or roughly the size of a kitchen trash can. It produces compost in 24 hours and reduces food waste volume by up to 90%.

The GG-02 is very easy to use. All you have to do is open the lid and pour food scraps inside. Once the lid is closed, Compostology's proprietary Acidulo® microbes, combined with heat and rotation, begin composting food waste immediately—you don't even have to press a button. It comes with a one-year manufacturer's warranty.

Compostology GG-02 Automated Composter

Pela Lomi Kitchen Composer

$499.99 at Poosh

The Lomi kitchen composter uses new technology to not only break down food waste, but bioplastics as well. Whereas some electric composters mainly just dehydrate food waste, the Lomi composter offers several composting cycle lengths that create a nutrient-rich compost.

The shortest cycle, called Eco-Express Mode, takes just four hours and reduces waste volume by up to 80%. It's perfect for when you simply want to get rid of food waste quickly. The mid-length cycle, called Lomi Approved Mode, takes 10 hours and breaks down Lomi-approved bioplastics. The longest cycle, called Grow Mode, takes approximately 20 to 24 hours and produces nutrient-rich compost that is ready for gardening.

The Lomi composter accepts all types of food waste, including fruits, vegetables, meat and dairy, as well as Lomi-approved biodegradable products and yard waste. It can hold up to 3 liters (6.6 pounds) of food waste at a time and measures 16 inches long, 13 inches wide and 12 inches tall—small enough to sit on your kitchen counter. It's made from recycled plastics and metal and the waste bucket is dishwasher-safe.

Pela Lomi Kitchen Composer

The Best Egg Cookers in 2022

0

Egg cooker on the kitchen table. 3D rendering

Boiling eggs may be simple in theory, but the truth is, unless you're some kind of egg wizard, they often come out overdone, forming those unappetizing-looking green rings around the yolks that indicate they're overcooked. Not to mention, boiling them on the stove can take what feels like ages while requiring your close attention, making it difficult to multitask. This is where an egg cooker can be an egg-cellent investment.

Video of the Day

Egg cookers (for the most part) are electric countertop appliances that use steam to rapidly cook eggs, while some egg cookers are designed for use in the microwave. The most basic egg cookers will allow you to quickly make hard- or soft-boiled eggs, but some fancier electric egg cookers are capable of making eggs in a variety of styles, including poached, scrambled, over-easy and even omelets. And if you hate peeling eggs boiled on the stove, many egg cookers cook eggs in such a way that their shells easily slide off—so you no longer have to worry about tiny little fragments remaining or making a mess. Whether you're an egg lover or a casual egg eater, an egg cooker will make your life in the kitchen easier.

What to Consider When Purchasing an Egg Cooker

Egg Capacity:​ Virtually all egg cookers can cook multiple eggs at once, so it depends on your needs. Compact egg cookers can usually cook four eggs at once, while larger egg cookers can cook up to a dozen or more. However, keep in mind that hard-boiled eggs spoil more quickly than raw eggs, so if you're not planning on eating tons of eggs within a relatively short period, the ability to cook large quantities at once may not be as important.

Size:​ Generally, egg capacity and egg cooker size are directly related. If you've got a gourmet kitchen with ample space, a larger egg cooker capable of cooking large batches of eggs may not be a bad idea, but if you're tight on counter space or cupboard space, a compact option probably makes more sense. You don't have to pay more for what you don't need.

Microwaveable Versus Electric:​ Most egg cookers are electric appliances that will sit on your countertop, but some don't need to be plugged in—but do require a microwave. Microwaveable egg cookers tend to be less fancy than electric egg cookers, but usually take up less space. While it may be difficult or impossible to make an omelet using a microwavable egg cooker, most are usually capable of making scrambled eggs.

Controls and Features:​ Many egg cookers, especially the most compact ones, have very simple and basic controls to get the job done, but more advanced cookers may include features such as lights and audible alerts to let you know when your eggs are done cooking. If you're a busy bee in the kitchen, these extra features may help you keep your rhythm.

Automatic Shutoff:​ Some egg cookers will shut off automatically once the job is done as a helpful safety feature and to ensure your eggs don't overcook.

Other Cooking Options:​ The more basic egg cookers will enable you to cook hard-boiled, soft-boiled and poached eggs, but more advanced egg cookers may come with accessories for cooking a wide variety of egg styles, including scrambled eggs, fried eggs and even omelets. If you love all kinds of egg styles or simply value versatility in an appliance, it's something to consider.

With these factors and criteria in mind, here's our list of the best egg cookers in 2022.

Sip it slowly

The Best Overall Egg Cooker

Cuisinart Egg Central Egg Cooker

$39.95 at Amazon

Cuinsart's high-end egg cooker can cook up to 10 eggs at once using two different tiers enclosed within its egg-shaped dome. It's perfect for steaming eggs in their shell to make hard-, medium- and soft-boiled eggs, but that's not all it can do. It also comes with a removable tray that lets you poach four eggs at once or make a two-egg omelet. The egg cooker includes a 180-milliliter measuring cup for measuring water (the amount of water used determines the cooking time) and the cooker features a simple on-off switch, a blue LED light, an audible alert when the eggs are finished and a standby mode that prevents the eggs from overcooking. The measuring cup also includes a piercing pin to make it easier to remove the egg shells. Cuisinart's egg cooker combines speed, capacity, versatility and thoughtful design, making it hard to beat.

Cuisinart Egg Central Egg Cooker

Runner-Up Best Overall Egg Cooker

Dash Rapid Egg Cooker

$19.99 at Amazon

This next-best egg cooker includes nearly everything we love about Cuisinart's egg cooker, except that it can't cook as many eggs at once. Dash's egg cooker can cook up to six eggs at a time, but in spite of its middling capacity, it has a lot to offer. It covers the basics, like cooking hard-, medium- or soft-boiled eggs, but also allows you to make poached eggs, scrambled eggs and individual omelets all in a matter of minutes, thanks to a separate poaching tray. The cooker features automatic shutoff to prevent overcooking and a loud alarm to alert you when your eggs are ready. Plus, it comes with a long cord to make it easier to reach your kitchen outlets. The non-electrical pieces are dishwasher-safe and the egg cooker comes in a variety of colors.

Dash Rapid Egg Cooker

The Best Large-Capacity Electric Egg Cooker

Bear Egg Cooker

$17.99 at Amazon

If you're a bona-fide egg lover or simply want to meal prep in large batches, the Bear Egg Cooker is your friend. It can boil up to 14 eggs at once, making it ideal for putting together party platters (devilled eggs, anyone?) and saving you time. It features a double-tier rack that holds seven eggs on each tier. The egg cooker shuts off when your eggs are ready to prevent overcooking and the indicator light also turns off to let you know your eggs are finished. In addition to boiling eggs, it also handles poached eggs and small omelets via a separate omelet tray. You can even use the omelet tray to steam other items such as vegetables and seafood, if you're willing to experiment. The egg cooker comes with a measuring cup that includes a piercer to make it easy to remove egg shells. The only caveats are that the cooker is a bit difficult to store, owing to its tall dome shape, and there's no sound to alert you when your eggs are ready.

Bear Egg Cooker

The Best Microwavable Egg Cooker

Nordic Ware Microwave Egg Boiler

$13.00 at Amazon

Instead of plugging into a kitchen outlet, this egg boiler goes straight into the microwave and steam-cooks hard-, medium- and soft-boiled eggs in ten minutes or less. Thanks to its design that shields the eggs from the microwave, you don't have to pierce the egg shells before putting the eggs inside. The microwave heats the water, allowing your eggs to steam-cook without direct contact with the microwave, eliminating any worry that they may explode while producing evenly-cooked eggs without hotspots. You can cook only four eggs at once, but the upside is that the cooker is non-electric and dishwasher-safe—although it usually creates little mess anyway, so a quick hand-wash will usually suffice. Since microwaves vary in size and power, it may take some experimenting, but once you figure out what works best with your microwave, you'll get consistent results each time.

Nordic Ware Microwave Egg Boiler

The Best Budget-Friendly Electric Egg Cooker

Copper Chef Electric Egg Maker

$19.99 at Amazon

This budget-friendly egg cooker is ideal for those who don't want to, ahem, shell out a lot of cash, but don't be fooled by the low price tag—this egg cooker is no yolk. It's compact and clocks in at under 2 pounds, and yet, it cooks up to 14 eggs at once, thanks to its two-tier design. With the touch of a button, you can make perfect hard-, medium- and soft-boiled eggs, but that's not all; the egg cooker also comes with a poaching insert and omelet ring to make up to four poached eggs or two omelets at once. It also includes a measuring cup. Other points in its favor include automatic shutoff to prevent overcooking and dishwasher-safe parts. There's no audible alarm to let you know when your eggs are finished cooking, though.

Copper Chef Electric Egg Maker

The Best Egg Cooker for Egg Bites

Hamilton Beach Egg Bite Cooker and Poacher

$24.00 at Amazon

For anyone who loves the delicious, savory egg bites you can get from coffee shops like Starbucks, you can save money by making them at home with the Hamilton Beach Egg Bite Cooker and Poacher. It uses the sous vide method to make two English muffin-shaped egg bites at a time, right on your countertop. The tray molds the shape for you and allows you to customize your egg bites with cheese, sausage, bacon crumbles, spinach or whatever you desire. In addition to making egg bites, the egg bite cooker can also make poached eggs. It's easy to use and features a power light that indicates when the cooker is turned on and another light that turns on when your egg bites are done cooking. The non-stick tray is dishwasher-safe for easy cleanup and there aren't a lot of pieces to keep track of, making this the easiest way to make egg bites at home.

Hamilton Beach Egg Bite Cooker and Poacher

How to Use an Air Pot

0

Air pots are commonly used in catering or at gatherings to serve hot or cold beverages. Air pots are insulating like a thermos. Hot beverages will stay hot for several hours, and cold beverages will stay cold. Air pots have a pump that dispenses a few ounces at a time by using air pressure, hence the name. Air pots are preferred over using a hot plate or percolating dispenser because of their simplicity and insulating capacity, although they do require a little more care.

Step 1

Rinse out your air pot prior to filling it. Even if it has been cleaned recently, go ahead and give it a little rinse. If the air pot has been sitting closed, it could have retained a slight odor. Rinsing will give your coffee, hot water or half-and-half a fresh start.

Video of the Day

Step 2

Close the lid and adjust so the guest can use the pump feature. With some air pots, you have to physically lift the pumping mechanism that is attached to the lid. Others have a push button that activates the pump with no adjusting necessary.

Step 3

Refill if necessary. Air pots have a pretty distinctive "empty" sound when someone has pumped out the last of the liquid inside; the customer will usually tell you when you need to refill the pot.

Step 4

Clean your air pot carefully. These are made with glass insulation that has been vacuum-sealed into the container. You can't just toss them into a dishwasher or a sink full of dishes; if you do so, they may break. The best way to clean air pots is to rinse them well with hot water. Add a teaspoon of baking soda. Fill it back up with hot water; soak the air pot overnight with the lid ajar.

Tip

Don't leave milk in your air pot over night. This could cause the inside of your air pot to smell sour, making it difficult to clean. It may then be unusable for anything other than milk in the future.

Grilled Salmon Kabobs Recipe

0

Grilled salmon kabobs are an easy and nutritious option for grilling year-round. All you need are a few basic ingredients, a grill, and some skewers to prepare this all-star entree. Feel like spicing them up by using various spice blends or adding vegetables? No problem! There is plenty of room to adapt these salmon kabobs to your personal taste. Let's get started!

salmon skewers on a plate Grilled Salmon Kabobs with lemon Image Credit: Julia Mueller

Video of the Day

Things You\’ll Need

  • 1 (1 1/2 lb) salmon fillet

  • 3 large lemons, sliced

  • 2 tbsp avocado oil or high-temperature cooking oil

  • 1/2 tsp sea salt

  • 1/2 tsp cracked black pepper

Step 1

Preheat your grill to medium-high heat.

Gather your ingredients. Place the salmon on a cutting board and chop into 1/2-inch cubes, then slice the lemons. If you're incorporating additional ingredients (such as zucchini, onion, tomato, pineapple, mango, etc.), chop them now, as well.

salmon fillets on a cutting board Ingredients for salmon kabobs Image Credit: Julia Mueller Chopped salmon and sliced lemon on a cutting board Chop the salmon and slice the lemons Image Credit: Julia Mueller

Step 2

Thread the salmon cubes and lemon slices onto 6 metal skewers.

skewer with salmon and lemon 
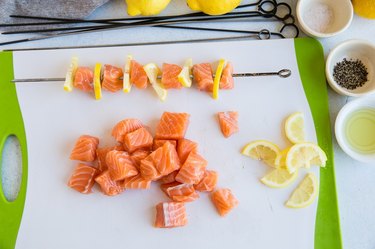
Thread the salmon and lemon slices onto the skewers Image Credit: Julia Mueller

Tip

If using wooden skewers, be sure to pre-soak them in water for at least 15 minutes before using so that they don't catch fire on the grill.

Step 3

Once you're finished preparing the skewers, generously coat them with avocado oil (or a high-temperature cooking oil).

salmon and lemon skewers on a cutting board Brush skewers with avocado oil. Image Credit: Julia Mueller

Step 4

Sprinkle with sea salt and pepper. You can also add any of your favorite spices and herbs!

salmon kabobs being sprinkled with pepper 
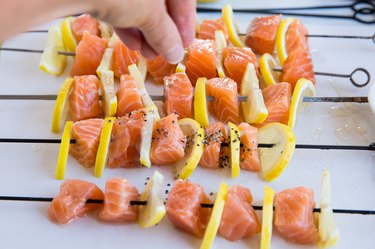
Season with sea salt and pepper. Image Credit: Julia Mueller

Step 5

Place skewers on the preheated grill. Grill 2 to 3 minutes until grill marks appear, then use tongs to carefully rotate the skewers. Grill an additional 2 to 3 minutes then flip again.

Continue grilling and flipping until salmon is opaque and cooked through, about 5 to 8 minutes total. Serve with your favorite side dishes, and enjoy!

salmon kabobs on a plate 
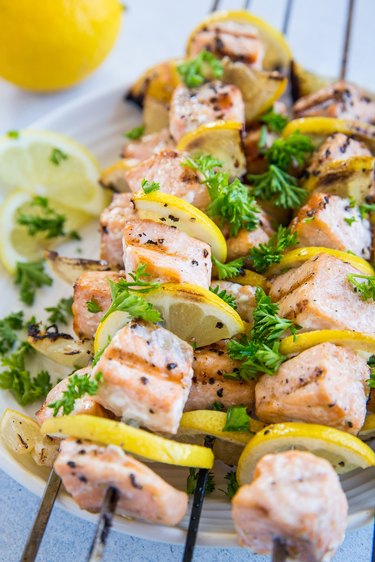
Grill 5 to 8 minutes, until cooked through. Image Credit: Julia Mueller

DIY Thanksgiving Turkey Cupcakes

0

Of all the festive treats you can make for Thanksgiving, these turkey cupcakes might be the cutest. But they're not just fun to look at, they're a delight to eat because perched on top of a yummy cupcake is a turkey assembled with assorted candies and Oreo cookies. So yes, you can say this turkey is definitely stuffed. And it's one your guests will want to gobble up.

turkey cupcakes

Video of the Day

Things You\’ll Need

  • Cupcakes

  • Frosting

  • Orange icing dye

  • Chocolate sprinkles

  • Chocolate candy melts

  • Oreo cookies

  • Candy corn

  • Chocolate truffles

  • Whoppers

  • Candy eyeballs

  • Pull 'n' Peel Twizzlers

materials

Prepare Cupcakes and Frosting

Step 1: Bake Cupcakes

Using your own recipe or a box mix, bake cupcakes in any flavor you desire. Fill the cupcake liners only about two-thirds full of batter, as we want cupcakes that rise just to the rim of the liners. If the cupcakes are too high and rounded, go ahead and cut off the tops with a knife so they are flat.

cupcakes

Step 2: Dye the Icing

Make your own buttercream frosting from scratch or use a pre-packaged tub from the supermarket. You can leave the frosting as is, but I like to give it some orange color so it pops against the Oreo cookies that will sit on top of the cupcake. To color white frosting orange, add a few drops of orange icing dye and stir well. Keep adding dye until the frosting is a bright orange.

icing dye

Step 3: Frost the Cupcakes

Using a spatula, apply a flat layer of frosting to cover the cupcakes.

frosting

Step 4: Add Sprinkles

Add some chocolate sprinkles on top of the frosting, especially around the perimeter.

sprinkles

Assemble the Tail Feathers and Body

Step 1: Heat the Chocolate Candy Melts

The "glue" that will be holding all the elements together is chocolate candy melts. Place some candy melts in a microwave-safe bowl, and heat in the microwave for 30-minute intervals, stirring until smooth.

candy melts

Tip

The candy melts work best as a "glue" when they have cooled down. Fresh out of the microwave, they will be too warm and liquid to provide much hold. As the chocolate candy melts cool and harden slightly, they will hold elements together better. Look for the consistency of thick frosting.

Step 2: Apply Melted Chocolate to Candy Corn

With a skewer or a treat stick, apply a dab of melted chocolate on the pointy end of one side of the candy corn.

candy corn

Step 3: Attach Candy Corn to Oreo

Place seven pieces of candy corn chocolate side down onto an Oreo cookie so they are fanned out like a turkey's tail feathers. Leave them undisturbed so the chocolate candy melts set and hold the candy corn in place.

tail feathers

Step 4: Attach Chocolate Truffle to Oreo

The body of the turkey will be a chocolate truffle like the Lindor truffles used in this example. We're placing it on an Oreo cookie, as the Oreo helps stabilize the turkey and keeps it from sinking into the frosting or falling off of it. Dip the truffles in some of the candy melts, and place them on one edge of the Oreo cookies. Allow the chocolate candy melts to set so the truffles stay in place.

truffles

Step 5: Attach the Body to the Feathers

Apply some of the melted chocolate to the bottom of the Oreo holding the feathers. Use a skewer, treat stick, or just dip the cookie in the melted chocolate.

cookie feathers

Then apply some melted chocolate to the back of the truffle, i.e., the side closest to the center of the cookie.

back of truffle

Place the Oreo with the tail feathers perpendicular on the Oreo holding the body. The chocolate on the bottom of the upright Oreo will adhere to the Oreo that's sitting flat. Likewise, the melted chocolate on the back of the truffle will hold the body to the upright Oreo. Allow the melted chocolate to set. If you wish, place these in the refrigerator to speed up the cooling of the chocolate.

body attached

Create the Turkey Head

Step 1: Make the Beaks

Cut the pointy tips off some candy corn so there is some the orange part remaining with all of the white. What a perfect beak!

beaks

Step 2: Attach Beaks to Heads

For the head, we're using Whoppers. Put a dab of melted chocolate on the wide end of the beak, and place it in the center of the Whopper. Remember, the melted chocolate works best as a glue when it is cool and thickened. It will bond the beak to the head almost instantly.

attach beak

Step 3: Attach Eyes

Apply a dab of melted chocolate to candy eyeballs, and place one on either side of the beak. You can find candy eyeballs in the cake decorating aisle of the supermarket or crafts store.

eyes

Step 4: Attach the Snood

The snood, which is the red protrusion that hangs on the turkey's head, is optional for these turkey cupcakes, as we're not aiming for anatomical accuracy. However, it is a fun element to add if you wish. Plus, it means more candy. To make the snood, pull a thin strand from a Pull 'n' Peel Twizzler. Then tear off a half-inch piece of the strand.

twizzler

Attach the snood to one side of the beak with some melted chocolate. Again, the chocolate needs to be cool and thick for it to bond the separate pieces.

snood

Step 5: Attach the Heads to the Bodies

Apply some melted chocolate to the back and bottom of the head, and place it on top of the body.

head and body

Finish with the Feet

Step 1: Cut the Feet

Cut the yellow part off of some candy corn. They make very cute duck feet.

yellow candy corn

Step 2: Attach the Feet

Apply a dab of melted chocolate to the bottoms of the feet, and position them on either side of the body on top of the Oreo cookie.

feet

Step 3: Place the Turkey on the Cupcake

Now that the turkey is complete, place it on top of the frosted cupcake. Happy Thanksgiving!

finished turkey cupcake

Easy to Make Pickled Jalapenos Recipe

0

Pickled jalapeños are a wonderful sandwich topper. They're also a great way to add spice to various snack foods such as homemade nachos. While you can purchase them jarred at the store, pickled jalapeños are incredible easy to prepare at home, and with this simple recipe they come together in no time!

Pickle Jalapeños With This Easy Recipe | eHow

Video of the Day

Things You\’ll Need

  • 1 cup distilled white vinegar or white wine vinegar

  • 1 cup water

  • 3 to 4 tablespoons granulated sugar

  • 1 tablespoon black peppercorns

  • 2 tablespoons kosher salt or 1 tablespoon pickling salt

  • Optional: 1 large garlic clove, smashed

  • 15 large or 20 medium jalapeño peppers (or a mix)

Step 1: Gather Your Ingredients

This recipe will work with either green or red jalapeños (it's fun to use a mix of colors for more festive looking results). You can also swap out the jalapeños for other options such as serrano or banana peppers. Use what you like and/or what's available to you. Three tablespoons of sugar will offer a subtle sweetness, while 4 tablespoons will give slightly more pronounced results.

Pickle Jalapeños With This Easy Recipe | eHow

Step 2: Prepare the Brine

In a medium-sized saucepan, bring the vinegar, water, sugar, black peppercorns, salt and garlic to a boil, stirring once or twice to help the sugar dissolve. Reduce the heat to a simmer.

Pickle Jalapeños With This Easy Recipe | eHow

Step 3: Slice the Jalapeños

While the brine is heating up, cut the jalapeños into 1/4 inch slices, discarding the stems.

Tip

Always use kitchen-safe gloves while working with hot peppers. The oils can burn your fingers or worse (your eyes), if your fingers accidentally touch them.

Pickle Jalapeños With This Easy Recipe | eHow

Step 4: Add the Jalapeños to the Brine

Add the jalapeños to the brine and bring the heat back up to a boil. Immediately remove the saucepan from the heat and allow the mixture to rest for 10 minutes.

Pickle Jalapeños With This Easy Recipe | eHow

Step 5: Cool and Store

Transfer the pickled jalapeños to a jar with a tight-fitting lid and store in the refrigerator for up to 2 months.

Pickle Jalapeños With This Easy Recipe | eHow