Home Blog Page 48

Tater Tot Nachos Recipe

0

Tater tots are the perfect base for creating an epic nacho platter worthy of any potluck or weekend game day nosh session. (Or really any time you're just plain hungry!) You're going to love piling on your favorite nacho toppings to create this delicious, easy, and addictive, appetizer.

Tater Tot Nachos Recipe

Video of the Day

Things You\’ll Need

  • 3 cups tater tots

  • 2 cups of shredded cheese (I used a combo of cheddar and Monterey jack)

  • 1/2 cup black beans, rinsed and drained

  • 1 jalapeno, sliced thinly

  • 1/2 cup chopped cilantro

  • 1/2 cup thinly sliced green onions

  • Salsa

  • Sour cream

  • Avocado

Tater Tot Nachos Recipe

Tip

Feel free to add ingredients such as pulled chicken or pork, or fajita steak meat to make this a heartier dish. You can also add or omit any ingredients to fit your taste buds! (We also recommend making this meaty topping!)

Step 1: Partially Bake Tater Tots

Preheat the oven to 350 degrees. Spread tater tots in an even layer on a baking sheet lined with parchment paper and bake for 20 minutes until they are almost done. If using non-frozen homemade tots, you can skip this step.

Step 2: Add Black Beans and Cheese

Bake the nachos for another 15 to 20 minutes until the cheese is melt-y, beans are warmed, and the tots have cooked through. If you are adding meat, you would add it at this point as well with the beans and the cheese.

Tater Tot Nachos Recipe

Step 3: Top with Fresh Ingredients

Once the nachos come out of the oven, top with jalapeno, cilantro, green onions, and avocado. Serve immediately with salsa and sour cream on the side.

Tater Tot Nachos Recipe Tater Tot Nachos Recipe Tater Tot Nachos Recipe

These nachos are seriously addictive and I love that you can switch up the ingredients and flavors to customize them to make them your favorite flavor combinations.

What Is the Fastest Way to Empty a Keg?

0

... Empty liquids from your kegs to keep them clean.

The quickest and easiest way to drain the liquid from a keg is by twisting off its lid and pouring out its contents. The method is less time-consuming than pumping out the liquid by hand. It also can ready any keg promptly for cleaning, recycling, re-purposing or other uses.

Video of the Day

Step 1

Release leftover pressure in the keg by switching on its pressure-relief valve, which is a round key on the keg's lid.

Step 2

Push the keg's lid down while turning the lid 90 degrees. Lift the lid, and remove it from the keg.

Step 3

Pour out liquid from within the keg.

Tip

Drain the keg quickly for cleaning if you hope to extend its party life because damaging bacteria, yeast and other microbes thrive in a keg left holding liquid such as beer and soda.

How to Freeze Apple Slices

0

Things You\’ll Need

  • 4 cups water

  • Saucepan

  • 2 1/2 cups sugar

  • Lemon juice

  • Shallow bowl

  • 3 lbs. apples

  • Knife

  • Zipper type freezer bags

  • Cookie sheets

...

There are two different ways to freeze apple slices depending on how you want to use the slices at a later date. If you plan to use the apples for uncooked desserts, you will want to freeze the slices in syrup. If you plan to use them in pies, cobblers or other cooked dishes, you can freeze the slices safely without adding sugar syrup. Ether way, freezing the slices allows you to preserve the harvest or take advantage of grocery store sales when apples are in season and least expensive.

Video of the Day

Apple Slices in Syrup

Step 1

...

Warm 4 cups of water to lukewarm temperature in a saucepan.

Step 2

...

Stir in the sugar into the water until fully dissolved.

Step 3

...

Chill the sugar solution until cold.

Step 4

...

Slice the apples into 1/4 inch slices. You can peel the apples first or leave the peels on the fruit.

Step 5

...

Fill a shallow bowl with lemon juice and dip the slices into the juice. This will prevent discoloration of the apple slices.

Step 6

...

Place the apple slices into the chilled syrup. Transfer the slices, in the syrup, into zipper type freezer bags, label and freeze.

Apple Slices without Syrup

Step 1

...

Pour approximately 1 inch of lemon juice into a shallow bowl.

Step 2

...

Peel and core the apples. Slice into 1/4 inch slices.

Step 3

...

Dip each slice into the lemon juice, ensuring that the slice is completely covered. This will prevent browning of the slices.

Step 4

...

Arrange the apple slices in a single layer on cookie sheets.

Step 5

...

Place the cookie sheets in the freezer and freeze the slices for 4 to 6 hours. Slide the frozen slices into freezer bags, label and place back into the freezer to store.

Tip

You can also find products in the canning supply aisle that will help prevent browning of fruits, if you prefer not to use lemon juice.

Detox Smoothie with Spirulina Recipe

0

Spirulina is one of the earth's most abundant and sustainable superfoods and contains a healthy dose of antioxidants to help cleanse your system. This chlorophyll-rich food helps remove heavy metals from your body and also helps stabilize blood sugar. Stemming from blue-green algae, spirulina is a powder that can easily be added to any of your smoothies to provide a boost of protein, B vitamins, iron, and calcium.

Glass of spirulina smoothie How to make a healthy detox smoothie with spirulina Image Credit: Julia Mueller

The flavor of spirulina can be a little off-putting to some people, which is why it's always a good idea to choose naturally sweet and flavorful ingredients such as banana, mango, and orange juice to help keep the smoothie delicious as well as nutritious. This easy recipe can be adapted using virtually any fruit (and many vegetables can be added, too) in order to cater to your dietary needs as well as please your palate.

Things You\’ll Need

  • 1 cup orange juice

  • 1 large ripe banana

  • 1 cup frozen mango

  • 1 teaspoon spirulina

  • 1 scoop protein powder, optional

  • 1 teaspoon chia seeds

  • 1 teaspoon hemp seeds

Tip

For added nutrients and detox benefits, add 1/4 cup cooked beets or blueberries, and/or 1 cup of baby spinach or kale.

You can use any type of fruit or juice to change up the flavor profile of this smoothie.

Step 1: Add Ingredients to Blender

This easy recipe only requires a few simple actions. Simply gather up your ingredients, add everything to a high powered blender, and blend until completely smooth.

ingredients for detox spirulina smoothie 
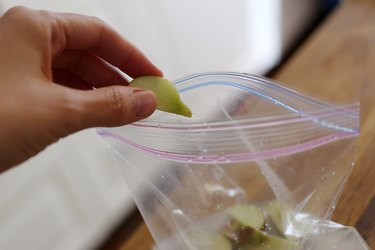
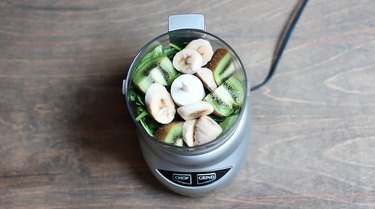
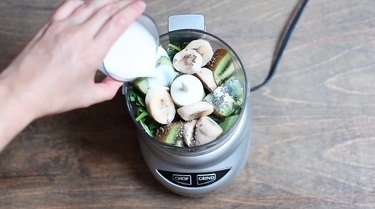
gather your smoothie ingredients Image Credit: Julia Mueller

Step 2: Pour Into a Glass and Enjoy!

Pour the smoothie into a tall glass, and garnish with additional chia seeds, hemp seeds, and/or fruit and granola for some extra pizzazz.

A glass of smoothie with chia and hemp seeds on top 
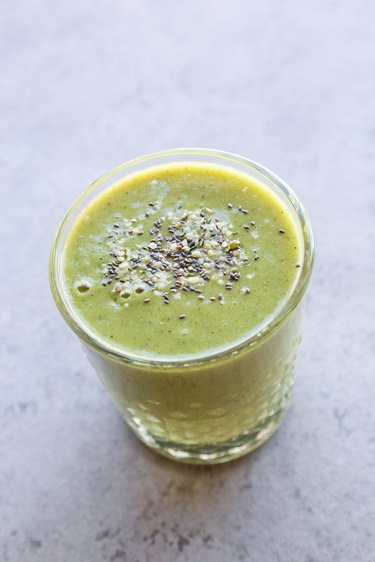
Tropical detox smoothie with spirulina Image Credit: Julia Mueller

Gluten-Free Low-Carb Donuts

0

It happens without fail. Right after committing to a healthy diet, someone walks in with a dozen, fresh-from-the-shop donuts. All of sudden your cup of coffee looks mighty lonely without something yummy to dunk into it. What to do? Run! To the kitchen, that is, and whip up a batch of these delicious no-guilt, low-carb coconut flour cake donuts packed with fiber and healthy fat. Unlike most low-carb donuts that are baked, these are first baked and then deep fried for that authentic donut taste. It's true, health-conscious eaters. Donuts are back on the menu, so do your happy dance!

Healthy coconut flour low carb chocolate covered donuts with sprinkles.

Watch the Video Tutorial

Things You\’ll Need

  • ½ cup coconut flour

  • ¼ cup sweetener (I prefer Swerve granular)

  • ¼ tsp salt

  • 1 tsp baking powder

  • ¼ tsp powdered stevia extract (I used SweetLeaf brand)

  • 4 eggs

  • ¼ coconut oil, melted

  • ¾ cup buttermilk (or coconut milk)

  • ½ tsp vanilla

  • Coconut oil for frying

  • 3 ounces sugar-free dark chocolate baking chocolate chips (optional for chocolate coating )

  • 1 tablespoon coconut oil (optional for chocolate coating)

  • All natural baking sprinkles (optional)

  • 6-cavity donut pan

Step 1

Preheat your oven to 325 degrees Fahrenheit. In a mixing bowl, whisk together the coconut flour, sweetener, salt, baking powder, and stevia powder.

Whisking dry ingredients for healthy coconut flour donuts.

Step 2

Add eggs, melted coconut oil, buttermilk (or coconut milk), and vanilla.

Mixing ingredients for healthy coconut flour low carb donuts.

Use a handheld or stand mixer to blend into a thick batter. It will hold its shape like soft cookie dough, and it won't be runny like pancake batter.

Mixing ingredients for healthy coconut flour low carb donuts.

Step 3

Grease a 6-cavity donut pan and fill each approximately ⅔ full.

Batter for healthy coconut flour low carb donuts in silicon donut pan.

Step 4

Bake the donuts at 325 degrees Fahrenheit between 20 to 22 minutes until they spring back when pressed, but are not browned. Allow to cool slightly in the pan so they are firm enough to remove from the mold without breaking. Transfer to a wire rack. They may appear sponge-y after baking, but will have a denser texture (like classic cake donuts) when fully cooled.

Healthy coconut flour low carb donuts on wire baking rack.

Step 5

Heat enough coconut oil in a small saucepan to deep fry (at least an inch deep). Once the oil is hot, turn down the heat and lower your first donut into the oil. Every ten seconds or so, check the underside to ensure it's not burning; you want your donuts to turn a nice golden brown. Once the underside is finished (about one minute), flip it over and brown the other side in the oil. Once ready, set on a paper towel to absorb excess oil. Repeat for all donuts.

Deep frying healthy coconut flour low carb donuts.

Once cool enough to handle, your donuts are ready to gobble up plain, dusted with sweetener, or (one of my favorites) sweetener plus cinnamon. As an added indulgence, you can make an easy, sugar-free chocolate coating (instructions below) and/or garnish them with colorful sprinkles. Go ahead — treat yourself!

Tip

They'll be ready to eat after frying and taste great warm. However, I find that the texture improves if you let them sit at room temperature for at least an hour or in the fridge for around 30 minutes. If you refrigerate them (my preference), they'll become even more dense and cake-like. They also keep well refrigerated in an airtight container for a few days.

Optional Chocolate Coating

In a small microwave-safe bowl, put 3 ounces of sugar-free dark chocolate chips (like Lily's brand) and 1 tablespoon of coconut oil. Microwave for 30 minutes on high and stir. Continue microwaving and stirring for 20 to 30 seconds at a time (depending on your microwave wattage) until it's smooth. Dip each donut into the chocolate coating — one side only, or both sides — and place face up on a sheet of parchment paper. The coating will harden as it cools.

Dipping healthy coconut flour low carb donuts in chocolate coating.

If your heart is set on sprinkles (and who would blame you?), I recommend finding a brand that uses 100% natural food colors (I use India Tree). Sprinkle them on right after dipping.

Healthy coconut flour low carb chocolate covered donut with sprinkles.

Since you'd only be using a small amount of sprinkles per donut, I think it's OK to indulge in them once in a while even if they're not sugar free. However, if you're super strict about limiting your carb intake, it's probably best to omit them. But, hey, sprinkles or no sprinkles, you're enjoying donuts! Healthy donuts. That's no less than a win in my book.

Healthy coconut flour low carb chocolate covered donut with sprinkles. Healthy coconut flour low carb chocolate covered donut with sprinkles. Healthy coconut flour low carb chocolate covered donut with sprinkles.

10 Hearty Recipes to Make During Cold Weather Season

0

donuts, turkey a la king and pot pie. 1 of 11

Brrr, cold weather. It's time to break out all of your sweaters, light your favorite candle and brainstorm what your first snowman of the season will look like. The change in weather also means you'll have to re-strategize your recipe lineup: light salads or outdoor grill options aren't going to cut it during the chillier months. Luckily, there are tons of hot and hearty recipes you can make all week for breakfast, lunch and dinner. From a French toast casserole to turkey soup, you'll be set with these 10 meal ideas.

Image Credit: eHow French toast casserole. 2 of 11

French Toast Casserole

The only reason to get out of bed on a chilly weekend morning is to have a slice of French toast casserole. Prep the night before and pop it in the oven when you wake up. You'll have just enough time to brew a huge pot of coffee and corral the magazines you've meant to read all week.

Image Credit: Thalia Ho Butternut squash soup. 3 of 11

Butternut Squash Soup

Weekends spent inside are great for nesting: you can work on crafts you've been meaning to try, tear through your full DVR and make delicious food in the process. This butternut squash soup can simmer on the stove while you make a new piece of wall art or watch the shows you've been meaning to catch up on.

Image Credit: Ashley Manila Chicken pot pie. 4 of 11

Homemade Chicken Pot Pie

Ease into the week with a homemade chicken pot pie that warms you right up. On your way home from work, pick up a rotisserie chicken, pre-made pastry dough and fresh vegetables. Pair with a glass of your favorite red wine (or two, because it's Monday and Mondays are hard.)

Image Credit: Jackie Dodd Turkey a la King. 5 of 11

Turkey a la King

If you're cooking for a family or a bunch of roommates, you know how tough it is for everyone's schedules to sync up around dinner. Next time, make a big pot of Turkey a la King for everyone to dish up as they come and go. They'll be psyched about a hot meal, and you'll be glad that you made it easy to enjoy.

Image Credit: Jackie Dodd Turkey meatloaf. 6 of 11

Turkey Meatloaf

Hot lunches on a cold day are one of life's simplest pleasures. When you're thinking about your week's packed lineup, round up the ingredients for a delicious turkey meatloaf. And don't forget about your side dish: there's definitely room for some mashed potatoes in that tupperware.

Image Credit: Julia Mueller Seafood cioppino. 7 of 11

Seafood Cioppino

If you're looking for a weeknight family dinner that deviates from the normal menu, consider a seafood cioppino. Bust out your slow cooker for this Italian soup made with shrimp, crab and clam. When the weather outside is frightful, your dinner will be oh so delightful.

Image Credit: Ashley Manila Black bean pumpkin chili. 8 of 11

Black Bean Pumpkin Chili

Yes, vegetarian options can be hearty and hot — try this black bean pumpkin chili recipe, for example. On a Thursday night in the dead of winter, you'll be glad you did. If you want to take it to the next level, make some homemade tortilla chips in the oven.

Image Credit: Ashley Manila Potato bites. 9 of 11

Mashed Potato Cheesy Bites

When it's too icy to go out for happy hour, invite your friends over for an impromptu party. While you're waiting for them to arrive, whip up mashed potatoes to morph into cheesy bites. They taste great with a big glass of beer and other party fixings.

Image Credit: Charity Curley Mathews Turkey soup. 10 of 11

Turkey Soup

Soup is an all-star recipe for chilly weather, especially after a holiday. During your Thanksgiving or Christmas cleanup, save the turkey carcass for turkey soup. This is a great alternative to the standard turkey sandwich leftovers, and you can even freeze batches of the soup to enjoy it later. As long as it's cold out, you'll have a hearty recipe to turn to.

Image Credit: Jackie Dodd Apple cider donuts. 11 of 11

Apple Cider Donuts

Chase away any Sunday blues by spending the last few hours of the weekend making apple cider donuts to last the whole week. Here's a pro tip if you do: pop your donut into the microwave for a few seconds before you take a bite.

Image Credit: April Anderson

How Do I Freeze Carbonated Water?

Things You\’ll Need

  • Ruler

  • Ice cube tray (or a cup with no lid)

  • Carbonated water or soda pop

  • Freezer

... Carbonated water expands when frozen.

Water expands by about nine percent when it freezes. Carbonated water expands at the same rate. The carbonated bubbles cause unusual swelling patterns, but have little impact on the total expansion rate. Sealed, pressurized containers do not allow for carbonated water's expansion. That is why an aluminum soda can will explode and leak frozen soda all over the freezer. Freezing carbonated water in a container that is not completely full, with an open top, will allow the room it needs to expand without making a mess.

Video of the Day

Step 1

Measure the height of the ice cube tray or cup that will will you to freeze the carbonated water.

Step 2

Subtract 10 percent from the height to find out how full the ice cube tray needs to be. Multiply the measurement by 0.10 and subtract. If, for example, the ice cube tray is one-inch tall, you will be looking for a total of 9/10 of an inch for your full line. You do not need to mark it, just remember where it is and avoid filling the tray all of the way to the top.

Step 3

Freeze the carbonated water until it forms solid cubes. Expect it to take at least one hour.

How to Decorate a Cookie Tray for Presentation

0

Things You\’ll Need

  • Cookie recipes

  • Cookie decorations

  • Cookie cutters (optional)

  • Decorative cookie tray

  • Paper doily (optional)

  • Decorative garnishes

... Create a decorative Christmas cookie tray.

Consider the elements of design when decorating a cookie tray for presentation. Size, color and shape are important elements to keep in mind to create an aesthetically pleasing display. When planning your cookie list, consider how the cookies will look together on the tray. Think about whether the colors and textures will go well together. Finish off the tray with themed garnishes for a final pop of drama.

Video of the Day

Step 1

Bake an assortment of cookies in similar sizes. Similar sizes give a uniform and neater appearance to a cookie tray. Small cookies will go unnoticed next to larger cookies.

Step 2

Make cookies in a variety of colors. Colorful cookies are more attractive and will add drama to your tray. Use jellies, melted colored chocolate, sprinkles and colored piping designs to add color to ordinary cookies. Restrict colors to three colors that coordinate well together, rather than a rainbow of colors, for best results.

Step 3

Create a variety of shapes for visual drama. As long as your cookies are about the same size and the colors are coordinated, then you can get creative with shapes. Cut cookies into shapes with cookie cutters, or form them by hand. Some attractive shapes include flowers, hearts and geometric shapes.

Step 4

Locate a decorative tray to use, or decorate a plain tray. Place a paper doily on a tray, if desired. Paper doilies are available in many colors, as well as metallic.

Step 5

Group the same types of cookies together once you are ready to present the tray. Wait until the last minute possible so the flavors of cookies do not mix with each other. Randomly scattering your cookies looks messy and will take away from the visual aesthetic of your tray. Instead, lay one of each of the cookie types flat on the tray and overlap the cookies in either groups or rows. Alternatively, stack cookies together on their sides around the edge.

Step 6

Add decorative edible embellishments to the tray. Add garnishes such as sprigs of herbs, fruits or candies in between cookies. Pour melted chocolates in a variety of colors into decorative molds and place the candies along the edges of the tray. Add edible sugar flowers for decoration, or make fondant flowers in custom colors.

Tip

For a seasonal cookie tray, make sugar cookies cut into seasonal shapes. Paint the shapes with colored icing. Use leaf cookie cutters for fall, pumpkins for Halloween or snowflakes for Christmas.

What Is the Difference Between a Sponge Cake & a Classic Genoise?

0

Sponge cake Sponge cake and Genoise share ingredients but are assembled differently. Image Credit: Jupiterimages/Photos.com/Getty Images

Sometimes it's possible to have the best of both worlds. Bakers generally sort cakes into two types: those whose loft and texture come from fat; and those whose loft and texture come from eggs. Two classic cakes, sponge and genoise, rely on eggs for their height and lightness. How ingredients are chosen and combined illustrate how even simple baking formulas can be modified to produce markedly different results.

Video of the Day

American Sponge

Both classic American sponge cake and European butter-sponge cake contain eggs, sugar and flour. For sponge cake, eggs are separated and the yolks are beaten with sugar. Once you have gently folded the sifted flour into the yolks, you can fold stiffly beaten egg whites into the mixture. Contact with liquid activates a small portion of the gluten in the flour, making the mixture more able to retain air bubbles. A sponge cake is ideally moist and light at the same time.

Genoise

Similar ingredients to a sponge cake, with one major addition, are assembled differently to create a classic genoise, or European-style butter-sponge. Both the assembly method and the addition of butter stem from differences between European and American flours, notes pastry chef Jenni Field on her website, PastryChefOnline.com. Because European flours are lower in protein, or gluten, than U.S. ones, flour contributes less to the structure of the cake. Beating whole eggs for a prolonged period over heat with sugar begins a coagulation that keeps air bubbles trapped for rising. Butter is added to increase moisture and tenderness. Despite the butter, genoise tends to be drier and chewier than American sponge.

Beating American Sponge Batter

The key to a good sponge cake lies in beating egg yolks thoroughly with sugar. After at least three minutes, the mixture should be light lemon-yellow and thick. Poured slowly from a spoon, it will fall like a ribbon. This mixture is now full of tiny air bubbles. Beating egg whites is your second step. Vigorous beating incorporates air into egg whites. After two minutes, stop beating and lift the beaters. When peaks stand without softening, the egg whites are full of air.

Folding an American Sponge Batter

Use a gentle, scooping stirring motion, commonly called folding, to combine ribbony egg yolks and flour, then add egg whites. Fold only till you see faint streaks of flour and small lumps of egg white. You have now incorporated and retained as much air as possible into your batter.

Beating a Genoise Batter

A genoise relies on beaten whole eggs for its loft. According to "Cake Bible" author Rose Levy Beranbaum, the key to successful beating of whole eggs is time. Recipes advise beating eggs with sugar up to five minutes over hot water, which brings the egg mixture to a temperature of between 110 and 120 degrees Fahrenheit. While the mixture may look thick and air-filled after less beating, continuing for the full time ensures the egg-sugar matrix has begun its necessary coagulation.

Folding a Genoise Batter

Add flour in several small batches and lightly incorporate it with folding strokes. Then add the melted butter. Room-temperature and clarified, with milk solids strained out, butter can be quickly folded in with a few gentle strokes. As with an American sponge batter, your goal is to retain the air bubbles formed by beating.

Baking and Finishing

Despite their differences, both cakes benefit from being baked in ungreased pans, so batter can adhere to the pan walls, and from being cooled with pans inverted. Steam from cooking reabsorbs into the cake, adding moisture, and making it easier to remove it from the pan. A cooled American sponge cake can be glazed, frosted or served plain. Flavoring is often added to a genoise after it has cooled, in the form of liqueur- or fruit-flavored syrup. Top either cake with fresh fruit and whipped cream for a light-textured pretty and festive treat.

How to Make a Smoothie With a Food Processor

0

If you ever find yourself with a hankering for a smoothie but no blender in sight, you can use a food processor instead. The key is to use frozen fruit instead of ice, as the food processor can break it down more easily. From lean and green to tropical and fruity, have fun whipping up your fave flavor combos!

Green smoothie with kiwi garnish

Things You\’ll Need

  • Leafy greens (optional)

  • Fruit, fresh and/or frozen

  • Energy or health boosters (optional)

  • Liquid base, sweetened or unsweetened

  • Sweetener (optional)

Tip

Keep scrolling for a variety of ideas on all ingredients.

Step 1: Add Your Greens

If you're adding greens to your smoothie, add them to the food processor first. Be sure to pack them down towards the bottom. Heavier items like frozen fruit will help weigh them down. Baby spinach, kale, romaine, beet greens and Swiss chard are all excellent examples of greens you can blend into your smoothie.

Baby spinach packed down into food processor

Step 2: Add Your Fruit

Next, add your fruit on top of the greens. Frozen fruit works best if you'd like a more slushy consistency to your smoothie. Frozen bananas, pineapples, mangoes and berries are common fruit bases, but feel free to use any of your favorite fruits.

Kiwi and frozen bananas in food processor

Step 3: Add Your Healthy Booster(s)

Enhance the health benefits of your smoothie by adding in one or several boosters. Here are a few examples you can try:

  • Protein: protein powder, chia seeds, hemp seeds
  • Fiber: flax seeds, oats, shredded coconut
  • Healthy Fats: almond butter, coconut oil, avocado
  • Energy Boost: maca powder, bee pollen, raw cacao
  • Antioxidant: acai, spirulina, goji berries

Adding chia seeds to food processor

Step 4: Add Your Liquid Base

Lastly, add your liquid to the food processor. Almond milk, coconut water and soy milk are all great alternatives to regular milk, if you prefer a non-dairy option. Kefir or yogurt are also semi-liquid options if you prefer a thicker smoothie.

If you are using an unsweetened liquid base and prefer your smoothies on the sweeter side, now's also the time to add in your sweetener of choice, such as honey, maple syrup, agave nectar or dates.

Tip

Start with 1 cup of liquid first. If you need more liquid, add it in small increments, as food processors can leak if you add too much liquid.

Pouring almond milk into food processor

Step 5: Blend Ingredients Together

Put the top on the food processor and blend the ingredients together. You may need to stop halfway through and scrape down the sides before continuing to blend.

Blending green smoothie in food processor

Step 6: Remove Blade and Pour

Be sure to remove the blade from the food processor first. There is no pour spout on a food processor, so carefully pour the ingredients into a tall glass or mason jar. You may need to scrape the sides and use a spatula to guide the smoothie into the glass, especially if it's on the thicker side. Serve immediately.

Pouring smoothie into glass Scraping sides of food processor

Banana Kiwi Green Smoothie Recipe

Enjoy the recipe featured in this article and video, and let us know what your favorite smoothie combination is on Facebook!

Makes 1 serving:

  • 1 cup baby spinach
  • 1 kiwi, sliced
  • 1 banana, sliced and frozen
  • 1 tablespoon chia seeds
  • 1 cup almond milk

Green smoothie with kiwi garnish