Home Blog Page 43

Easy Instant Pot Chicken Stock Recipe

0

The Instant Pot is an all-in-one kitchen wiz that's been taking the cooking world by storm for a few years now. It's quite the machine: a pressure cooker, slow cooker, rice cooker, yogurt maker, and sauté pan. Surprisingly, it does all of these things quite well. One of my favorite things to do with the Instant Pot is make chicken stock. What traditionally takes 8 hours of simmer time is ready in an hour (not counting time needed to chill the stock at the end). You want a time saving technique? Look no further.

Instant Pot Chicken Stock Recipe | eHow

Things You\’ll Need

  • 3 to 4 pounds raw chicken wings

  • 2 yellow onions, quartered

  • 2 ribs celery, halved

  • 2 carrots, halved

  • a handful of fresh parsley

  • 5 to 6 black peppercorns

  • 2 to 3 garlic cloves

  • Instant Pot

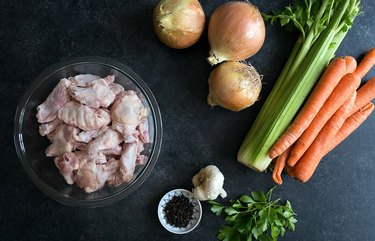
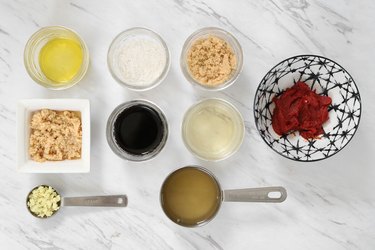
Step 1: Gather your ingredients and tools.

Chicken wings are an excellent option for stock because they're full of collagen. Collagen is what makes homemade stock different from what you'll find packaged for sale in stores; it gives sauces a rich, gelatinous quality. However, you don't need to use wings. Any raw chicken bones will work. The remaining ingredient quantities don't need to be exact. You can omit the garlic, add some leeks or bay leaves… the only thing you definitely don't want to add is salt. Stock should always be free of salt so that the recipes you decide to use it in (soups, sauces, stews, etc.) can be seasoned to taste.

Instant Pot Chicken Stock Recipe | eHow Instant Pot Chicken Stock Recipe | eHow

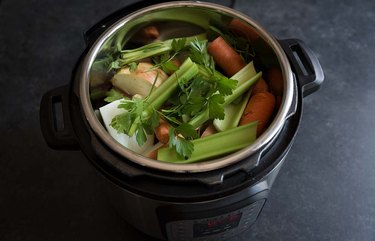
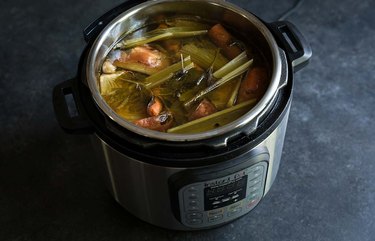
Step 2: Place ingredients in the Instant Pot.

Place the wings in the bottom of the Instant Pot. Top with the onions, celery, carrots, parsley, peppercorns and garlic cloves. Fill to the max line with water.

Instant Pot Chicken Stock Recipe | eHow

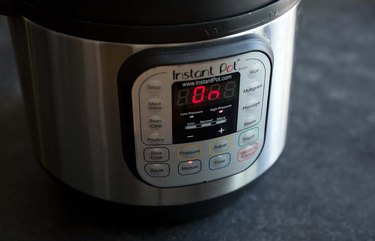
Step 3: Set for 60 minutes on manual.

Close the lid, making sure the top valve is set to "Sealing." Turn the Instant Pot on and press the manual button. Adjust the time to 60 minutes. Allow the stock to cook. Once it's finished, you can either release the pressure from the top valve or allow it to release naturally, which will take another 20 minutes or so.

Instant Pot Chicken Stock Recipe | eHow

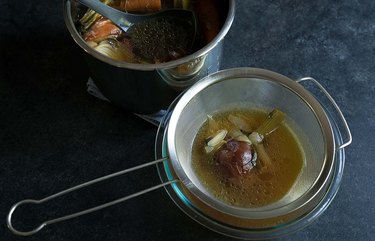
Step 4: Strain the solids.

Place a fine mesh strainer over a bowl. Strain the stock and discard the solids.

Instant Pot Chicken Stock Recipe | eHow

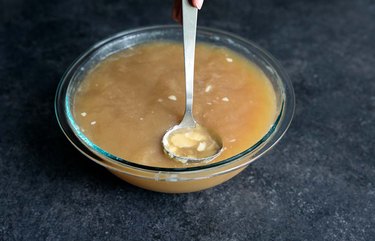
Step 5: Chill to separate the fat.

Cover the stock and place in the refrigerator to chill. This will allow the fat to rise to the surface. If you're in a hurry, you can speed up the process by using several smaller bowls.

Instant Pot Chicken Stock Recipe | eHow

Step 6: Skim the fat from the surface.

Once the stock is cold, use a ladle to skim and discard the fat from the top.

Instant Pot Chicken Stock Recipe | eHow

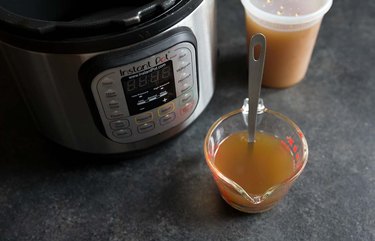
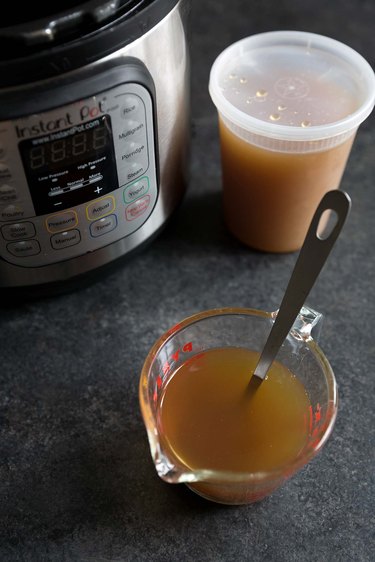
Step 7: Use or store chicken stock.

Transfer the stock to storage containers. It will keep in the refrigerator for 3 to 4 days, the freezer for 3 to 4 months, or it can be pressure canned indefinitely. Note: pressure canning is not the same as water-bath canning.

Instant Pot Chicken Stock Recipe | eHow

10 Delicious Fall Flavors That Rival Pumpkin Spice

0

Woman holding a pumpkin smoothie bowl - Autumn concept 1 of 11

Did you know that you can now get pumpkin spice pet shampoo? The pumpkin spice craze may have gone too far now. While delicious, this flavor profile has been done. When you're craving the taste of fall but need a break from pumpkin spice everything, branch out and explore these 10 other sweet and cozy flavors of the season.

Image Credit: Xsandra/E+/GettyImages Apple cider and cider donuts 2 of 11

Apple Cinnamon

Okay, apple cinnamon isn't far behind pumpkin spice when it comes to the most popular flavors of fall. But for good reason – apples are at their peak this time of year, and it would be a shame not to enjoy them while you can. Try this tasty recipe for baked apple cider donuts, or simply combine peeled apple slices with a little butter, brown sugar and cinnamon in a pot and cook until the apples are softened. Eat them plain, mixed into oatmeal or on top of pancakes.

Image Credit: Bill Boch/Photolibrary/GettyImages A chicken sandwich with cranberry chutney and lettuce witting on a plate next to a glass jar of chutney. 3 of 11

Cranberry

Cranberries get their moment to shine on Thanksgiving. But what about the rest of the year? The tart bite of cranberries is the perfect counterpoint to a lot of the warm and creamy dishes we tend to favor when autumn comes. Try this orange cranberry sauce recipe to complete your holiday meal, use them to make homemade granola with lots of chopped nuts and vanilla, or make cranberry butter to spread over warm apple bread or pumpkin muffins.

Image Credit: Beth Galton Inc/The Image Bank/GettyImages Two halves of a fig, one on top of the other 4 of 11

Figs

'Tis the season for fresh figs, and all their honeyed sweetness. They also have the benefit of being a delicious complement to both sweet and savory dishes. One option? Make a simple fig jam that deliciously complements cheeses and meats. For dessert, try simple sautéed figs with butter and cinnamon over vanilla ice cream.

Image Credit: Richard Boll/Photographer\’s Choice/GettyImages Multiple maple glazed bacon donuts 5 of 11

Maple

Maple is one of those flavors that you might associate with autumn but rarely use outside of pancake time. Sadly, it can't be pancake time all the time. Happily, maple flavors can still be part of your day from morning to night. Try cupcakes with maple bacon frosting, grilled pork chops with a maple glaze or roasted Brussels sprouts with maple and bacon.

Image Credit: Lisa Romerein/Photolibrary/GettyImages Chai or Tea seller 6 of 11

Chai

Chai is one of the those flavors that you've probably enjoyed but not quite understood. It simply means "tea" in Hindu, but in the U.S. chai is understood to mean a drink made with black tea, milk and spices that typically include cardamom, cinnamon and cloves. These flavors work beautifully in baked goods, and they're comforting on cold or rainy days. Try making cake or muffins with chai flavors.

Image Credit: Hira Punjabi/Lonely Planet Images/GettyImages Four pears 7 of 11

Pears

Pears get slightly overshadowed by apples, especially around autumn. And that's a shame, because pear is one of the most subtle and versatile flavors of the season. Use fresh pear slices to top crostini with ricotta cheese and a drizzle of honey, or harness the natural sugars in pears by caramelizing them in the oven. Roasted pears with crumbled bacon also makes a spectacular and easy side dish for pork.

Image Credit: Garry Gay/Photographer\’s Choice/GettyImages A table filled with bowls of butternut squash soup. 8 of 11

Butternut Squash

Working with butternut squash might seem intimidating, when you're holding a hefty squash in both hands. But this sweet and slightly nutty ingredient is worth taking home, in part because it's so easy to prepare. It can be as simple as slicing the squash down the middle, seasoning it and roasting the halves until the flesh is tender. Make the perfect cold-weather soup using little more than roasted squash, broth and a blender.

Image Credit: Beth Galton Inc/The Image Bank/GettyImages Christmas homemade gingerbread man 9 of 11

Ginger

For some people, ginger only gets its moment when gingerbread season comes around in December. This year, get a head start and embrace spicy ginger during autumn. Make delicious gluten-free gingerbread cookies, hot ginger tea with a little honey (add a little whiskey for an adults-only treat), or try a ginger pear tart or ginger applesauce. And of course, ginger belongs in garlicky, spicy stir-fries all year long.

Image Credit: istetiana/Moment/GettyImages roasted carrots 10 of 11

Carrot

They're earthy, hearty and just a little bit sweet. Carrots are the perfect fall vegetable, though you're missing out if you're only eating them in savory dishes. Try slow cooker maple glazed carrots or creamy curried carrot soup with ginger for a cozy dinner on a cold night. For dessert, treat yourself to spiced carrot bars with cream cheese frosting or soft carrot pudding with raisins and nuts.

Image Credit: Michael Marquand/The Image Bank/GettyImages Plate of ravioli with sage and butter, studio shot 11 of 11

Sage

Sage is one of those herbs that just seems made for fall. It pairs beautifully with other hearty herbs like thyme and rosemary, and it adds a wonderfully nutty note to butternut squash and sausage dishes. Simply fry pieces in butter until crispy and use them to top a bowl of butternut squash ravioli or a platter of roasted chicken. Sage can even be used in cocktails; try making a simple syrup with it to add subtle sage flavor without overpowering the drink.

Image Credit: Tom Grill/The Image Bank/GettyImages

What Beer Pairs With Alfredo

Fettuccine Alfredo Fettuccine Alfredo isn\’t usually paired with beer, but that never stops a true beer lover — nor should it. Image Credit: Jupiterimages/Comstock/Getty Images

Beer is not the most intuitive beverage to pair with the creamy, ultra-rich pasta dish known as fettuccine Alfredo. After all, the dish is Italian in origin — and the Italians are not known to be big beer drinkers. This doesn't mean, however, that with a little creativity, you can't find a great beer match for this dish. If you're a beer lover, you'll find a handful of rewarding pairings to try.

Video of the Day

Abbey Tripel

Abbey tripel or triple, is a Belgian-style ale full of sweet malty flavors, but with a more pronounced hoppy finish than its cousins. This bitter edge of the hops helps cut through the richness of an Alfredo sauce, providing a nice balance between beer and plate, while the sweet malt matches the full flavors of the cream sauce.

Dopplebock

Dopplebocks are dark, hearty, malty German-style lagers. Its dark, robust flavors ironically complement a creamy sauce like Alfredo. The sweet malt boosts the subtle flavors in the cream sauce while the bitter under notes prevent the sauce from becoming too cloying in the mouth. You can try a bottle straight from Germany, but several domestic brewers also do a good job with this beer style; look to some of the small Wisconsin labels for some flavorful examples.

Oatmeal Stout

Oatmeal stout is even heartier than doppelbock, with a pleasing bitterness reminiscent of coffee and chocolate. Rich plus bitter equals the perfect foil for Alfredo. The best oatmeal stout these days comes from small domestic producers from around the U.S.

India Pale Ale

India pale ale, commonly abbreviated IPA, is a wildly popular style of ale characterized by a high alcohol content and a particularly strong hoppy finish. The bitter hops edge provides a tasty contrast to the richness of the Alfredo sauce, acting as a palate cleanser between bites. Despite the name, the best India pale ale comes from the U.S.

Vegan General Tso\’s Cauliflower Recipe

0

General Tso's chicken is a dish that's sweet, spicy, and downright delicious. It's a popular meal that is served in Chinese restaurants throughout North America. However, if you eat a vegan or vegetarian diet, you don't have to miss out on the fun. It's possible to make General Tso's with zero animal ingredients! The trick is to use the right combination of flavorful ingredients. You'd be surprised at how easy (and addicting) it is to make vegan General Tso's cauliflower.

Vegan general tso\'s cauliflower

Video of the Day

Vegan Breaded Cauliflower

Things You\’ll Need

  • 1/2 large cauliflower head

  • 3/4 cup all-purpose flour

  • 3/4 cup unsweetened non-dairy milk

  • 1 cup panko bread crumbs

  • 1/2 teaspoon ground black pepper

  • 1 teaspoon sea salt

Ingredients for vegan general tso\'s cauliflower

Tip

For a gluten-free version, use gluten-free baking flour and gluten-free panko bread crumbs.

Step 1

Pre-heat the oven to 350 degrees Fahrenheit.

Chop the cauliflower into bite-sized pieces. In a large bowl, combine the flour, milk, pepper, and salt. Mix well.

Toss the cauliflower in the batter, coating each piece completely.

Coat cauliflower florets with batter

Step 2

With a pair of tongs, coat each piece of cauliflower with panko bread crumbs.

Coat cauliflower with panko bread crumbs

Step 3

Place the breaded cauliflower on a baking sheet lined with parchment paper.

Bake for 25 to 30 minutes or until crispy.

Breaded cauliflower florets

Vegan General Tso Sauce

Things You\’ll Need

  • 2 tablespoons olive oil

  • 3 tablespoons minced garlic

  • 1 tablespoon minced ginger

  • 1 tablespoon all-purpose flour

  • 1/3 cup brown sugar

  • 1/3 cup low-sodium soy sauce

  • 1/3 cup rice vinegar

  • 1/2 cup low-sodium vegetable broth

  • 1 1/2 tablespoons tomato paste

Ingredients for general tso sauce

Step 1

Over low-medium heat, warm the oil in a pan. Sauté the garlic and ginger until fragrant, about 3 to 5 minutes.

Add the tomato paste and brown sugar. Cook for 3 minutes, mixing frequently to prevent sticking.

General tso sauce

Step 2

Mix the all-purpose flour with 1 tablespoon warm water. You can also use 1 tablespoon of non-dairy milk.

Flour and water

Step 3

Add the flour mixture, soy sauce, rice vinegar, and vegetable broth. Mix well.

Let simmer for 7 to 10 minutes, mixing frequently.

General tso sauce

Once the sauce has thickened, it is ready to serve. Toss the cauliflower in the sauce and serve with quinoa, rice, or salad. Top with chopped scallions and sesame seeds, if desired. Enjoy!

Vegan general tso\'s cauliflower

How to Make Cold Brewed Coffee

0

Things You\’ll Need

  • Large pitcher

  • 2 cups medium-grind coffee

  • 3 1/2 cups room-temperature filtered water

  • Fine-mesh strainer

  • Coffee filter

... Cold-brewed coffee is easy to make. Image Credit: Jennifer Farley

Coffee drinkers who find themselves doing the bitter coffee face may prefer cold-brew coffee instead of that traditional-brewed cup of joe. Because the grinds never come into contact with hot water, the cold-brew coffee has a much smoother, sweeter flavor. This recipe yields approximately 2 cups of cold-brewed coffee.

Video of the Day

Step 1

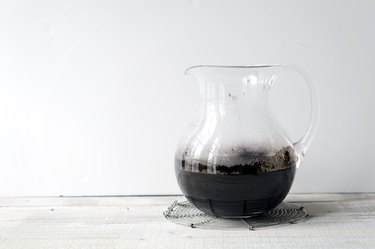
... Cold-brewing requires 12 to 24 hours. Image Credit: Jennifer Farley

In a large pitcher, stir together 2 cups medium-grind coffee with 3 1/2 cups room-temperature filtered water. Cover the pitcher with plastic wrap and allow to sit at room temperature for 12 to 24 hours.

Step 2

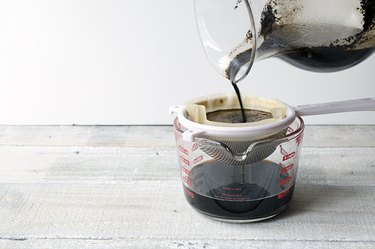
... Strain to remove all coffee grounds. Image Credit: Jennifer Farley

Strain the coffee through a fine-mesh strainer fitted with a coffee filter. Discard the grinds.

Step 3

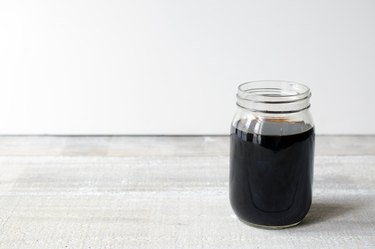
... Add ice to make a refreshing iced coffee. Image Credit: Jennifer Farley

Add ice, milk, cream, sugar or whatever you normally like with your coffee and enjoy.

Can I Freeze Creme Anglaise?

0

23891836 Freeze creme anglaise to make your own premium ice cream. Image Credit: Jupiterimages/Photos.com/Getty Images

Starches are some of the most useful thickeners for cooks. They provide a relatively quick and reliable way to produce thick sauces and fillings. Custards are much more problematic, relying on the gentler thickening power of egg proteins to create a delicate gel. Creme anglaise, a basic vanilla-flavored custard sauce, is the most basic example of the technique. It refrigerates readily for later use, but freezing it can be another matter.

Video of the Day

How Custards Work

If you've ever watched eggs in a skillet, you have a basic understanding of how heat affects their proteins. As they become warmer, the proteins set into the familiar firm texture that's the signature of a properly fried egg. If you dilute your scrambled eggs with cream, it prevents the proteins from bonding as tightly and makes the eggs softer. Custards take that a step further, diluting the eggs with enough cream that they can only form the softest and most delicate of gels. Custards only hold their form within a narrow range of temperatures, quickly separating if they're frozen or overheated.

Creme Anglaise

Creme anglaise is the most basic of custards. It's made by whisking eggs together with sugar, then gradually stirring in hot cream to dilute the mixture. The combination is heated gently, usually over a double boiler, until the egg proteins "set" the custard to a thick texture similar to heavy cream. You may add vanilla extract and sometimes butter at the end of the cooking time, or infuse the cream with a vanilla bean while it's heating. Pour the sauce over hot or cold desserts, and keep it refrigerated for three to four days.

Freezing and Thawing

Like any liquid, creme anglaise freezes easily. The difficulty comes with thawing the custard. Almost invariably, it will separate into a mixture of thin, milky liquid and thicker clumps of egg. If you don't have the ingredients to make a fresh batch, you can sometimes salvage your sauce with an extra egg yolk. Use a mixer or "stick" blender to recombine the sauce, then whisk an egg yolk in a separate mixing bowl. Add a few tablespoons of the thawed custard to your yolk and combine, then place the bowl over a double boiler. Whisk in the remaining custard and heat the mixture gently until it rethickens. The new egg yolk will return the other ingredients to a texture almost as fine as the original sauce.

Ice Cream

The best reason to freeze leftover creme anglaise is to produce ice cream. Pour any leftovers into the bowl of your ice cream maker and let it churn until the custard freezes. If you don't have an ice cream maker, let the custard freeze in an airtight container, then beat it vigorously for a few minutes with the paddle of your stand mixer. Return the mixture to your freezer to solidify once more. The plain frozen mixture can be eaten without whipping, but its texture is denser.

Variations

Tweak a basic creme anglaise mixture to make other sweet treats. Vary the number of whole eggs and egg yolks to produce relatively firm baked custards, such as the beloved Latin "flan," or softer custards such as creme brulee. Incorporate cornstarch or flour into the mixture to create a more stable custard called pastry cream. Pastry cream is often used as a filling, and the filled pastries can be frozen for later baking.

DIY Pearl & Oyster Cupcakes

0

You don't need to dive into the ocean to find precious treasure—just do some baking. These cupcakes decorated as oyster shells displaying pearls will be a hit at your next summer social, beach gathering or even mermaid-themed party. They may look fancy, but they're surprisingly easy to assemble. The shells are made from madeleine cookies, and the pearls are sixlet candies. Of course, the oysters and pearls may not be worth millions of dollars, but the reactions of your family and friends will be priceless.

oyster cupcakes

Video of the Day

Things You\’ll Need

  • Cupcakes

  • Frosting

  • Blue and red frosting dye

  • Piping bag

  • Open star piping tip

  • Disposable piping bags

  • Gold sanding sugar

  • Madeleine cookies

  • Pearl sixlet candies

materials

Step 1: Bake the Cupcakes

Using a box mix or your homemade recipe, bake cupcakes in paper liners (I used a confetti cake mix). Fill the liners about two-thirds of the way with batter, and the cake should rise just to the rim.

cupcakes

Step 2: Prepare the Frosting

Whip up a batch of frosting with your favorite recipe, or purchase a tub of prepackaged frosting from the supermarket. I find that homemade frosting not only tastes better, but it also spreads more easily and pipes beautifully.

I made a basic buttercream frosting mixing two sticks of butter, three cups of confectioner's sugar, two tablespoons of heavy cream, one teaspoon of vanilla extract and a pinch of salt. Divide the frosting in half, and add one or two drops of blue frosting dye in the first batch. Blend in the dye until you get a bright ocean blue. Add more drops of dye if necessary.

Tip

Frosting dye, available at party or crafts stores, will color your frosting without adding more liquid to it.

blue frosting

Add one or two drops of red dye to the other batch of frosting and stir to create a pleasing pink hue. The blue frosting will be for the ocean waves, while the pink frosting will be for the inside of the oyster.

pink frosting

Step 3: Frost the Top of the Cupcake

While you can just spread the frosting with a spatula, I recommend using a piping tip and bag. It's easier than you would think and gives you professional-looking results. Place an open star piping tip on the end of a disposable piping bag. You don't necessarily need a piping coupler to attach the tip to the bag, but I like how the coupler locks in the piping tip.

piping tip

Fill the bag with the blue frosting, not going past the fill line indicated on the bag.

piping bag

Squeeze the piping bag to release frosting through the tip, making swirls on top of the cupcake to look like cresting waves. It's a good idea to practice on a piece of wax paper first to figure out your design.

frosting

Step 4: Sprinkle Some Sanding Sugar

To give the suggestion of a beach, sprinkle some gold sanding sugar on one side of the cupcake. The gold sugar creates a sparkling sand.

sanding sugar

Step 5: Prepare the Madeleines

Madeleines make perfect "oysters" because of their shell shape. If your local supermarket or bakery does not have madeleines, any flat, round cookie like a vanilla wafer will work, as well. You will need two madeleines to make each oyster—one for the top and one for the bottom.

Madeleines typically have a hump on the back. Cut off one of the humps with a knife, but leave the hump on the second madeleine intact. The hump will help prop up the cookie so the oyster remains open.

madeleine humps

Slice off about half an inch on the narrow end of the madeleines so the shells won't be so long. Now they look perfect.

madeleine shells

Step 6: Assemble the Oyster

Place the madeleine that has the hump on the cupcake. The hump should be facing up.

madeleine oyster

Prepare a new piping bag for the pink frosting, and squeeze the frosting onto the madeleine. You don't need to cover the entire cookie with the frosting–just a small oval in the center is enough.

pink frosting tip

Position a pearl sixlet on the frosting toward the front tip of the madeleine cookie. Sixlets are candies usually used for weddings and showers. They are available in many colors at party stores.

pearl sixlet

Place the second madeleine on top to finish the oyster. As you can see, the hump from one madeleine props up the other one, and the frosting acts like glue to keep the two cookies together.

oyster

With cupcakes like these, the world is your oyster.

oyster and pearl cupcakes

Sweet, Spicy Teriyaki Chicken-Wrapped Asparagus Recipe

0

When I finally made the decision to start eating healthier, one of the meals that I targeted to change was lunch. For one, I realized that I was spending about $60/week alone just by eating out with co-workers. Also, I found myself tired and sluggish after eating heavy lunch meals, which affected my productivity and mood at work.

This is one of the easiest recipes I have used for my meal prep to ensure that I get a serving of both protein and veggies. Additionally, I learned that preparing the chicken this way made organizing meals for the week much easier—I could prepare five servings (or five days worth of lunches) in less than 30 minutes.

Video of the Day

I don't know about you, but for some reason or another, around lunchtime I often crave Chinese food. Instead of heading over to the nearest Chinese buffet, try this variation of the FitMenCook chicken wrapped asparagus with a healthier homemade teriyaki sauce. Remember to always customize portions to complement your goals and your diet.

Sweet, Spicy Teriyaki Chicken-Wrapped Asparagus Recipe

Total prep & cook time: 20 minutes (plus at least 30 minutes to marinate)

Things You\’ll Need

  • Two 6 ounce chicken breasts (thinly sliced)

  • 6 thick asparagus spears

  • 1 tablespoon Coconut Aminos (This is a healthier alternative to soy sauce that can be found in the health food section of most specialty stores. You can also use sea salt if Coconut Aminos are unavailable.)

  • 1 tablespoon raw honey

  • 1 tablespoon red chili garlic paste

  • 1 teaspoon ginger (minced)

  • 1 teaspoon rice vinegar

  • 1 tablespoon water

  • 1 green onion chopped

things you\'ll need

Step 1

Set oven to 375° F.

Cut and trim fat from chicken breasts so it is about six ounces. If the chicken breast is very thick, pound with your fist or meat mallet to soften and flatten. The meat should be thin enough to roll and close. Set aside in a bowl.

Combine sauce ingredients in a bowl.

combine sauce ingredients

Step 2

Pour the sauce over the chicken and mix thoroughly, ensuring all sides of the chicken breasts are covered. Refrigerate and marinate for at least 30 minutes. I prefer marinating at least four hours, sometimes even preferably overnight. Just be sure to place the chicken in an airtight bag or container with the sauce.

pour sauce over chicken

Step 3

Trim the bottom stems from the asparagus spears.

Place three asparagus spears at the thick end of the chicken breast and completely roll the asparagus in chicken.

roll asparagus in chicken roll

Step 4

Place the roll on a baking sheet or foil lined pan with the ending flap down so that the chicken roll bakes closed. Drizzle excess sauce over the chicken roll. Place foil over the tips of the asparagus spears to prevent any burning during baking.

Bake rolls in the oven for 10-12 minutes. If you have extra time before baking, brown all sides of the chicken roll in a non-stick skillet set to medium heat for 3-4 minutes. This will enhance the flavor of your chicken.

bake rolls

Serve with your choice of carbs. I used jasmine brown rice mixed with cherry tomatoes and cilantro, and one clementine.

Approximate macros for one serving using 6ounce chicken breast and three asparagus spears: 236 calories, 41g protein, 14g carbs, 4g fat

No-Churn, Five Ingredient Coffee Ice Cream Recipe

0

Bowl of coffee ice cream with a few whole beans on top. You don\’t need to churn all day for this coffee ice cream treat. Image Credit: Julia Mueller

Homemade ice cream hits the spot in the summertime, and you don't need an ice cream maker to make it. Using a variety of milks, sweeteners and fresh ingredients, you can make ice cream to please your own personal taste and to fit your dietary restrictions. This no-churn coffee ice cream turns out sweet and creamy, with plenty of coffee flavor, and the best part: It requires only 5 ingredients and no more than 10 minutes of prep time!

Video of the Day

Things You\’ll Need

  • 2 cups heavy whipping cream

  • 1 (14-ounce) can sweetened condensed milk

  • 1/2 cup strong brewed coffee, cooled (or 2 tablespoons dry instant coffee)

  • 2 tablespoons coffee grinds (optional)

  • 1/4 teaspoon sea salt

Ingredients for coffee ice cream in individual containers. 
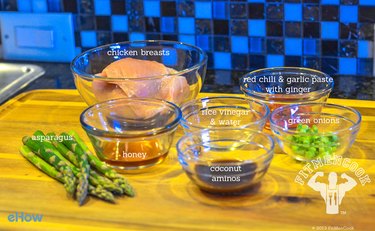
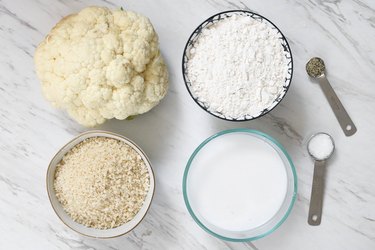
Measure out all of your ingredients before you begin. Image Credit: Julia Mueller

Prepare for the recipe by measuring out your ingredients. You will need 1/2 cup of strong-brewed coffee, which can be saved from your morning pot of coffee. If you do not have brewed coffee on hand, you can use 2 tablespoons of dry instant coffee.

Tip

Coffee grinds are coffee grounds that have been brewed. You may omit these from the recipe altogether if you don't have a brewed pot of coffee on hand.

Step 1: Blend Ingredients

Blender containing coffee ice cream ingredients. 
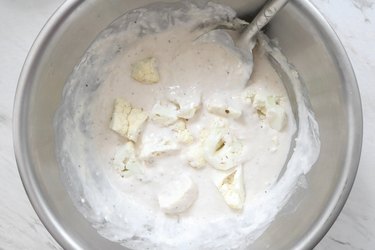
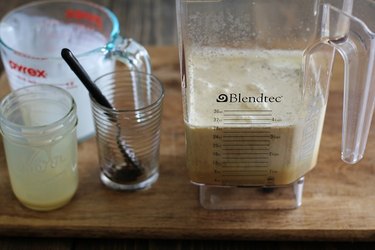
Combine all of your ice cream ingredients. Image Credit: Julia Mueller

Pour all of the ingredients for the coffee ice cream into a blender. Blend the ice cream base until well-combined.

Blended coffee ice cream base. 
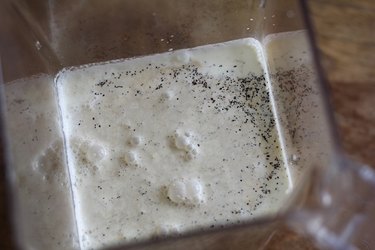
Blend the ingredients until smooth. Image Credit: Julia Mueller

Step 2: Pour Into Freezer-Safe Container

Ice cream base being poured into a loaf pan. 
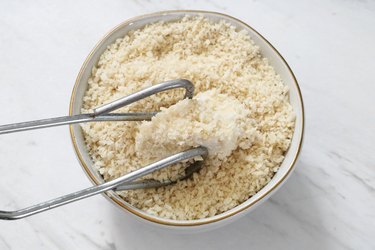
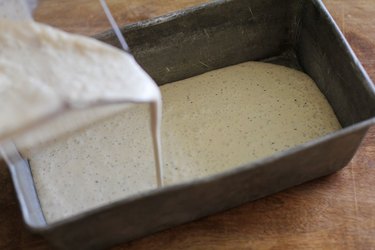
Transfer to a freezer-safe container. Image Credit: Julia Mueller

Transfer the ice cream base to a freezer-safe container, such as a loaf pan. If you'd like, you can line the pan with parchment paper.

Step 3: Cover and Freeze

Pan of ice cream base covered with plastic wrap. 
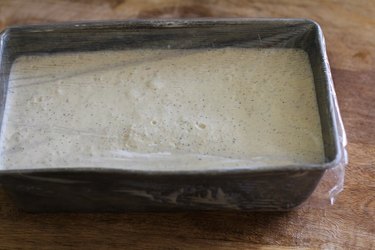
Freeze the ice cream until solid. Image Credit: Julia Mueller

Cover the container with a lid or plastic wrap. Place in the freezer and freeze for 5 to 6 hours, or until ice cream is solid.

Step 4: Thaw and Serve

Scoop and container of frozen coffee ice cream. 
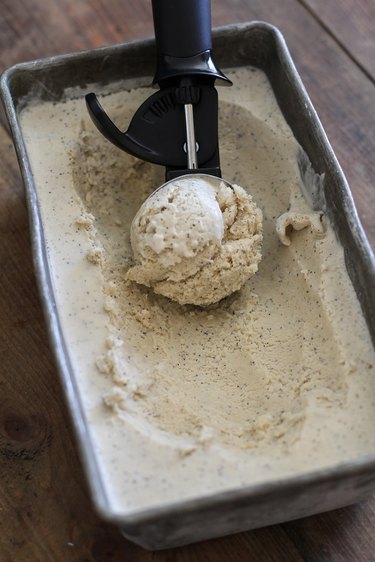
Scoop up your coffee ice cream and enjoy. Image Credit: Julia Mueller

When ready to serve, remove the container of ice cream from the freezer and allow it to thaw 5 to 8 minutes. Use an ice cream scoop to scoop and serve ice cream.

Tip

For a lower fat recipe, substitute a portion of the heavy whipping cream with half and half. Note: The ice cream will not turn out as rich and creamy.

To make this recipe dairy-free, replace the heavy whipping cream with full-fat canned coconut milk and the condensed milk with canned coconut cream. Note: The ice cream will turn out much harder with this method, so using an ice cream maker rather than a blender is recommended. You also can replace the dairy with 2 cups of soaked cashews and 1 cup of full-fat coconut milk: Blend these ingredients well to a completely creamy consistency.

Make this recipe refined sugar-free by replacing the sweetened condensed milk with another 1 1/2 cups heavy whipping cream (or 1 14-ounce can of coconut cream) and add 1/2 cup of a natural liquid sweetener, such as agave or pure maple syrup.

How to Saber Champagne

Sabering champagne is an impressive way to open a bottle of bubbly and it's way less intimidating than it sounds, especially when you understand the dynamics behind the process. Icing the bottle upside down forces the carbon dioxide into to the neck of the bottle and working at the seam takes advantage of the weakest part of the bottle (the point where the seam meets the lip). You may need a few tries to get it right, but with a little practice, you can be swashbuckling with the best of them. If you have a sword, you're set. If not, a butcher's knife will work just fine.

Cutting top off champagne bottle with sword.

Step 1

Chill a bottle of champagne for at least two hours, or until it reaches about 38 to 40 degrees F. Resist the temptation to skip this step. Glass is more brittle and easier to break when it's cold than when it's at room temperature.

Step 2

Transfer the bottle from the fridge to a bucket of ice, and place the bottle upside down into the bucket. Allow to chill for 10 to 15 minutes.

Chill bottle upside down in ice bucket.

Step 3

Remove the foil, and then the hood (wire cage) from the bottle.

Remove foil from champagne bottle. Remove wire hood over cork.

Warning

Point the bottle away from yourself and away from anyone or anything that could be hurt or damaged by the flying cork.

Step 4

Inspect the bottle, looking for the seam running from the lip to the base. On some bottles, you'll be able to see the seam fairly clearly but on others you'll be able to feel it better than you can see it.

Find seam on the bottle.

Step 5

Hold the bottle in your non-dominant hand. Turn it until seam of bottle is facing up and centered.

With your dominant hand, hold the blade about a 30-degree angle, near the bottom of the bottle, resting against the seam. If using a knife or sharp sword, point the blunt edge toward the cork.

Slide the blade down the bottle, toward the cork, smoothly and with a modest amount of force. Let the laws of physics do the work for you. Aim for the lip of the bottle, not the cork.

Slide blade toward lip of bottle.

Push through the lip of the bottle. It should burst forth, taking the cork along with it.

Push through the lip of the bottle.

Step 6

Retrieve the cork and check the surrounding area for shards of glass.

Retrieve the cork and any glass shards.

Step 7

Pour and enjoy!

Pour champagne into flutes. Enjoy.