Home Blog Page 41

How to Tell When a Plantain Is Ripe

0

Banana plantain How to Tell When a Plantain Is Ripe. Image Credit: DipaliS/iStock/GettyImages

If you eat bananas, you probably have strong feelings about which level of ripeness you prefer. Some like the faintly acidic tang of a banana that's still a bit green, while others prefer the lush sweetness of a fully ripened banana that's turning brown. With plantains, or cooking bananas, the situation is rather different. Picking plantains is less about whether they can be used than it is about how you plan to use them.

Video of the Day

Plantains vs. Bananas

Bananas and plantains form a large family, with hundreds of closely related subspecies. Botanically, they're nearly identical, so the distinction is a practical rather than a scientific one. If the fruit remains high in indigestible starches as it ripens, it's considered a plantain and must be cooked. If its starches convert almost entirely to sugars as it ripens, it's a banana and is typically eaten raw. This isn't a hard and fast rule — sweet bananas can also be prepared as a starchy vegetable when they're green and immature — but it's a good rule of thumb.

Green and Yellow Plantains

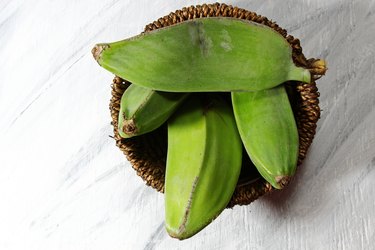
Most of the plantains you'll see at the market are unripe or under-ripe specimens, with a green or yellow skin. This is the starchiest and most vegetable-like stage of the plantains' ripening process, and, unsurprisingly, they're used as a starchy vegetable. Green plantains are the ones used for plantain chips, or for twice-fried tostones. They're also diced and used as a vegetable in soups or stews, just as carrots and potatoes are in more northerly climes.

Slightly riper plantains, with yellow skins, are a bit sweeter — think sweet potato versus potato — and are typically baked or boiled first, and then mashed. Green and yellow plantains can be hard to peel, so slash their skins and soak them first for a minute or two in very hot water to soften the skin.

Ripe Plantains

Sweet bananas are soft and mushy by the time their skin turns black, but that's not the case with plantains. A fully black skin, or one with only a few fugitive traces of yellow, is the sign of a plantain that's fully ripened. You usually won't find them that ripe at the store, so you'll need to buy green or yellow plantains and keep them in a paper bag until they've ripened.

The skin is easier to remove at this stage, and the fruit underneath is sticky and mushy at the surface but still firm enough in the middle to hold its shape. At this stage, they're usually fried slowly until the surface is well caramelized and the interior very soft, then served as a sweet side dish — platanos maduros — with savory meals.

Overripe Plantains

If you regularly ripen plantains for platanos maduros, sooner or later you'll leave them to ripen for too long. When the plantain's skin is not just black but wrinkled, and the plantain itself is visibly shrunken and soft to the touch, they're at their peak of sweetness and most banana-like flavor.

Like overripe bananas, this is the time to use them for baking and sweets. The Latin world has many recipes for these last-stage fruits, but you can simply substitute them for ripe bananas in your favorite banana bread, banana cake or banana pudding. They lack the cloying sweetness of overripe bananas; a positive if you ordinarily find banana desserts to be too much for your taste buds.

How to Make Homemade Ice Creams You\’ll Want to Eat Every Day

0

Nothing compares to fresh and creamy ice cream. As a kid, a slowly melting stack was a welcome sight whether it was eaten after school or topped with sprinkles for dessert. And now as an adult, rolling a scoop over soft ice cream still evokes feelings of excitement and fun. Whether you've chosen mint chocolate chip and vanilla since you were little, or you're all about the grown-up tastes of bourbon and coffee, these flavors will suit any hankering you have for a sweet treat. Eat your pick in a waffle cone, a big bowl, between two cookies or inside warm bread. When you have options as mouthwatering as these 13 recipes, you really can eat a different ice cream every day!

strawberry ice cream, mango ice cream, and chocolate chip ice cream.

Video of the Day

Grab a Bowl of No-Churn Cookies and Cream

If the thought of making your own ice cream is a little intimidating, this cookies and cream recipe is a great place to start. No ice cream maker is necessary — although Oreos definitely are — and you'll have a delicious ice cream treat in a snap.

A small glass bowl of cookies and cream ice cream on a wooden table

Wake Up With Coffee Ice Cream

Consider replacing that afternoon coffee with a scoop of creamy coffee ice cream. Better yet, have this instead of a morning latte. No one says you can't have ice cream for breakfast!

A white bowl with three scoops of coffee ice cream and two jars of coffee beans

Go Nuts for Dairy-Free Peanut Butter Ice Cream

Lactose intolerance or a vegan diet shouldn't mean that ice cream is off the menu. This peanut butter ice cream, which is made from coconut and non-dairy milk, will hit the spot without breaking any rules. The hard chocolate magic shell is not to be missed, either.

Peanut butter ice cream with a chocolate shell in a white ramiken

Beat the Blues With Boozy Bourbon Ice Cream

You can't go wrong when a recipe calls for bourbon, and this bourbon vanilla bean ice cream will not let you down. Add some sliced banana and praline sauce and you'll have a bananas foster-style ice cream sundae to boot.

A scoop of ice cream in a bowl next to two vanilla bean pods

Soak Up Summer With Peaches and Pecan Ice Cream Sandwiches

For another ice cream delight, check out this recipe for peaches and pecan bourbon ice cream sandwiches. Nothing says summer like sweet peaches and crunchy pecans, and a shot of bourbon makes this dessert all the more decadent. Sandwich a hefty scoop between two oatmeal cookies, and you'll have heaven on earth.

A stack of ice cream sandwiches next to a peach

Keep This Berry Ice Cream to Yourself

When you whip up this no-churn berry ice cream made from fresh summer berries, you won't want to share. You might even find yourself eating it straight from the freezer! Combine the ingredients in a baking dish and let the contents chill for at least eight hours. When it's ready, this ice cream is all yours.

A large bowl of berry ice cream

Brighten Up Your Day With Mango Ice Cream

This recipe for mango ice cream calls for only a handful of ingredients, yet it packs a powerful punch of tropical mango flavor. A spoonful of this, and you will be transported to warm, white-sand beaches.

A stack of silver bowls topped with a scoop of mango ice cream

Keep Things Simple With Chocolate

Chocolate ice cream is a classic, and it's no surprise why we keep going back to it. This recipe for churned chocolate ice cream proves yet again that there is no flavor that can compare to the sweet taste of cocoa.

A bowl of chocolate ice cream on a silver platter with an ice cream scoop

Tantalize Your Taste Buds With Chocolate Chip

When you're looking to satisfy your chocolate cravings, but plain chocolate ice cream isn't quite enough, try this recipe for chocolate chip. It has the best of both worlds: smooth vanilla and rich chocolate chips harmonizing in every bite.

A stack of silver bowls topped with chocolate chip ice cream next to a striped tea towel

Delight in Dairy-Free Chocolate Ice Cream

This recipe for chocolate ice cream is so good, you won't even know it's vegan. With coconut milk, rich chocolate and a hint of espresso, the flavor is dynamic without being over-the-top. Pair it with some vegan chocolate chip cookies and dig in.

Three bowls of ice cream on a silver tray with an ice cream scoop

Cool Off With Mint Chocolate Chip Ice Cream

The refreshing taste of peppermint and the slight crunch of chocolate chips make this ice cream the type of choice that will never go out of style. And since you don't need an ice cream maker for this one, either, you can eat this timeless treat without much hassle.

Two small bowls of ice cream on a green table

Spoon Up Fresh Strawberry Ice Cream

Bright strawberry ice cream is just what you need for an amazing banana split. After you blend fresh strawberries and churn the ingredients in a mixer, freeze the pink concoction for two hours. When it's nice and frozen, add bananas. You can top everything with whipped cream and cherries, of course, to really enjoy the full effect.

Three glass bowls full of strawberry ice cream and a teal background

Fall in Love With Lemon and Lavender Ice Cream Bread

This recipe for lemon and lavender bread is as unique as it is irresistible. The base is essentially ice cream with a little bit of self-leavening flour added into the mix. Serve a slice or two to guests for dessert or skip the bread step and just make some lovely lemon and lavender ice cream — either way, it will be delicious!

A sliced loaf of lavender lemon ice cream bread topped with lavender flowers

How to Brine Green Peppercorns

0

Things You\’ll Need

  • Glass canning jar with lid

  • Antimicrobial spices

  • Food acid, such as vinegar or lemon juice

  • Kosher salt

Olive oil and balsamic vinegar You can use white vinegar or any flavored vinegar to brine green peppercorns, as long as it has at least 5 percent acetic acid. Image Credit: draghicich/iStock/Getty Images

Think of green peppercorns as the young, plump version of the familiar, aged and wrinkled black peppercorns no well-stocked spice rack is without. Green peppercorns have a pungency redolent of their dried counterparts, but require brining to maintain their piquant bite that always comes with a burst of juiciness. A standard salt-and-acid pickling brine keeps green peppercorns fresh for about one month in the refrigerator, as long as you brine them within 24 hours of harvest.

Video of the Day

Step 1

Rinse the peppercorn stalks under cool running water. Keep the berries as intact as possible, and use a gentle, low-pressure flow of water from the faucet. Drain the peppercorn stalks on a plate lined with paper towels, and let them air dry.

Step 2

Add antimicrobial spices to the glass jar you'll use to brine the peppercorns. Antimicrobial spices, such as bay leaves, garlic cloves and cardamom seeds, inhibit food-borne bacteria and mold growth. You need about 1 tablespoon of spices for every 1-quart jar.

Step 3

Pack the peppercorn stalks vertically in the glass jar. Pack the stalks as closely together as possible without compressing them.

Step 4

Mix together equal parts water and acid in a saucepan, along with 1 tablespoon of kosher salt for every cup of water. Green peppercorns typically work well with lemon juice as the acid, but you can also use 5 percent vinegar. Mix just enough brine to fill the jar or jars you'll use to brine the peppercorns.

Step 5

Bring the brine to a boil and pour it over the peppercorns, leaving about 1/2 inch of head space. Place the lid on the jar but don't tighten it; let the brine cool until it's warm to the touch.

Step 6

Tighten the lids on the jars, and let the peppercorns reach room temperature. Then place the jars in the refrigerator.

Step 7

Store the brined peppercorns in the refrigerator for 24 hours before eating them. Keep the brined peppercorns up to one month in the refrigerator.

Warning

If the peppercorns develop any off flavors or smell of alcohol, discard them.

How to Make Vegan Spring Garden Pizza

0

It's hard to say no to pizza. Thankfully, though, this classic dish can be made with nutritious vegan-friendly ingredients. Think tangy cashew cheeze, savory pesto, and a generous helping of fresh spring veggies. The result? A deliciously colorful (and healthy) vegan spring garden pizza. Here's how to make it yourself.

Vegan spring garden pizza

Video of the Day

Cashew Cheeze

Things You\’ll Need

  • 1 1/2 cups cashews (soaked in water overnight)

  • 1/4 to 1/2 cup oat or soy milk

  • 1/4 cup nutritional yeast

  • 1 tablespoon lemon juice

  • 2 tablespoons minced garlic

Cashew cheeze ingredients

Tip

For best results, soak the cashews in water for at least 6 hours or overnight.

Step 1

In a food processor or high-powered blender, add the soaked cashews, oat or soy milk, nutritional yeast, lemon juice, and minced garlic. Process all of the ingredients until combined.

Cashew cheeze in food processor

Tip

If using a high-powered blender, roughly chop up the cashews first. You may also need to scrape down the sides more often and work in batches.

Step 2

Give the cashew cheeze a taste. If necessary, add more nutritional yeast, lemon juice, or garlic. You can also slowly add more milk for a creamier consistency.

Cashew cheeze

Vegan Pesto

Things You\’ll Need

  • 2 cups basil leaves, packed

  • 1/4 cup sunflower seeds or nuts of choice

  • 3 tablespoons nutritional yeast

  • 3 to 4 tablespoons olive oil

  • 2 tablespoons lemon juice

  • 2 tablespoons minced garlic

Ingredients for vegan pesto

Step 1

In a food processor or high-powered blender, add all of the ingredients except the olive oil. Process until combined, scraping down the sides as necessary.

Vegan pesto in food processor

Tip

Again, if using a high-powered blender, work in smaller batches.

Step 2

Slowly add olive oil and continue blending. Taste the pesto and add more nutritional yeast, lemon juice, or minced garlic, if necessary.

For a "saucier" consistency, slowly add another tablespoon or two of olive oil.

Vegan pesto

Spring Garden Vegetables

Things You\’ll Need

  • 1 cup baby spinach or kale

  • 3/4 cup grape tomatoes

  • 10 to 12 asparagus spears

  • 1/4 cup canned peas

  • 1 tablespoon olive oil (optional)

  • 1 tablespoon lemon juice (optional)

Spring garden vegetables

Tip

Don't feel limited to this list; these vegetables are only suggestions. Feel free to use your favorite spring veggies from your garden or local farmer's market.

Step 1

To prepare the asparagus, trim away the woody ends and cut into 2 or 3-inch pieces. You can also break each spear by hand; it will naturally snap where the woody part ends.

If you'd like, toss the asparagus with olive oil and lemon juice with a dash of salt and pepper. Set aside for 10 minutes.

Prepare asparagus

Step 2

Slice the grape tomatoes in half, lengthwise.

Slice grape tomatoes

Vegan Spring Garden Pizza

Things You\’ll Need

  • Cashew cheeze

  • Vegan pesto

  • Pizza crust

  • Spring garden vegetables

Vegan spring garden pizza ingredients

Tip

Use your favorite store-bought pizza crust or dough.

If you'd like to make the crust from scratch, prepare it according to the recipe's directions. You may need to adjust the baking time and temperature of the final pizza, as well.

Step 1

Pre-heat the oven to 400 degrees Fahrenheit.

Spread the cashew cheeze on the crust. Add a layer of pesto. Top with baby spinach, tomatoes, peas, and marinated asparagus. Finish off with a drizzle of olive oil and dash of your favorite spices.

Vegan spring garden pizza

Step 2

Bake for 20 to 22 minutes or until the veggies are cooked, crispy, and sizzling.

Vegan spring garden pizza

Your mouthwatering vegan creation is ready to serve! Remember, you can customize this recipe as much as you'd like. Other tasty pizza toppings include artichoke, kale, watercress, and radishes.

Vegan spring garden pizza

Rustic Rataouille Recipe

0

Ratatouille is a classic French dish that's packed with vegetables. There are many variations, but it often features tasty ingredients like eggplant, zucchini and garlic. You can toss the veggies into a stew or layer them on top of tomato sauce, just like we did in the following recipe. After you bake the vegetables and add fresh herbs, they'll pair perfectly with pasta or rice.

Rustic ratatouille

Video of the Day

Things You\’ll Need

  • 28 ounces canned crushed tomatoes

  • 2 tablespoons olive oil

  • 1 medium red bell pepper, deseeded and diced

  • 1 medium white or yellow onion, diced

  • 1 tablespoon minced garlic

  • 1/4 teaspoon black pepper

  • 1/4 teaspoon salt

  • 2 tablespoons fresh basil, chopped

  • 2 tablespoons fresh parsley, chopped

  • 2 teaspoons fresh thyme, chopped

  • 4 large Roma tomatoes, sliced

  • 3 medium zucchini, sliced

  • 2 to 3 baby eggplants (or 1 large standard eggplant), sliced

  • Balsamic vinegar

Ingredients for rustic ratatouille

Tip

It's best to use vegetables that are about the same width. But since this isn't always possible, you can trim the vegetables to size. For example, if you can't find baby eggplant, simply cut slices of standard American eggplant into quarters. You can also add or substitute vegetables like yellow squash, bell peppers or onions.

Step 1

Preheat the oven to 375° Fahrenheit. In a large pot over medium heat, warm the olive oil. Cook the onion and red bell pepper for 5 to 7 minutes, or until the onion is tender and translucent. Add the minced garlic and cook for another 30 seconds.

Cook onion, bell pepper and garlic

Step 2

Add the canned tomatoes and fresh herbs. Mix well and cook for 2 to 3 minutes.

Add the tomatoes and herbs

Step 3

Carefully transfer the tomato sauce to a greased 9×13" casserole dish.

Layer the tomato sauce into a dish

Step 4

Place the sliced vegetables into a dish, stacking them in a horizontal layer. Continue until the dish is full.

Layer vegetables in baking dish

Step 5

Drizzle balsamic vinegar on top of the vegetables.

Drizzle balsamic vinegar

Step 6

Bake for 45 to 55 minutes, or until the sauce is bubbling and the vegetables are browned. Garnish with fresh herbs and serve with pasta, rice or quinoa. For even more flavor, top the dish with goat cheese.

Rustic ratatouille

How to Shred Lettuce

0

Cheese,Onion,Lettuce and Tomato Offer shredded lettuce as a topping for any build-your-own meal. Image Credit: ljhimages/iStock/Getty Images

In culinary terms, to chiffonade is to slice leaves of lettuce or herbs into thin ribbons. It's a decorative and functional technique to master. Shredded lettuce makes an airy and attractive bed for food; fills out items like wraps, sandwiches and tacos with manageable bites; and creates an easily tossed salad.

Video of the Day

The Prep

If you're working with a head of lettuce, remove and discard the outer leaf. Peel off the individual leaves, taking care not to tear them. Submerge unwashed lettuce leaves in a large bowl of cold water and swish them around to loosen dirt and debris. Take the lettuce out of the water, rinse it off and pat it dry with paper towels.

The Shred

Stack up to 10 leaves of lettuce on top of one another other, or start with fewer leaves if you're a novice knife user. Roll the stack of lettuce as tightly as possible into a cigar shape; leafier lettuce rolls tighter, but be careful not to snap crisper varieties like iceberg or romaine. Pinch the roll closed at one end and position it so it points to your left and right. Starting at the opposite side from where you're holding the roll, use a sharp nonserrated knife to make perpendicular cuts. The closer together your cuts, the thinner the resulting shreds. After you chiffonade the entire roll and repeat with additional rolls, gently pull apart and fluff the lettuce ribbons.

How to Make an Edible Sugar Cookie Bouquet

0

Everything is sweeter in bouquet form! This edible sugar cookie bouquet is so simple to create and is the perfect sweet gift. The cookies are a simple vanilla roll-out cookie glazed with a pretty, pastel-hued royal icing and decorated with flowers! It's perfect for spring or for Mother's Day. It's just as delicious as it is gorgeous, too!

This Edible Sugar Cookie Bouquet is so beautiful and delicious. Perfect for Spring!

Watch the video

Things You\’ll Need

  • 8.8 ounces (250 grams) all-purpose flour

  • 1/2 teaspoon baking powder

  • 1/4 teaspoon baking soda

  • 1 teaspoon salt

  • 5.6 ounces (160 grams) unsalted butter, at room temperature

  • 4.9 ounces (140 grams) granulated sugar

  • 1 large egg, at room temperature

  • 1 teaspoon vanilla bean extract

  • 1.1 pounds (500 grams) powdered sugar

  • 2 large egg whites

  • 1/2 teaspoon cream of tartar

  • 3-4 teaspoons water, as needed to thin the icing

  • Food dye, e.g. red, blue, yellow or green

  • Decorations, e.g. edible flowers (rose or lavender buds), edible glitter, gold leaf or sprinkles

  • 15 to 20 wooden skewers

  • Cookie cutters

  • Fresh flowers, ribbon, kitchen string and brown wrapping paper (optional)

Step 1: Make the dough

In a large mixing bowl, whisk together the all-purpose flour, baking powder, baking soda and salt. Set aside.

In the bowl of a stand mixer, beat the butter and granulated sugar together on medium-high speed until light and fluffy, about 3 to 4 minutes. Add in the whole egg and vanilla bean extract. Beat until well combined, two more minutes. Add in the dry ingredients and beat until just combined.

Mix until the dough resembles a coarse and combined mixture.

Remove the dough from the bowl and cover in a layer of plastic wrap. Set aside in the refrigerator to chill for at least two hours or overnight.

Step 2: Roll the dough

Pre-heat the oven to 350 degrees F (180 degrees C). Line a large baking tray with parchment paper. Set aside. On a lightly floured surface, roll the dough out into a rough rectangle, about 1/4 of an inch (0.6 centimeters) thick.

Use a lightly floured rolling pin to roll out the dough.

Using the cookie cutters, cut out as many shapes as possible out of the dough. Re-roll the dough scraps into the same thickness and again, cut out as many shapes until the dough is all used up.

Set the shapes aside on the baking tray, making sure to allow room for spreading.

Place the cookies on the baking tray.

Step 3: Bake

Bake the cookies, for 7 to 12 minutes, or until the cookies are just beginning to take on some color and are firm around the edges. Remove from the oven and immediately insert the wooden skewers into the middles of each cookie. Leave the cookies to cool completely, about 30 minutes.

Bake until the cookies are beginning to take on some color and the edges are firm.

Step 4: Make the royal icing

In the bowl of a stand mixer, combine the powdered sugar, egg whites and cream of tartar. Whisk, on medium speed, until just beginning to combine. Add in two teaspoons of water. Whisk to combine.

At this point, judge the consistency of the royal icing. You want it to be fluid but firm enough to be able to pipe on-top of the cookies. If it is too thick, add an extra teaspoon of water at a time to thin or if it is too thin add a teaspoon of powdered sugar until it has slightly thickened.

The royal icing should be very smooth and fluid but thick enough to pipe when it is ready.

Divide the icing between two small bowls. Add one drop of food coloring into the first bowl and mix until evenly combined. Add another drop of food coloring into the second bowl and again, mix until evenly combined. Place each colored icing into a piping bag fitted with a small tip. Set aside.

Divide and color the icing.

Tip

If you do not have access to a piping bag or piping tip, you can place the icing in a small zip-lock bag and snip off the tip for a similar effect.

Step 5: Ice the cookies

Pipe the royal icing over the tops of the cookies, alternating colors and decorating styles.

Thickly ice the sugar cookies.

Step 6: Assemble and serve

Tie your sugar cookies together with some kitchen string. Add some fresh flowers (if desired) and a pretty ribbon then use some brown paper to wrap the bouquet up!

Turn the sugar cookies into bouquet form by adding fresh flowers, wrapping paper and ribbon!

Gift and enjoy your edible sugar cookie bouquet! The cookies can be stored in an airtight container for up to three days.

This Edible Sugar Cookie bouquet is as beautiful as it is delicious!

This Kiwi Cupcake Recipe Is Bursting with Tart & Buttery Flavor

0

These kiwi cupcakes are a delicious and refreshing summertime treat. They are bursting with tart kiwi flavor whilst also being buttery and perfectly sweet. Learn how to make these striking cupcakes by following the simple instructions below.

These kiwi cupcakes are the perfect summer treat.

Video of the Day

Things You\’ll Need

  • 7 ounces / 200 grams all-purpose flour

  • 1 teaspoon baking powder

  • 1/2 teaspoon baking soda

  • 1/2 teaspoon salt

  • 5 ounces / 140 grams granulated sugar

  • 8 ounces / 225 grams unsalted butter, at room temperature

  • 3 large egg whites, at room temperature

  • 5 ounces / 140 millilitres whole milk

  • 2 teaspoons vanilla bean extract

  • 1.1-pounds / 450 grams confectioners' sugar

  • 1 large kiwi fruit, mashed

  • 1 tablespoon full-fat coconut cream or heavy cream, at room temperature

  • A few drops of green food coloring, optional

  • For decoration: 2 large thinly sliced kiwi fruit, coconut flakes, sprinkles (optional)

Make the Cupcake Batter

Step 1

Pre-heat the oven to 350 degrees Fahrenheit (180 Celsius). Line a 12-hole cupcake pan with paper liners. Set aside.

Line a cupcake pan with paper liners.

Step 2

In the bowl of a stand mixer fitted with the beater attachment set on medium speed, beat the flour, baking powder, soda, salt, and sugar, until incorporated.

Mix together the dry ingredients.

Add in 3.5 ounces (100 grams) of the butter, a tablespoon at a time, until it is all used up. Continue to beat for a further 3 to 5 minutes or until the mixture forms a sandy meal-like texture.

Beat to form a sandy texture.

Meanwhile, in a large pouring jug or bowl, whisk together the egg whites, milk, and a teaspoon of the vanilla bean extract.

Combine the liquid ingredients.

Set the mixer speed to medium-low. Pour in half the liquid ingredients. Beat until just combined, then pour in the remaining half. Pause mixing to scrape down the bottom and sides of the bowl.

Pour the liquid ingredients into the dry ingredients.

Increase the mixer speed to medium-high and beat until the batter is smooth, 3 more minutes.

Mix to form a smooth batter.

Step 3

Divide the batter between the paper liners, making sure to fill them no more than 2/3 full.

Divide the batter between the paper liners.

Step 4

Bake for 20 minutes or until risen, and a skewer inserted into the middle comes out clean. Remove from the oven and let the cupcakes cool in the tin for 10 minutes before setting them out and onto a wire rack to cool completely before frosting.

Bake until the cupcakes are golden brown.

Make the Frosting

Step 1

In the bowl of a stand mixer fitted with the beater attachment, beat together the remaining 4.4 ounces (125 grams) of the butter and the confectioners' sugar until pale, 4 minutes.

Add in the mashed kiwi fruit and beat until combined. Add in the remaining teaspoon of the vanilla bean extract, cream, and a few drops of green food coloring, if using. Increase the mixer speed to medium-high and beat until well combined and fluffy, 3 more minutes. Pause mixing as needed to scrape down the bottom and sides of the bowl.

Beat to form a thick and smooth frosting.

Place the frosting into a large piping bag fitted with a large star tip. Pipe a generous amount of the frosting onto the tops of the cooled cupcakes in a circular motion to form a ruffled and swirled effect. Top each cupcake with a thin slice of kiwi fruit. Chill for 20 minutes to firm up the frosting.

Generously frost the cupcakes and top with a kiwi slice.

Step 2

Serve the kiwi cupcakes! They are best served on the day of making but can be kept in an airtight container at room temperature for up to 3 days or sealed in the refrigerator for up to 5 days. The cupcake can be made up to 2 days in advance and frosted on the day of serving.

Enjoy the kiwi cupcakes!

DIY Red-Hot Cinnamon Heart Lollipops

0

It's no secret that Valentine's Day is known for boxed chocolate and conversation hearts. Both treats are tasty, but if we're being honest, sweet treats aren't for everyone. So why not make a batch of homemade cinnamon heart lollipops? This project is perfect for fans of zesty, spicy flavors. The best part is that it uses store-bought candy, so you won't need to make anything from scratch. Once Valentine's Day rolls around, these DIY lollipops can be gifted individually or bunched together like a bouquet.

Cinnamon heart lollipops

Video of the Day

Things You\’ll Need

  • Silicone heart lollipop mold

  • Lollipop sticks

  • Cinnamon Jolly Ranchers

  • Resealable plastic bag

  • Hammer

  • Star sprinkles and icing (optional)

  • Edible glitter flakes and maple syrup (optional)

Supplies for cinnamon heart lollipops

Tip

Silicone lollipop molds and lollipop sticks can be found in the candy section of your local craft store. If the retailer doesn't have heart-shaped molds, check eBay or Amazon.

Making a large batch of lollipops? Consider purchasing multiple molds.

Step 1

Unwrap the Jolly Ranchers. Place them in the plastic bag and seal it shut.

Pre-heat the oven to 275 degrees Fahrenheit.

Place Jolly Ranchers in plastic bag

Step 2

With the hammer, smash the Jolly Ranchers to break them apart.

Warning

Head outside and do this step on your driveway or sidewalk. The force of the hammer can break tile, so avoid counter tops and floors.

Crush candy with a hammer

Aim for a mix of small and big chunks; the pieces don't have to be super tiny.

Crushed cinnamon candy

Step 3

Fill the heart mold with crushed Jolly Ranchers. Don't worry about filling every nook and cranny because the candy will melt into the shape. You'll also be adding more candy later on.

Place the mold in the oven for 5 to 7 minutes, or until the pieces have completely melted into whole hearts.

Fill the heart mold with candy

Step 4

Place the lollipop sticks into the mold. Slightly rotate and roll each one to cover the end with melted candy, but make sure it stays in the groove.

Add lollipop sticks to melted candy

Step 5

Add more crushed candy until the cavity is full. Return to the oven for another 5 to 7 minutes, or until the additional candy has completely melted.

Add crushed cinnamon candy

Step 6

Let cool for at least 25 minutes.

Let the lollipops harden

Once set, the lollipops will pop right out.

Finished cinnamon heart lollipops

Step 7

For an emoji-inspired version, stick 2 star-shaped sprinkles to a finished lollipop. Ordinary canned icing works great as "glue", while a toothpick is useful for application.

Emoji heart lollipop

Step 8

You can also add edible glitter flakes for some sparkle and shine. Apply a thin layer of maple syrup on each lollipop, then sprinkle the flakes on to the lollipop. Leave to dry.

Glitter heart lollipops

To gift your homemade heart lollipops, wrap each one in a cellophane bag and tie it off with a ribbon. Feel free to make it extra special with a personalized note or card.

Cinnamon heart lollipops

DIY Campfire Cupcakes

0

If you and your troop have a longing to gather around a fire pit, here are some adorable cupcakes that will make everyone a happy camper. Decorated with logs and flames, there are even marshmallows roasting by the open fire. These treats are perfect for outdoor enthusiasts, boys and girls scouts, and even people who are more into glamping than camping. One bite, and they'll be singing kumbaya.

campfire cupcakes

Video of the Day

Things You\’ll Need

  • Chocolate cupcakes

  • White frosting

  • Red, yellow and orange frosting dye

  • Clear plastic wrap

  • Piping bag

  • Open star piping tip #1M

  • Confectioner's sugar

  • Pirouette cookies

  • Pretzel sticks

  • Toothpicks

  • Miniature marshmallows

materials

Step 1: Bake Cupcakes

Bake a batch of chocolate cupcakes, either from scratch or with a cake mix. I used a devil's food cake mix for convenience. These baking cups with a woodgrain were super appropriate for the campfire theme, but a plain cupcake liner with a dark color would be just fine. Stay away from polka dots or stripes, which would be distracting.

cupcakes

Step 2: Prepare the Frosting

You can use store-bought white frosting or make your own. I like the way homemade frosting holds its shape, so I made a basic buttercream frosting with a stick of butter, half a cup of vegetable shortening and four cups of confectioner's sugar. After mixing those ingredients, I added a pinch of salt, a teaspoon of vanilla and three tablespoons of water. Divide the frosting into three bowls.

frosting

Step 3: Dye the Frosting

To give the frosting the look of flames, we'll dye it in three colors — red, yellow and orange. Place a few drops of frosting dye in each bowl and stir. Add a little dye at a time until you reach the color intensity you desire.

red dye

You will need very little of the orange and yellow dyes to color those frostings. Red takes a little more to get the darker hue. Also, instead of using orange dye, you can use a mixture of red and yellow.

dyed frosting

Step 4: Prepare the Piping Bag

Cut a 15-inch piece of clear plastic wrap and set it on your work surface.

plastic wrap

Spoon the frosting in three rows onto the middle of the plastic wrap, almost like a rainbow.

frosting rows

Roll up the frosting in the plastic wrap like it's a sausage. Snip off the excess plastic wrap from one end.

rolled frosting

Place the rolled up frosting in a piping bag fitted with a 1M open star tip. Now when you squeeze out the frosting, it will come out in three colors.

piping bag

Step 5: Sprinkle Powdered Sugar

Sift a little powdered sugar on top of your cupcake. This layer gives the cupcake a look of ashes. And, well, who doesn't love a little more sugar?

powdered sugar

Step 6: Add the Logs

For logs, we're using Pirouette cookies. Break them into one-inch pieces. If the ends are ragged and uneven, that's even better because they are more realistic that way.

logs

Squeeze a round dollop of frosting onto the middle of the cupcake and position three logs on the frosting on top.

logs on the fire

Step 7: Pipe the Flames

To create the flames, hold the piping bag over the cupcake, squeeze while raising the bag, stop squeezing and then lift the bag. You'll want about five flames. Don't worry about making them look perfect. Actual flames vary in size and shape. As long as you have some twisting red, yellow and orange colors on top of your logs, it will look like flames.

flames

Step 8: Add More Firewood

While the three sticks of "wood" covering the "fire" provide a fun look, they also keep the frosting flames from drooping over until they're set. For this step, we're using pretzel sticks. Position three sticks around the fire, alternating them between the logs, so that they intersect at the top. You don't need to actually insert the sticks in the cupcake — just rest them against the frosting flames. When the frosting sets, it will lock the pretzel sticks in place.

teepee

Step 9: Add the Marshmallows

Skewer two miniature marshmallows onto a toothpick.

marshmallows

With a lighter, singe the surface of one side of the marshmallows. You want just a little bit of color, not a totally blackened marshmallow.

roasted marshmallow

Stick the toothpick into the side of the cupcake by the fire.

marshmallow by fire

What a delightful way to enjoy a campfire without worrying about ants, mosquitoes or bears.

campfire cupcakes