Home Blog Page 32

Easy Pizza Casserole Recipe

0

Looking for a fun and tasty weeknight meal? Make this family-friendly pizza casserole. With ingredients like Italian sausage, pepperoni and bell peppers, this dish features the best of a classic "meat lover's pizza." It's also ideal for satisfying that pizza craving when you don't have a crust—or simply don't feel like making one! Read on to make it yourself.

Pizza casserole recipe

Video of the Day

Things You\’ll Need

  • 1 pound Italian sausage or ground meat of choice

  • 1 medium bell pepper, deseeded and diced

  • 1 medium onion, deseeded and diced

  • 2 garlic cloves, minced

  • 5 cups pasta or pizza sauce

  • 2.25-ounce can sliced olives (optional)

  • 1/2 cup chopped ham, plus more for topping

  • 3 ounces pepperoni

  • 2 cups shredded mozzarella cheese

  • 16 ounces pasta of choice

  • Olive oil

Ingredients for pizza casserole recipe

Step 1

Preheat the oven to 350°F. Grease a 3-quart casserole dish.

In a large skillet, heat about 2 tablespoons of oil. Cook the bell peppers and onions for 5 to 7 minutes, or until tender. Add the garlic and cook for 30 seconds to 1 minute.

Cook bell pepper, onion and garlic

Step 2

Remove the sausage from their casings and add to the skillet. Cook for 10 minutes or until no longer pink, using a spatula to break up the meat.

Cook Italian sausage

Step 3

Set aside about 20 pieces of pepperoni for the topping. Chop the rest of the pepperoni.

Chop the pepperoni

Step 4

To the skillet, add the sauce, chopped pepperoni, diced ham and olives. Mix well. Simmer for 10 minutes or until the sauce is thick.

Mix sauce, ham, pepperoni and olives

Step 5

While the sauce is simmering, cook the pasta according to the package's directions. Drain well.

Cook the pasta

Step 6

Carefully add the pasta to the sauce and stir. If your skillet isn't big enough, you can add the sauce to the pot of pasta instead.

Add the pasta to the sauce

Step 7

To the greased casserole dish, add half of the pasta. Top with half of the shredded cheese.

Add pasta and cheese to casserole dish

Step 8

Add the remaining pasta, then top with the remaining cheese. Top with chopped ham and pepperoni.

Top with pasta, cheese and pepperoni

Step 9

Bake for 20 minutes or until cheese is bubbly and pepperoni is slightly crispy.

Bake until cheese is bubbly

Serve with a side salad or garlic bread. Enjoy!

Pizza casserole recipe

Drinks That Help You Sleep at Night

High angle view of a cup of milk A warm glass of milk at bedtime can help you go to sleep. Image Credit: Medioimages/Photodisc/Photodisc/Getty Images

Drinking a warm glass of milk before bedtime is a nostalgic, comforting tradition passed on from generation to generation. In other families or cultures it may be another warm beverage like tea or hot chocolate. Many people believe that ingredients in certain warm beverages work with chemicals in your body to help relax you and send you off to sleep.

Video of the Day

Warm Milk

Woman drinking milk Warm milk may help you sleep. Image Credit: Jupiterimages/Photos.com/Getty Images

While most doctors believe that there is no real connection between falling asleep and drinking a warm glass of milk at bedtime, the tradition will not die anytime soon. It remains a popular bedtime ritual in the U.S. You can heat the milk slowly in a saucepan to just below boiling. You can also use the microwave, but you must watch the milk to prevent it from overflowing. To spice up your milk, add a bit of nutmeg or honey.

Warm Eggnog

Cup of eggnog, (Close-up) Warm eggnog Image Credit: Spike Mafford/Photodisc/Getty Images

Switch to warm eggnog during the holiday season. This rich and creamy drink is made of egg yolk and heavy cream, so it is very heavy on the stomach. A full stomach can also make you very sleepy. Eggnog is widely available during the holiday season at grocery stores, or you can find a recipe and make it yourself. Homemade eggnog usually includes a few teaspoons of rum. The mixture of heavy, warm eggnog and rum induces sleep.

Hot Chocolate and Malted Milk

Two cups of abuelita hot chocolate with chocolate pieces, close-up Hot chocolate Image Credit: Jack Hollingsworth/Photodisc/Getty Images

Hot chocolate is a popular drink for bedtime because it's tasty, warm and creamy. Malted milk drinks are even creamier than hot chocolate. Popular types of malted milk drinks include Ovaltine and Horlicks. The creamy hot drinks are comforting, and heavy on the stomach. However, do not make hot chocolate in the biggest mug you can find; there are diuretic ingredients in hot chocolate that will have you running to the bathroom all night if you drink too much.

Herbal Tea

close-up of a young woman holding a cup of herbal tea Herbal tea Image Credit: George Doyle/Stockbyte/Getty Images

Many swear by calming herbal teas such as chamomile tea. Some companies even labels these teas as bedtime teas. Make sure that the tea is caffeine free. Caffeine will keep you alert rather than put you to sleep. Other teas that are said to be relaxing and calming are jasmine, peppermint and ginger.

How to Freeze Kidney Beans

Things You\’ll Need

  • Large pot

  • Dried or canned kidney beans

  • Freezer-safe zip-top bags

  • Permanent marker

  • Freezer or deep freeze

Kidney beans are named for their kidney shape, and are often used in soup and chili for their hearty, meaty texture. Freezing kidney beans is an easy way to preserve cooked beans for long periods of time. Freezing beans when they are slightly undercooked will help maintain the texture of the beans, but because kidney beans contain small amounts of toxins when they are undercooked, you'll want to fully cook your beans before serving. Kidney beans can be frozen for up to a year while still maintaining their flavor and texture.

Step 1

Cover dried beans with water and soak overnight in a large pot. The next morning, drain the soaking water and cover beans with fresh water. Simmer the soaked beans over medium heat until they are still slightly firm (about the texture of al dente pasta), then drain and rinse the beans. Most kidney beans cook in about two hours. Canned beans are pre-cooked, and can be frozen right from the can once they are drained and rinsed.

Video of the Day

Step 2

Scoop your kidney beans into freezer-safe zip-top bags. Put about one cup of beans in each bag for easy portioning later on. Press any air out of the bag, and seal the top. Mark the date on the front of each bag with a permanent marker.

Step 3

Smooth the beans into a flat layer across the bag for easy storage in the freezer. Stack bags on top of each other in your freezer or deep freeze. Leave the beans in the freezer until you want to use them.

Step 4

Remove the beans from the freezer and allow them to thaw in the sink or on the kitchen counter. Add thawed beans to soup or chili and allow them to finish cooking with the rest of the ingredients, or finish cooking the beans individually. Beans can be baked with sauce and spices or simmered on the stove top. Cooked beans should be soft, and the inside should be slightly mushy.

Types of Glass to Serve With Eggnog

... Eggnog means eggs inside a small cup.

Eggnog is a common drink served during the holiday season. Traditionally, eggnog has been served as an adult-only drink containing alcohol, but alcohol-free recipes are gaining in popularity. Children, the elderly or even the health-conscious can have their share of eggnog for the holiday season. Eggnog can be served in a variety of glasses from casual parties to the most elegant party in town.

Video of the Day

Martini Glass

Serve eggnog in a martini glass for a posh look. Sprinkle nutmeg on top of the eggnog and finish it with half a stick of cinnamon as a stirrer and for added spice.

Punchbowl

For a large group or party, serve eggnog in a punchbowl. The punchbowl allows guests to get their own drinks and serves as a nice display. Add whipped cream and cinnamon to the bowl and lightly swirl it into the eggnog, leaving a visible swirl. Use small shooter glasses for guests to drink from.

Shot Glasses

Using small shot glasses is a great way to have guests sample your eggnog recipe. Mix cinnamon and allspice together, and put it on a plate. Store shot glasses in the freezer for 20 to 30 minutes. Remove glasses from freezer and dip the tops of the glasses into the cinnamon and allspice mixture. Pour eggnog into glasses and serve.

How to Eat Muscadine Grapes

0

Muscadine Grapes Close-up of muscadine grapes on branch Image Credit: BSPollard/iStock/Getty Images

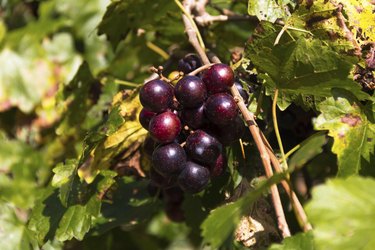
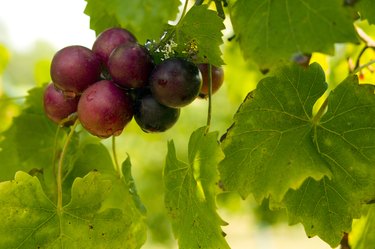
Whether deep red or greenish-bronze, the large, tough-skinned grapes known as muscadines are among the few that will survive the South's hot, humid summers. The various muscadine varieties, including the well-known bronze-hued scuppernong, thrive in wild areas, vineyards and home gardens. Because of this abundance, muscadines have been heavily used in Southern diets for more than just wine. In addition to being a sweet snack, muscadine grapes are also featured in classic recipes for entrees, desserts and preserves.

Video of the Day

Fresh Fruit

Muscadines 
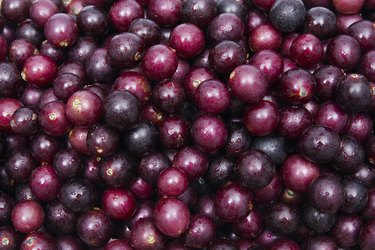
Close-up of muscadine grapes Image Credit: Darryl Vest/iStock/Getty Images

Most people prefer not to eat the thick skins or large seeds of the muscadine — but that doesn't mean the Southern grapes don't make suitable fresh eating. After biting or slicing a small slit into the grape skin, hold the open end of the grape inside your mouth and pop the pulp from the skin by squeezing the grape with your fingers. Discard the skin and seeds, unless you have a hankering for the tough, yet edible pieces.
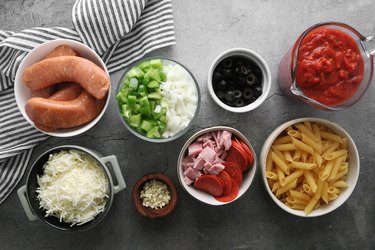
Juicing up Recipes

Cranberry juice 
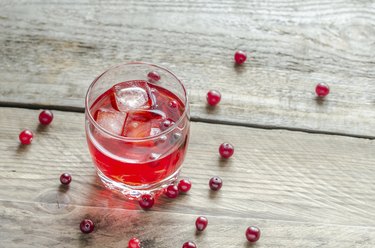
Glass of muscadine and cranberry juice Image Credit: AlexPro9500/iStock/Getty Images

Coaxing the juice from muscadine grapes not only produces a tangy liquid to replace your usual fruit juice, but also forms the base of jellies, wines and iced desserts. To juice muscadine grapes, choose fruit that is ripe but not overly so, then wash and mash them. This pulp gets simmered in its own juices, for about 10 minutes, before being put through a strainer to express the juice. An overnight settling in the refrigerator, then a final straining through jelly bags or cheesecloth, will produce muscadine juice that you can use in jellies and other foods.

Southern-Style Jelly

sandwich with jam 
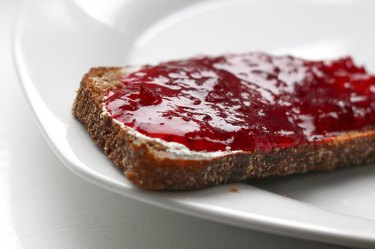
Red jelly on toast Image Credit: olegtoka/iStock/Getty Images

Muscadine jelly starts with the fresh juice, which is boiled rapidly with sugar at a rate of 4 parts muscadine juice to 3 parts sugar. When the temperature reaches about 220 degrees Fahrenheit, test the jelly by inserting a chilled spoon into the mixture and tipping the filled spoon on its side and letting the fluid drip back into the pan. If two drops come together as they are dripping from the spoon and form a "sheet," the muscadine jelly is ready to come off the heat and have its foam skimmed, says the National Center for Home Food Preservation. After filling and sealing jelly jars, they go into a boiling water canner for at least 5 minutes, depending on your altitude.

Sophisticated Slushies

Strawberry smoothie with Healthy juices 
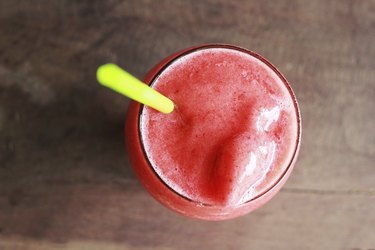
Close-up of a red slushy drink Image Credit: seagames50/iStock/Getty Images

To make an elegant granita — an iced dessert somewhat similar to a sorbet — start by simmering a few cups of muscadine juice with a small scoop of sugar. After the juice and sugar simmer for about 10 minutes, it's brought off the heat, and mixed with an equal amount of cold water. This mixture is then put in a glass dish, slipped into the freezer, and removed every 30 minutes or so for scraping and remixing to create an icy treat.

"Muscy" Muffins and More

Mixed Berry Muffin 
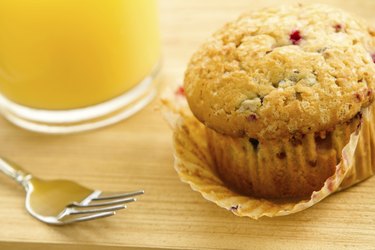
Muscadine muffin beside glass of orange juice Image Credit: RonOrmanJr/iStock/Getty Images

To use muscadines in baked goods, you'll need to process the grapes first — the fruit is too big and seedy to use in muffins or cakes as you might blueberries. After you've removed the pulp from the skins, heat the pulp to loosen the seeds. The pulp, put through a sieve to remove the seeds, can rejoin the skins until it becomes a tender filling. Once you have your pulpy filling, spread it over a basic cake batter before it goes into the oven, or use it as a muffin filling.

Tangy Touches

Muscadine grapes on the vine Close-up of muscadine grapes on branch Image Credit: Paula Siwek/iStock/Getty Images

Along with their key role in desserts and preserves, muscadine grapes add piquancy to Southern savories. Once roasted or baked, the skins soften enough for easy chewing, making preparation limited to halving or quartering the grapes, and removing their seeds with the tip of a knife. Muscadines make a sweet-savory combination on feta-onion pizza, or when roasted with sausage, pork or lamb chops. Also on the non-sweet spectrum, muscadine juice forms the basis for a hearty vinegar when fermented with sugar, wine or grain alcohol, and for starter vinegars, such as apple cider.

How to Make Geode Cupcakes

Who doesn't like cupcakes? After all, their soft texture and sweet topping make for perfect just-for-me treats. But there is a way to make these individual desserts even more irresistible: add rock candy. By creating divots in your cupcakes for the hard pieces, you can assemble a topping that looks identical to a precious geode. Choose a color that resembles the real deal, like purple or blue, and then create the jeweled effect — don't worry about uneven lines, since imperfections make each cupcake look all the more unique! When you can add a gemstone-inspired look to your next fresh batch, you'll not only like your cupcakes, you'll love 'em.

How to Make Geode Cupcakes

Video of the Day

Things You\’ll Need

  • Cupcake recipe

  • White frosting

  • Cupcake liners (a tan color looks best)

  • Rock candy in white

  • Rock candy in desired interior color

  • Spoon or melon baller

  • Sandwich-size plastic ziplock bags

  • Knife

Step 1: Bake Cupcakes

Use your favorite recipe to whip up a batch of cupcakes.

How to Make Geode Cupcakes

Step 2: Create a Geode Shape

Once your cakes have cooled, take a melon baller or a spoon and scrape out some of the middle of each cupcake.

How to Make Geode Cupcakes

They don't have to be uniform, since geodes themselves are all unique in their structure. Save the insides to make cake pops, or just devour them as you go.

How to Make Geode Cupcakes

Step 3: Apply a Crumb Coat

Make your favorite white frosting — whether it's buttercream frosting or whipped cream frosting — and give each cupcake a thin layer. This doesn't have to look perfect: the purpose is to help keep all crumbs (and there will be a lot) from showing when the cupcakes are complete. After every cupcake is coated, pop them into the freezer to let the frosting harden.

Tip

You can leave the cupcakes inside the freezer for a few days, as long as they're in an airtight container. When you're ready to complete the final steps, let the cupcakes sit at room temperature for 30 minutes.

How to Make Geode Cupcakes

Step 4: Apply a Final Layer of Frosting

Now, apply another layer of frosting. This layer should hide all the crumbs.

How to Make Geode Cupcakes

Step 5: Crush Rock Candy

Place your rock candy, whether the pieces are on strings or on sticks, inside a plastic bag. Next, take the underside of a bowl, cup or a mallet to crush your candy into tiny bits. Do this to each shade of rock candy in individual bags.

How to Make Geode Cupcakes

Step 6: Apply Rock Candy to Cakes

First, sprinkle the interior color into the divot you've made in each cupcake. This color can also come out of the divot, too —again, it doesn't need to be perfect.

How to Make Geode Cupcakes

Next, take the white candy and press it onto the edges, surrounding your inside candy and covering the cakes completely.

How to Make Geode Cupcakes

Step 7: Dig In and Rock On

These pretty cupcakes sure know how to steal the show! As an added bonus, most rock candy is fruit-flavored, so you'll taste a fun combination when you bite in.

How to Make Geode Cupcakes

Skillet Brookie: Half Brownie Half Cookie Recipe

0

If you're having trouble deciding if you should make chocolate chip cookies or brownies, why not marry the best of both worlds and make a brookie! This dessert is made in a skillet and features a layer of chocolate chip cookie and a layer of brownie, resulting in a dish that's truly wicked and delicious. The cookie layer hides folds of molten chocolate chunks and the brownie layer is fudge-like with a perfectly crackled top. It's the ideal dessert for when you need something quick, simple and decadent. Add a scoop of ice cream and you've got yourself something truly amazing!

This Skillet Brooke is such a delicious and easy dessert!

Things You\’ll Need

  • 3.5 ounces / 100 grams unsalted butter, melted

  • 2.3 ounces / 65 grams granulated sugar

  • 4.2 ounces / 120 grams light brown sugar

  • 1 large egg

  • 1 teaspoon vanilla bean extract

  • 6.2 ounces / 175 grams all-purpose flour

  • 1/2 teaspoon baking soda

  • 1/2 teaspoon salt

  • 5.3 ounces / 150 grams dark chocolate, roughly chopped

  • Optional for serving: ice cream, chocolate fudge sauce, chopped nut_s_

Step 1

Pre-heat the oven to 350 Fahrenheit (180 Celsius). Grease an 8 inch / 20 centimeter cast iron skillet or a large baking tin. Set aside.

Generously grease a large skillet.

Step 2

To make the chocolate chip cookie base, pour the melted butter into a medium sized mixing bowl. Add in the granulated sugar and light brown sugar. Whisk until combined. Add in the egg and vanilla bean extract. Whisk until the mixture is smooth and glossy.

Add in the all-purpose flour, baking soda and salt. Whisk until just combined. Fold in the dark chocolate chunks until evenly combined throughout the dough. Set the bowl aside until needed.

Whisk until the chocolate chunks are evenly incorporated throughout the dough.

Make the Brownie

Things You\’ll Need

  • 2.3 ounces / 65 grams dark chocolate, finely chopped

  • 3 ounces / 85 grams unsalted butter, melted and hot

  • 5.3 ounces / 150 grams granulated sugar

  • 1 large egg

  • 1 teaspoon vanilla bean extract

  • 1.4 ounces / 40 grams all-purpose flour

  • .8 ounces / 25 grams Dutch-processed cocoa powder

  • 1/2 teaspoon salt

Step 1

Place the dark chocolate into a medium sized mixing bowl. Pour over the hot melted butter. Whisk until the mixture is smooth. Immediately add in the sugar and whisk until combined.

Add in the egg and vanilla bean extract. Whisk until the mixture is very glossy and thick. Add in the flour, cocoa powder and salt. Whisk until smooth.

Whisk until the brownie batter is smooth and glossy.

Assemble the Skillet Brookie

Spread the chocolate chip cookie dough over the base of the skillet, using a rubber spatula to help spread it all the way to the edges. Pour over the brownie batter. Use a rubber spatula to smooth down the top.

Smoothly spread the cookie dough until it reaches the edges of the skillet. Bake, until firm around the edges and just set in the middle.

Bake for 25 to 30 minutes, or until firm around the edges, crackled on the top and the middle has just begun to set. Remove from the oven and let cool until you're ready to serve.

Ready to Eat!

Slice and serve! Add a dollop of ice cream, if you desire, or a generous drizzle of chocolate fudge sauce. The brookie is best eaten warm but will keep for up to 3 days stored in an airtight container at room temperature.

Serve with a generous scoop of ice cream for something even more delicious.

One-Bowl Peppermint Brownies Recipe

0

This is the most decadent one-bowl dessert of the year. Two kinds of chocolate join together for a rich and fudge-like brownie, studded with peppermint candy inside and out.

peppermint brownies

Video of the Day

Things You\’ll Need

  • 1/2 cup salted butter

  • 12 ounces chocolate, divided

  • 3 eggs

  • 1 teaspoon vanilla extract

  • 1 teaspoon peppermint extract

  • 3 tablespoons unsweetened cocoa powder

  • 3/4 cup flour

  • 1/2 cup sugar

  • pinch of salt

  • 1 cup peppermint candies (or candy canes)

ingredients for peppermint brownies

Step 1: Melt Chocolate and Butter

Cut 8 ounces of chocolate and butter into large chunks, then melt together in a microwave-safe bowl, in 30 second intervals. About 60-90 seconds total. (Save the rest of your chocolate for the last step.)

butter and chocolate

Stir to combine.

melted chocolate and butter

Step 2: Add Wet Ingredients

Stir in eggs, one at a time. Add vanilla and peppermint extract.

eggs

Step 3: Combine Dry Ingredients

Whisk in sugar, cocoa powder and salt, but not the flour.

Tip

Over-stirring flour develops gluten, which can make baked goods chewy like bread. Adding flour at the end helps avoid gluten buildup.

whisking dry ingrdients

Step 4: Crush Peppermints

Put candies (or candy canes) in a zip-top baggie and crush by whacking–not rolling–with a rolling pin or meat mallet. Add 1/2 cup of crushed candy to the cocoa mixture and reserve the rest.

crushing candy

Step 5: Finish with Flour

Add peppermint candy to the cocoa mixture. Then stir in flour.

adding flour as a last step

Step 6: Prepare a Pan

Coat a 9×9 baking dish with butter or non-stick spray, then line with a sheet of parchment paper.

prepping pan

Step 7: Bake

Bake at 350°F for 30 minutes, until a toothpick comes out with only a crumb or two attached.

In the last two minutes of baking time, pull the brownies out (working quickly so they get back in without losing baking time) and place remaining blocks of chocolate on top. The chocolate will melt and create a nice glue for the rest of your peppermint candy.

Step 8: Add Toppings

Once the brownies are completely out of the oven, use a spatula to spread the warm chocolate in an even layer on top.

melted chocolate

Then sprinkle peppermint candy over the top.

sprinkle peppermint candy

Step 9: Cool and Slice

Allow to cool for 10 minutes, then pull up on sides of parchment to remove from pan easily.

Cool completely before cutting, ideally in the refrigerator so the chocolate frosting can stiffen.

baked brownies

Keep your squares small. The result is rich and thick, every bite packing a punch of seriously satisfying flavor.

peppermint brownies

How to Drizzle Caramel Over Cakes

0

Things You\’ll Need

  • Cake

  • Cooling rack

  • Baking sheet, rimmed

  • Aluminum foil

  • Caramel glaze

  • Saucepan or microwave-safe bowl

  • Large cooking spoon

  • 2 large spatulas

  • Serving platter

... Drizzle caramel over cake for a sweet treat.

Caramel is created by heating sugar and other ingredients until they turn a golden brown and take on a characteristic flavor. A tasty caramel glaze adds a sweet finish to a cake, and it is thinner than a caramel frosting, which is applied with a spatula. A glaze that is intended for drizzling is pourable. Buy this glaze commercially or make your own, and drizzle it over yellow, white, chocolate or spice cakes. Drizzle it over cheesecakes as well.

Video of the Day

Step 1

Place the cake on a cooling rack and put both on a rimmed, foil-lined baking sheet. The baking sheet will catch any dribbles that do not stick to the cake.

Step 2

Warm the caramel briefly if necessary to make it pourable. Place it in a small saucepan or a microwave-safe bowl and warm it on a low setting.

Step 3

Scoop up a large spoon full of caramel and hold it over the cake.

Step 4

Tip the spoon lightly to control the flow, and allow the caramel to fall across the top of the cake and cascade down the sides.

Step 5

Refill the cooking spoon as necessary and drizzle until the cake has as much drizzled glaze as you like.

Step 6

Place the cake in a cool place so that the glaze will set, then use two large, wide spatulas to move the cake from the rack to the serving platter.

Tip

Drizzle caramel glaze on a tube or Bundt cake for a beautiful presentation.

Drizzle caramel over a fully-frosted cake. The two-tone effect is very attractive.

Pound cakes, which are generally unadorned, are dressed up nicely with a drizzle of caramel.

Consider applying the caramel with a pastry bag and large open tip.

Warning

Do not allow caramel to get too warm or it will become runny. A bit of the caramel will drip below to the baking sheet, but most will stay on the cake if drizzled at the right consistency. Caramel that is too cool will be thick and will not drizzle effectively. It takes practice to get the consistency just right.

How to Make Juice From Nanking Cherries for Jelly

0

Things You\’ll Need

  • Colander

  • Paper towels

  • Heavy-bottomed pot with lid

  • Wooden spoon

  • Potato masher

  • Fine-mesh strainer and cheesecloth or jelly bag

  • Large bowl

  • Liquid measuring cups (optional)

Plate of holiday treats Use Nanking cherry jelly in tarts or to glaze savory roasts. Image Credit: Jupiterimages/Photos.com/Getty Images

Tart Nanking cherries, fruits similar to common cherries, are just small enough to make pitting them a maddening task. For that reason, as well as because of their sweetly puckery taste, Nanking cherries are better known as jelly fruits than as pie filling. Before you can make the ruby-red jelly, you first have to stem, cook and strain the fruits to collect their juice.

Video of the Day

Step 1

Rinse the Nanking cherries with gently running water, then pat them dry. For every 3 1/2 cups of cherry juice called for in your jelly recipe, use about 3 1/2 pounds of whole Nanking cherries.

Step 2

Remove the stems from the cherries.

Step 3

Put the Nanking cherries in your pot and add enough water to cover them.

Step 4

Turn the burner to medium-high and bring the mixture to boiling. Stir the Nanking cherry pulp frequently as you're waiting for the liquid to boil.

Step 5

Lower the heat to medium-low once the Nanking mixture begins to boil. Prop the pot's lid loosely over the pot.

Step 6

Stir the pulp occasionally as it settles to a slow boil. Cook the Nanking cherry mixture for about 10 minutes. At this time, mash the pulp firmly with a potato masher. Return the lid after each time you stir and mash the pulp, making sure that it is not put too tightly on the pot.

Step 7

Set your cheesecloth-lined strainer or jelly bag over a large bowl. If you're using a strainer, line it with a least 4 layers of cheesecloth.

Step 8

Remove the pot from the stove. Pour the Nanking cherry pulp into the strainer or jelly bag. Leave the pulp to drip its juices into the bowl for at least 2 hours.

Step 9

Remove the strainer or jelly bag with the Nanking cherry pulp, reserving the pulp for another use. Pour the juice from the bowl into a measuring cup or a bowl.

Step 10

Proceed with your jelly recipe, or store the juice in the refrigerator for up to 24 hours.

Tip

Use the leftover pulp in muffins or tea bread. Alternatively, use it to make Nanking cherry jam or cherry butter.

Warning

Resist the temptation to squeeze or mash the Nanking cherry pulp once it is in the strainer or jelly bag. Doing so can add sediment to the juice, making for a cloudier jelly.