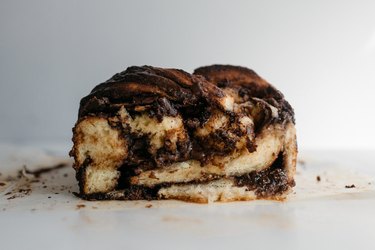
This delicious babka is filled with hypnotic molten swirls of hazelnut chocolate, which are spread throughout the most golden and fluffy brioche dough. There's a sticky-sweet sugar syrup over the top too, making this bread so incredibly addictive and soft. Learn how to make the most mesmerizing Chocolate Hazelnut Babka by following the simple instructions below!
Video of the Day
Make the Dough
-
1.6 fluid ounces (45 millilitres) whole milk
-
.25 ounce or 1 sachet (7 grams) dried instant yeast
-
8.8 ounces (250 grams) all-purpose flour
-
2 tablespoons granulated sugar
-
1 teaspoon salt
-
3 large eggs, at room temperature
-
4.4 ounces (125 grams) unsalted butter, at room temperature
-
8.8 ounces (250 grams) chocolate hazelnut spread
Place the whole milk in a small saucepan. Heat until it is lukewarm in temperature. Remove from the heat and whisk in the yeast until dissolved. Set the mixture aside to proof, 5 minutes.
Put the all-purpose flour, sugar and salt in the bowl of a stand mixer fitted with the dough hook attachment. Mix on low speed to combine. Increase the mixer speed to medium-low and pour in the yeast mixture. Mix to form a rough, shaggy dough, about 2 minutes. Increase the speed to medium and add in the eggs, one at a time, beating well after each addition. Let the mixer knead the dough until it is smooth, about 4 more minutes. Add in the unsalted butter, a tablespoon at a time, until it is all incorporated. Knead on high speed until the dough is smooth and velvety, 6 minutes.
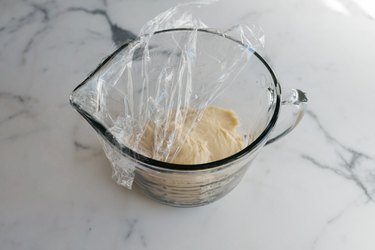
Place the dough in a lightly greased bowl and cover it with plastic wrap. Place the bowl in a warm draft-free area until the dough has doubled in sized, about 1 hour to 1 1/2 hours. When the dough has risen, knock it back in its bowl then re-cover the bowl and set it in the refrigerator to chill for at least 4 hours, or overnight.
Shape the Babka
Grease a 9 x 5 inch (22 x 13 centimetres) loaf pan. Line the tin with non-stick parchment paper, making sure to let it slightly overhang the sides. Set aside.
Remove the chilled dough from the bowl and place it onto a lightly floured surface. Using a lightly dusted rolling pin, roll the dough out to form a rough rectangular shape, about 1/2 inch (1.2 centimetres) in thickness. Then use a butter knife to spread an even layer of the hazelnut chocolate spread over the face of the dough.
Starting with the longest side of the dough, begin to tightly and gently roll the dough until it resembles a log shape. Turn the dough log over so that it faces seam side down. Use a sharp knife to trim about 1 inch (2.5 centimetres) of the dough off the ends. Then, starting at the top of the dough log, gently cut it evenly in half through it's middle. The layers of the dough should be visible and you will end up with two pieces.
Begin to braid the dough pieces together to resemble that of an intertwined plait, by bringing the two pieces close to each other and twisting the right piece over the left, the left piece over the right and so on. Gently press each end together to seal.

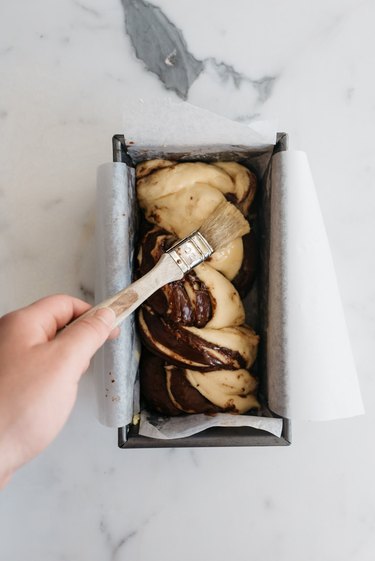
Carefully place the babka braided-side facing up in the baking tin set aside above. Loosely cover it with plastic wrap then place it in a just warm and draft-free place until it has doubled in size, about 1 hour.
Bake and Prepare the Glaze
-
1 lightly beaten egg, for the egg wash
-
1.8 ounces (50 grams) granulated sugar
-
1.7 fluid ounces (50 millilitres) water
Pre-heat the oven to 350 Fahrenheit (180 Celsius).
Using a pastry brush, gently glaze the top of the babka with a light coating of the egg wash.
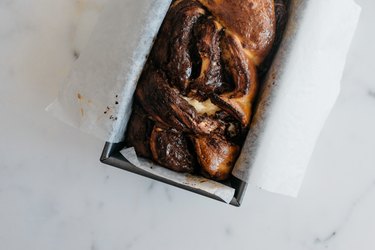
Bake for 22 to 26 minutes, or until golden brown and a skewer inserted into the middle comes out clean.
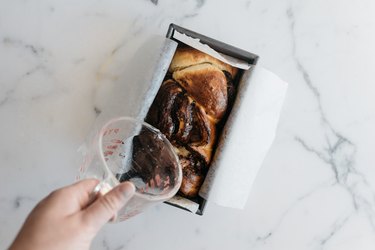
Meanwhile, make the sugar syrup glaze. Combine the sugar and water together in a small saucepan. Heat, stirring often until the sugar is dissolved. Set the glaze aside.
When the babka is baked, remove it from the oven. Immediately pour over the sugar syrup glaze. Allow the babka to cool in the tin for 15 minutes before carefully turning it out and onto a wire rack to cool completely.
Serve
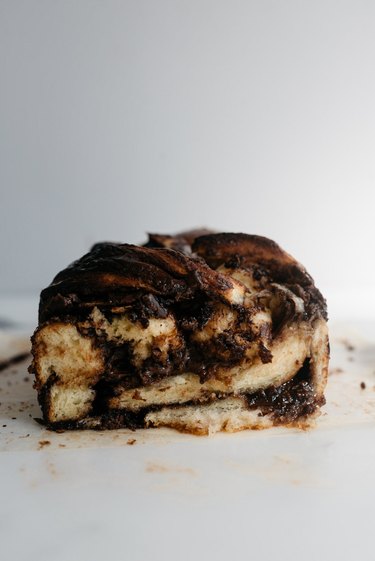
Slice and serve!

It is best eaten slightly warm or at room temperature and can be stored in an airtight container at room temperature for up to 3 days. Keep it out of direct heat or sunlight.

 There are many different kinds of avocados.