Home Blog Page 23

Elote (Mexican Street Corn) Recipe

0

Summer gatherings simply aren't complete without grilled corn. And while you can't beat simple toppings like butter and salt, you can also take things up a notch with elote. Also known as Mexican street corn, elote is a classic and delicious way to enjoy corn. It's easy to prepare, so you can lay out the ingredients and invite your guests to pile on the toppings themselves. Here's how to make elote for your next summer party.

Mexican street corn recipe

Video of the Day

Things You\’ll Need

  • 6 ears of corn, shucked

  • Olive oil, for grilling

  • 1/3 cup sour cream or crema fresca

  • 1/3 cup mayonnaise

  • 1/3 cup cotija cheese

  • 2 garlic cloves, minced

  • 1/2 teaspoon chili powder

  • 1/2 cup fresh cilantro, chopped

  • 1 lime

Ingredients for Mexican street corn

Tip

Cotija cheese is available in most grocery stores. But if you can't find cotija cheese, you can use feta instead.

Step 1

Brush the corn with olive oil.

Coat corn with oil

Step 2

Heat the grill to medium-high heat. Cook the corn for 25 minutes, turning occasionally. The corn is ready when it is slightly charred.

Grill corn

Tip

If you don't have a grill, you can use the oven. Heat the oven to 425 degrees Fahrenheit and place the corn on a foil-lined baking sheet. Cook for 30 to 40 minutes, turning every 10 minutes or until slightly charred.

Step 3

While the corn is cooking, combine the sour cream, mayonnaise and garlic in a small bowl.

Mix sour cream and mayonnaise

Step 4

Spread the sauce onto each side of the cooked corn. You can add as little or as much as you'd like.

Brush sauce on corn

Step 5

Pour the cotija cheese on a flat plate. Roll the corn in the cheese until covered.

Roll in cotija cheese

Step 6

Sprinkle with chili powder and fresh cilantro. Cut the lime into wedges and squeeze on the corn just before eating.

Mexican street corn

3 Pie Crust Recipes You Need to Try

0

Rich, creamy pies and some low-sugar fruit varieties (e.g. blueberry and strawberry rhubarb) make the perfect low-carb dessert. But what about the crust? Wouldn't ingredient restrictions make creating a tender and flaky crust dang near impossible? Well, actually, no. Not only is it possible, but it's easier than you think. Whether you need a pre-baked crust or a fill-and-bake one, there's a gluten-free, low-carb option that'll fit your needs and skill level. Below are three tried and tested crusts that'll work for a variety of pie recipes. The coconut-flour rolled crust can be used for single or double crust pies, both sweet and savory. The no-roll almond flour crust is a no-fuss, shortbread-style crust that can be used for practically any recipe calling for a single crust. And, finally, the no-bake chocolate crust is perfect for refrigerator-set pies with fillings that pair well with a chocolate shell.

Gluten-free and low-carb coconut flour rolled pie crust

Watch the Video Tutorial

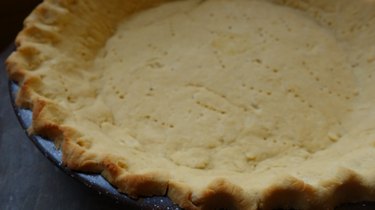
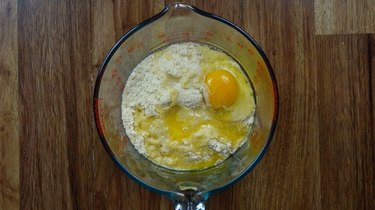
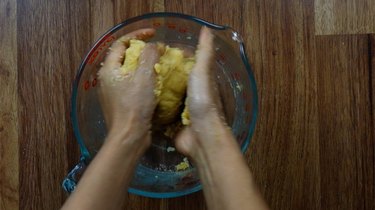
Almond Flour No-Roll Pastry Crust

Things You\’ll Need

  • 2 cups blanched almond flour

  • ¼ teaspoon salt

  • ¼ cup granular sweetener (I prefer Swerve granular)

  • 2 tablespoons melted butter

  • 1 egg

Step 1

In a large bowl, mix 2 cups almond flour and ¼ teaspoon of salt until well combined, then add ¼ cup granular sweetener, 2 tablespoons melted butter, and 1 egg.

Ingredients for almond flour no-roll gluten-free low-carb pie crust.

Step 2

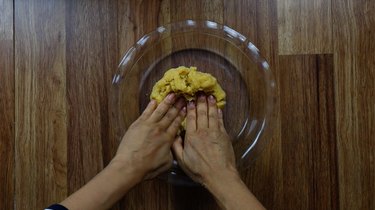
Mix with hands until it forms a ball.

Mixing ingredients with hands for almond flour no-roll gluten-free low-carb pie crust.

Step 3

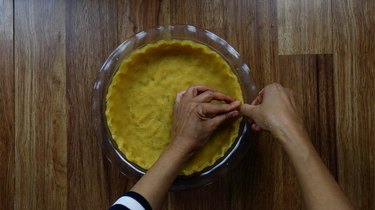
Place ball of dough into a 9-inch pie plate and press down evenly to form a crust.

Pressing almond flour no-roll gluten-free low-carb pie crust into pie plate.

Flute the edges if desired.

Crimping edges of almond flour no-roll gluten-free low-carb pie crust.

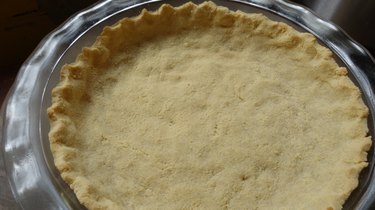
If you need a pre-baked crust for a no-bake pie (such as French silk) bake at 350 degrees Fahrenheit for 10 to 12 minutes or until golden and firm. If you're making a baked pie (such as pumpkin), prebake the crust at 350 degrees Fahrenheit for 8 minutes with the edges covered in foil before filling and baking. This ensures that the bottom of the crust is fully baked without the edges getting burnt from too much heat exposure.

Almond flour no-roll gluten-free low-carb pie crust

Coconut Flour Rolled Pie Crust

Things You\’ll Need

  • 1 cup coconut flour

  • ¼ teaspoon salt

  • 1 egg

  • ¼ cup granular sweetener (omit if making a savory pie)

  • 1 tsp vanilla (omit if making a savory pie)

  • ½ cup cold butter, cut into cubes

This recipe comes from Sugar Free Mom and it produces a tender, flaky crust resembling a traditional pie crust. In fact, the method is similar to the standard shortcrust pastry method, save for the addition of an egg and the substitution of coconut flour (in a lesser amount) for wheat flour. The optional addition of vanilla helps to mask the coconut flavor if you don't want any trace of it in your pie.

Step 1

In a medium mixing bowl, combine 1 egg, ¼ cup granular sweetener (omit if making a savory pie), and 1 teaspoon vanilla (optional for sweet pies, omit if using for a savory pie). Mix until well combined, then set aside.

Step 2

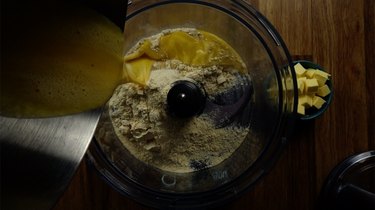
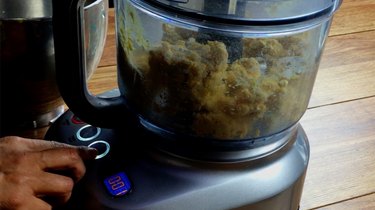
In a food processor or large mixing bowl, combine 1 cup coconut flour and ¼ teaspoon salt. Mix or whisk to combine. Then, pour in pre-combined egg mixture.

Combining ingredients for gluten-free, low-carb coconut flour rolled pie crust.

Step 3

Add ½ cup cold, cubed butter to the food processor or bowl. If using a food processor, pulse about 4 or 5 times (only for 1 second each time), until the mixture just comes together. Note that there should be small, visible pieces of cold butter in the dough. If not using a food processor, use a fork to first combine the egg mixture into the dry ingredients, then a pastry cutter to cut the cold butter cubes in.

Combining ingredients for gluten-free, low-carb coconut flour rolled pie crust in food processor.

Step 4

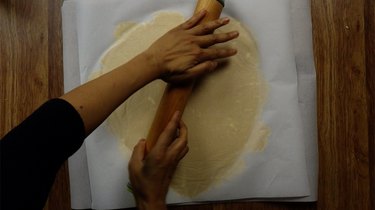
Roll out the crust between two sheets of parchment paper until about ⅛ of an inch thick.

Rolling out gluten-free, low-carb coconut flour rolled pie crust between two pieces of parchment paper.

Step 5

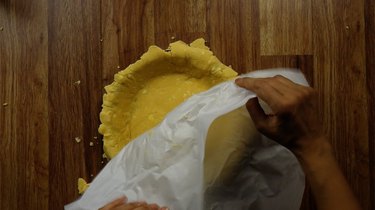
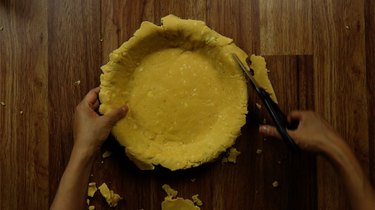
Peel off the top layer of parchment and place an inverted 9-inch pie plate on top of the crust.

Putting gluten-free, low-carb coconut flour rolled pie crust into pie pan.

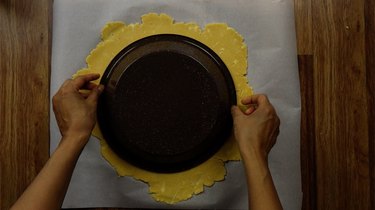
Flip the parchment paper, crust, and plate over, then peel off the paper. Gently ease the crust into the pan and trim excess crust from the edges. Try not to handle the dough more than needed to avoid melting the butter. Also, the dough has no elasticity so will tear if stretched. Patch up holes or tears with the excess pieces that were trimmed off.

Putting gluten-free, low-carb coconut flour rolled pie crust into pie pan. Trimming excess gluten-free, low-carb coconut flour rolled pie crust dough in pie pan.

Step 6

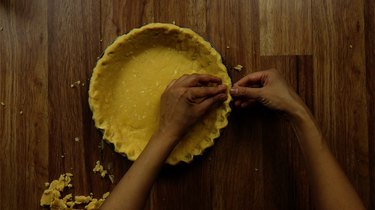
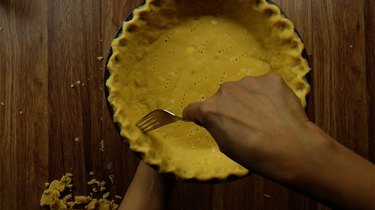
Flute the edges, then prick all over with a fork to allow heat to escape while baking.

Preparing gluten-free, low-carb coconut flour rolled pie crust for baking by fluting edges. Preparing gluten-free, low-carb coconut flour rolled pie crust for baking by pricking with a fork.

Step 7

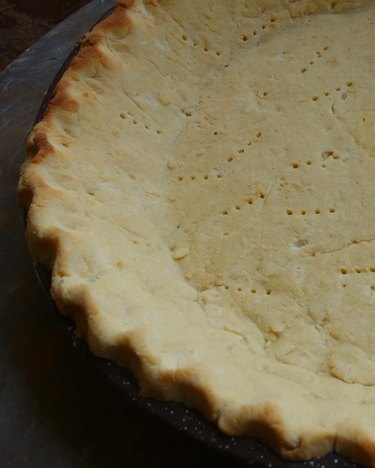
For a pre-baked pie crust, bake at 400 degrees Fahrenheit for 10 to 12 minutes. If you're making a baked pie (pumpkin, etc), partly prebake the crust at 400 degrees Fahrenheit for 8 to 10 minutes with the edges covered in foil before filling and baking. This ensures that the bottom of the crust is fully baked without the edges getting burnt from too much heat exposure.

Gluten-free and low-carb coconut flour rolled pie crust

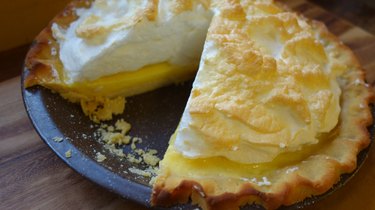
I paired this crust with low carb lemon meringue pie with terrific results.

Lemon meringue pie with gluten-free, low-carb coconut flour rolled pie crust.

No-Bake Almond Flour Chocolate Crust

Things You\’ll Need

  • 1½ cups almond flour

  • ¼ cup melted butter

  • ¼ cup cocoa powder

  • ⅛ powdered sweetener (I prefer Swerve confectioners)

  • ¼ teaspoon sea salt

Step 1

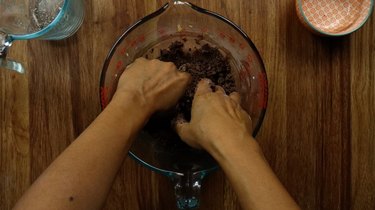
In a large bowl, mix the almond flour, butter, cocoa powder, sweetener, and salt until moist and crumbly. It's easiest to use your hands.

Mixing ingredients for gluten-free low-carb almond flour chocolate pie crust.

Step 2

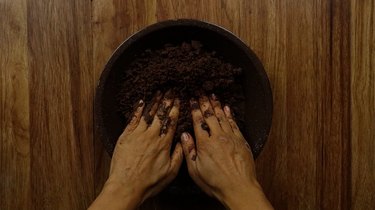
Put the `crumbly mixture into a 9-inch pie pan and press into the pan evenly to form a crust about ⅛ of an inch thick.

Pressing no-roll gluten-free low-carb almond flour chocolate pie crust into pie pan.

Step 3

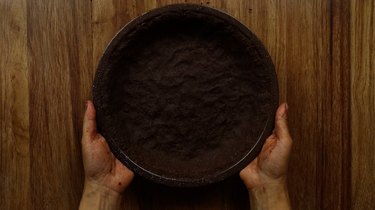
Chill your crust in the fridge while you make your no-bake filling. The crust will continue to set after it is filled and further chilled.

Gluten-free low-carb chocolate almond no-bake pie crust.

This no-fuss crust is featured in our recipe for no-bake peanut butter cream cheese pie, pictured below. Or for a double dose of chocolate, try using this crust with a French silk pie or no-bake chocolate cheesecake.

Gluten-free low-carb chocolate almond no-bake pie crust used for peanut butter cream cheese pie

DIY Graveyard Pudding Cups

0

One of the most memorable parts of any successful Halloween party is the food, and these graveyard dessert cups are sure to bring any dead party back to life. Complete with mud, dirt, bones, grass and a headstone, these festive DIY personal desserts are simply to die for. Just follow these easy steps and get ready to dig in!

DIY Graveyard Pudding Cups

Things You\’ll Need

  • Oreos

  • Chocolate pudding

  • Milano Cookies

  • Black gel icing

  • Green sour punch straw candies

  • White bone candies

  • Small clear bowls or cups

  • Plastic snack bag

Step 1

Scoop chocolate pudding into the clear cup or bowl to create the "mud".

pudding mud

Step 2

Add candy bones around the rim of the pudding facing the sides of the bowl.

candy bones

Step 3

Pour Oreos into the plastic snack bag and use a utensil such as an ice cream scoop to crush the cookies into crumbs. Then sprinkle the cookie crumbs on top of the pudding to bury the candy bones in "dirt".

cookie crumb dirt bury bones

Step 4

Place a Milano cookie into the pudding and cookie crumbs so that the top half of the cookie is sticking out. Then use the black gel icing to complete the headstone with "R.I.P."

RIP

Step 5

Cut green sour punch straw candies into pieces about 2 inches long, then cut each piece into thinner strips. Fold each thin strip into a "v" shape and stick the folded points into the cookie crumbs to create a grass effect.

candy grass add grass

Step 6

Top everything off with a few more candy bones.

top with bones

Now you're ready to dig in. Bone appétit!

final graveyard cup graveyard cups graveyard cups

Philly Cheesesteak Stuffed Shells Recipe

0

If you love the flavors of Philly cheesesteak, you'll want to try this stuffed shell recipe. From the sautéed bell peppers to the creamy cheese sauce, this dish embodies some of the best parts of the famous sandwich. It's like a Philly cheesesteak that you can eat by the spoonful! Pressed for time? Skip the homemade cheese sauce and use Cheez Whiz instead. Another option is to use Provolone or American cheese like many restaurants in Philadelphia. Whatever you choose, this Philly cheesesteak stuffed shells recipe is sure to be a hit.

Philly cheesesteak stuffed shells

Video of the Day

Philly Cheesesteak Filling and Shells

Things You\’ll Need

  • 22 jumbo pasta shells (just under 12 ounces)

  • 1 pound ground lean beef

  • 2 tablespoons olive oil

  • 1 small yellow onion, diced

  • 1 medium green bell pepper, diced

  • 1 medium red bell pepper, diced

  • 1 teaspoon ground oregano

  • 1/2 teaspoon ground black pepper

  • 1 teaspoon salt

  • 1 tablespoon ketchup

  • 1 tablespoon yellow mustard

  • 1 tablespoon Worcestershire sauce

Ingredients for Philly cheesesteak stuffed shells

Tip

One pound of ground beef is enough for about 22 jumbo pasta shells. A 12-ounce box of jumbo pasta shells usually has 30-something shells. If you want to use all the pasta shells, you'll need a bit more than one pound of ground beef.

Step 1

Pre-heat the oven to 350° Fahrenheit.

In a pan over medium heat, sauté the onion. Cook until slightly clear, about 5 to 7 minutes. Add the peppers and cook for another 5 minutes.

Cook onions and peppers

Step 2

Add the ground beef, ketchup, mustard, Worcestershire, and spices. Mix well and cook until the beef is completely brown, about 12 to 15 minutes.

As the beef cooks, break it apart with a spatula.

Cook the ground lean beef

Step 3

Make the pasta according to the package's directions.

Cook the pasta

Cheddar Cheese Sauce

Things You\’ll Need

  • 1 3/4 cup shredded cheddar cheese

  • 3 tablespoons butter

  • 3 tablespoons flour

  • 1 1/2 cup whole milk

  • 1/4 teaspoon salt

  • Dash of ground black pepper

Ingredients for cheese sauce

Step 1

Over low-medium heat, melt the butter. Add the flour, salt, and pepper and whisk until combined.

Cook until golden brown.

Combine melted butter and flour

Step 2

Slowly add the milk. Whisk until smooth and thick, about 5 minutes.

Add the milk

Warning

Make sure the milk doesn't boil. Otherwise, it might curdle.

Step 3

Add the cheese. Whisk until melted and smooth, about 7 to 9 minutes.

Melt the cheese

Philly Cheesesteak Stuffed Shells

Once you've cooked the pasta, ground beef, and cheese sauce, you're ready to prepare the stuffed shells.

Step 1

Scoop a thin layer of cheese sauce on to the bottom of a baking dish.

Fill the shells with the Philly cheesesteak filling. Place the shells in the dish and top with remaining cheese sauce.

Fill jumbo pasta shells with beef filling

Step 2

Bake for 10 to 15 minutes. Enjoy!

Philly cheesesteak stuffed shells

Enjoy!

Philly cheesesteak stuffed shells

How to Grate Daikon Radish for Sashimi

0

Things You\’ll Need

  • Knife

  • Vegetable peeler

  • Vegetable carving knife

  • Cutting board

... Grated daikon radish is used as a garnish for sashimi.

Presentation plays a large role when it comes to presenting Japanese dishes. The dishes that the food is served on are usually very elegant and the plating is colorful and precise. A common garnish when serving sashimi is shredded, or grated, daikon radish. The daikon radish is a very juicy, tart and crisp radish used in many Asian dishes. The daikon radish has flesh that is very white, almost translucent in color. The radish is shredded to provide a bed for the sashimi pieces to rest upon. Several delicate cuts are needed to create grated daikon radish for sashimi.

Video of the Day

Step 1

Cut off a section of the daikon radish about 2 inches long using a knife. Wrap the remaining section of radish in plastic wrap and refrigerate.

Step 2

Peel the daikon radish using a vegetable peeler. Lay the daikon radish piece on a cutting board so that the cut end is facing you.

Step 3

Make a small incision about 1/4 inch into the part of the radish that is facing up using a flexible knife, such as a vegetable carving knife. Angle the knife so that you can cut the outer layer about 1/4 inch all the way around the radish.

Step 4

Lay the cut side down on the cutting board and slowly roll the radish keeping the knife blade flush against the cutting board to remove the outer layer. Move the knife along the cut as you roll the radish. Cut in this manner until you reach the center of the radish. Trim away any thick or uneven parts and cut the long sheet of radish into two or three pieces depending on the length.

Step 5

Roll the cut pieces into tight circles. Make 1/4 inch cuts off the end to create long strands similar to spaghetti noodles.

Step 6

Separate the strands and place in cold water until ready for use.

How Long Does an Untapped Beer Keg Last?

Beer Barrells Kegs are the simplest method for transporting large quantities of beer. Image Credit: Coquette18/iStock/Getty Images

When you have an extra keg of beer left over from a party, it can seem attractive to keep it around for the next one. However, even untapped, the beer in your keg can still go bad. Your keg of beer should have a stamp signifying the expiration date.

Video of the Day

Shelf Life

Beer keg stand Man drinking keg beer while doing a hand stand Image Credit: Michael Czosnek/iStock/Getty Images

The shelf life of beer will vary depending on the brand and whether or not is has been pasteurized. An unpasteurized beer has a life expectancy of 45 to 60 days — however, once you account for shipping time, this can drop to about a month from the date of purchase. If beer has been pasteurized, it can last three to four months. Most American beer is not pasteurized.

Spoiled Beer

pouring beer with bubbles and froth Draft beer detail in glass Image Credit: elena moiseeva/iStock/Getty Images

While the flavor will be a sure indicator of whether or not your beer has gone bad, you can look for some other signs before taste-testing. If the beer has gone cloudy or is overly foamy, it may have already gone bad.

Keg Storage

Lots of metal barrels at a beer factory Beer kegs Image Credit: Voyagerix/iStock/Getty Images

For unpasteurized beer it is crucial to keep the keg cool, below 38 degrees; anything above this will cause your beer to foam excessively when dispensed. Because unpasteurized beer contains dormant bacteria, any temperature above 50 degrees is likely to cause the bacteria to grow and spoil the beer.

How to Make a Mint Julep

0

... Mint Julep Cup Image Credit: Anne Dale/Demand Media

No matter if you're kicking back on a front porch or celebrating the Kentucky Derby, the mint julep is a cool choice when craving a warm weather cocktail. This drink, dating back to the early 1800s, packs a sweet, refreshing punch.

Video of the Day

Step 1

...

Place a handful of mint leaves at the bottom of a shaker and add the simple syrup.

Step 2

...

Using the muddler, press down on the mint leaves and syrup, and gently twist. Continue to twist until the fragrance of the mint leaves is released.

Step 3

...

Add the bourbon.

Step 4

...

Fill about half of the shaker with ice and let the mixture stand for a couple of minutes – this allows the bourbon to soak in the flavors of the mint.

Step 5

...

Shake vigorously.

Step 6

...

Strain the cocktail into a mint julep cup or rocks glass filled with shaved ice.

Step 7

...

Garnish with a sprig of mint… and enjoy!

Things You\’ll Need

  • Serves one

  • Handful of fresh mint leaves

  • 1 ounce simple syrup (see tips below for recipe)

  • 4 ounces of bourbon

  • Shaved ice

  • Cocktail shaker

  • Cocktail strainer

  • Muddler

  • Silver mint julep cup or rocks glass

Tip

When muddling, be sure not to mash up the mint leaves too hard. Your mint might end up tasting bitter. You want your ice to be crunchy and slightly slushy – but not like a snow cone. An ice grinder can create the right consistency. Use the freshest of mint leaves. To make simple syrup, pour one cup of sugar and one cup of water in a saucepan and bring to a boil. Stir until the sugar dissolves. Let cool, and store in a glass container. Can be kept for up to two weeks.

How to Prepare Fresh Blueberries

0

... Frozen blueberries are a refreshing snack on a summer day.

Although small, blueberries are juicy, flavorful berries that are packed with nutritional benefits. Blueberries have nearly zero fat and are a good source of dietary fiber and vitamin C. The health benefits don't end there, as blueberries are one of the best sources of antioxidants, according to the Blueberry Council. Blueberries are a popular ingredient in all types of recipes, from pancakes to salads. You can also wash them and eat them plain or with a bit of sugar.

Video of the Day

Step 1

Look for plump and firm berries when buying blueberries. They should be dry and unbruised and have a smooth surface with a silvery shine. If berries are reddish in color, they are not ripe yet. Any blueberries that are soft or shriveled should be avoided. Blueberries typically come in plastic containers at the supermarket. Inspect each container to find the freshest berries.

Step 2

Refrigerate the berries as soon as possible. You can keep them in the plastic container they came in or in a covered bowl.

Step 3

Wash the berries when you are ready to eat or serve them. You can now eat the blueberries plain or part of a dessert or snack. Pour a little bit of sugar over the blueberries for a sweet snack. Use them in yogurt parfaits, layering yogurt and blueberries. Put some in pancake batter for blueberry pancakes.

Tip

If you would like to freeze the berries, place the berries still in their plastic container in a large freezer bags or containers.

Cube Steak Vs. Minute Steak

0

Close-up of steak sandwich Steak sandwiches often contain minute steak. Image Credit: Jupiterimages/Photos.com/Getty Images

Like anything that inspires passion, steak has its own complex and sometimes confusing vocabulary. Even if you've mastered the jargon and know the difference between an onglet and a goose skirt, some terms can be challenging. Cube steak and minute steak are examples of this, partly because the terms refer to the way the steak is cut rather than its location on the animal and partly because they're slightly imprecise to begin with.

Video of the Day

Cube Steak Isn\’t a Cube

The name cube steak comes not from the shape of the cut, but from the process used to tenderize it. Typically made from tougher cuts such as the top or round, cube steak gets both its name and its characteristic dimpled texture from a machine that pounds it with metal tenderizers to break up its muscle fibers and soften its texture. Cube steak is inexpensive and according to the "New York Times" is enjoying a resurgence in American kitchens.

Minute Steak Is Quick

Like cube steak, minute steak can come from any part of the animal, although the rump cap is common. This cut is very thinly sliced and fries quickly; the name "minute" derives from how quickly this cut can be cooked. Slightly on the tough side, this cut is often used in steak sandwiches. Like cube steak, minute steak is popular because of its low cost compared to more tender cuts.

Are They the Same Thing?

If you look for cube steak recipes, eventually you will find a recipe writer pointing out that cube steak is often called minute steak or even asserting that they are the same thing. Although cube steak is often called minute steak, not all minute steaks are cube steak. A thin slice of inexpensive steak may be put through a mechanical tenderizer — in which case it's cube steak — but it may not, in which case it is minute steak but not cube steak.

Similarities

It's easy to see why minute steak and cube steak go together in the minds of steak lovers. Both are inexpensive, made from less-desirable cuts and easy to cook. The key difference is that cube steak is mechanically tenderized, while minute steak can retain its toughness. They're also cooked differently: cube steak tends to be used in casseroles or fried. The steak in a chicken-fried steak is usually cube steak. By contrast, minute steak is often eaten by itself, sliced and added to a salad or noodles, or served in a sandwich.

DIY Gift: Taco Seasoning in a Mason Jar

0

Making your own taco seasoning mix is a simple and unique gift. Mix a big batch for friends or co-workers, or any gift exchange. Free of fillers, MSG and extra preservatives, you'll also be able to customize your taco mix for salt and spiciness, giving it your own personal touch. This recipe makes enough taco seasoning to fill three 6-ounce mason jars, with a little leftover for you to enjoy on your own taco night.

taco seasoning mix

Video of the Day

Things You\’ll Need

  • 1 cup chili powder

  • 4 tablespoons garlic powder

  • 4 tablespoons onion powder

  • 5 tablespoons oregano

  • 1/2 cup paprika

  • 2/3 cup cumin

  • 3 tablespoons salt

  • 4 tablespoons finely ground pepper

  • 2 teaspoons red pepper flakes (optional)

  • 6-ounce mason jars, (3)

  • Labels (optional)

  • Gift wrap & string (optional)

ingredients for DIY taco seasoning

Step 1: Measure Ingredients

In a large mixing bowl, combine all spices.

spices for diy taco seasoning mix

Step 2: Stir to Combine

Use a spatula or wooden spoon and stir until thoroughly mixed with no lumps.

stirring taco seasoning mix taco seasoning mix stirred

Step 3: Fill Jars

Fill jars, leaving about 1/2 inch of space at the top. Affix lids.

finished taco seasoning mix

Step 4: Add Labels

Write out your taco seasoning mix information, or use your printer's label setting. Include instructions: combine cooked meat with 1/4 cup mix + 1/2 cup water and simmer.

Tip

If you're making a particularly spicy mix, be sure to write that on the label.

taco seasoning mix

Step 5: Wrap It Up!

Pictured here is a simple piece of tissue paper wrapped with twine but the options are endless.

taco seasoning mix wrapped

Store any extra in an airtight container.

diy taco seasoning taco seasoning mix