Home Blog Page 17

Family Favorite Sweet Potato Casserole Recipe with Crunchy Pecan Topping

0

Every year when the holidays roll around there are a couple of classic recipes that are a must on my holiday table. One of those favorites happens to be sweet potato casserole because it borders between a vegetable and a dessert in all the best ways. Creamy sweet potatoes topped with a crunchy pecan topping makes for one irresistible casserole that no one can ever resist!

Family Favorite Sweet Potato Casserole Recipe

Video of the Day

Things You\’ll Need

  • 4 cups of cooked sweet potatoes, peeled and fork tender

  • 3/4 cup of granulated sugar

  • 1/2 cup melted butter + 5 tablespoons

  • 2 eggs

  • 1/3 cup of milk

  • 1 teaspoon vanilla extract

  • 1 cup of brown sugar

  • 1 cup chopped pecans

  • 1 teaspoon cinnamon

  • 1/4 teaspoon salt

  • 1/2 cup flour

Family Favorite Sweet Potato Casserole Recipe

Step 1

Preheat the oven to 350 degrees. Combine sweet potatoes with granulated sugar, 1/2 cup melted butter, eggs, milk and vanilla. Mix with a stand mixer or hand mixer until creamy and smooth.

Pour the sweet potato mixture into a casserole dish that has been sprayed with non-stick spray and spread evenly.

Family Favorite Sweet Potato Casserole Recipe

Step 2

Mix together brown sugar, cinnamon, salt, 5 tablespoons melted butter, and flour and combine with a fork until the mixture resembles wet sand.

Family Favorite Sweet Potato Casserole Recipe

Step 3

Spread the brown sugar pecan topping over the sweet potatoes in an even layer. Place into the oven and bake for 30 to 35 minutes until the topping is brown and toasted.

Family Favorite Sweet Potato Casserole Recipe Family Favorite Sweet Potato Casserole Recipe

I'm telling you that just the smell of this casserole alone will have your belly growling — it's so delicious!

How to Clean an Electric Coffee Maker

0

Things You\’ll Need

  • Vinegar

  • Bowl

  • Soap

  • Sponge

Cleaning your coffee maker is crucial to preserve the quality of the coffee it produces. A mineral buildup gradually accumulates, especially when you use tap water. This buildup affects the flavor profile of the coffee in undesirable ways, leading to bitter cups. Cleaning your coffee machine takes about 20 minutes and should be done once every 2 months. It should be done more often if you use your coffee machine more than once per day.

Step 1

Measure and mix one part vinegar to three parts water in a bowl.

Video of the Day

Step 2

Put the mixture in the coffee machine. Make sure the reservoir is filled to the top with the mixture.

Step 3

Turn on the coffee machine. Let the vinegar and water mixture go through it.

Step 4

Fill the reservoir with water. Turn on the coffee machine and let the water go through the machine. Repeat this step at least one more time to remove the vinegar odor.

Step 5

Wash the coffee carafe with soap and water after the last water-rinse cycle. Scrub with a soft sponge so you don't scratch the glass.

Tip

If you don't want to make your own cleaning solution, you can buy coffee machine cleaning solutions.

Warning

Make sure the vinegar residue is completely rinsed out with water. Leftover vinegar in your coffee machine will make your coffee taste even worse than before you cleaned it.

How to Make Leftover Easter Candy Brownies

0

Nothing is more perfect for Easter than chocolate! Loaded with salted caramel, chocolate eggs and lots of dark chocolate, these brownies are the ideal treat for Easter or any indulgent occasion! The best part? You can be as creative as you would like and use any kind of leftover Easter candy you desire. These brownies are definitely the ultimate of all brownies — they're so fudgy, delicious and simple to make! Make sure to top them with chocolate ganache sauce, too.

These Leftover Easter Candy Brownies are so delicious and simple to make!

Watch the Video

Things You\’ll Need

  • 6.2 ounces (175 grams) granulated sugar

  • 2.5 ounces (70 grams) unsalted butter, cubed

  • 4.3 fluid ounces (125 milliliters) heavy cream

  • 1 teaspoon salt, plus more for sprinkling (optional)

  • 2.3 ounces (65 grams) all-purpose flour

  • 2.7 ounces (75 grams) Dutch-processed cocoa powder

  • 10.6 ounces (300 grams) granulated sugar

  • 1/4 teaspoon salt

  • 2 large eggs

  • 5.3 ounces (150 grams) unsalted butter, melted

  • 1/4 cup Easter candy of your choice to decorate (e.g. chocolate easter eggs, speckled eggs, peanut butter cups or chocolate chips)

  • 4.4 ounces (125 grams) semisweet dark chocolate, finely chopped

  • 2.9 fluid ounces (85 milliliters) heavy cream

Step 1: Make the salted caramel

Preheat the oven to 350 degrees Fahrenheit (180 degrees Celsius). Grease and line a 8-inch (20 cm) square baking pan or ceramic dish. Set aside.

Place 6.2 ounces (175 grams) of the granulated sugar, 2.5 ounces (70 grams) of the butter, 2.5 ounces (70 grams) of the cream and salt into a medium sized saucepan set over medium-low heat. Heat, stirring often, until the butter has melted and the sugar has dissolved.

Increase the heat to medium and continue to cook, swirling the pan often but not stirring, until the mixture forms a deep amber caramel color. Keep the caramel set on a very low heat on the stove to prevent it from hardening while you make the brownie batter.

Cook the caramel until it is a deep amber color.

Tip

If the caramel hardens, simply add in a tablespoon of cream as needed, and place it back on the heat to melt until smooth again.

Step 2: Make the brownie batter

Place the all-purpose flour, dutch processed cocoa powder, 10.6 ounces (300 grams) of the sugar and 1/4 teaspoon of the salt into a large mixing bowl. Add in the eggs and whisk vigorously until just combined. Add in the melted butter and stir until very smooth and glossy.

Whisk the brownie batter until it is very smooth, thick and glossy.

Step 3: Marble the salted caramel and brownie batter

Place three quarters of the brownie batter in the bottom of the prepared baking dish. Use a rubber spatula to evenly spread the batter to the edges. Pour the salted caramel directly over the top of the brownie layer. Then, dollop the remaining quarter of the brownie batter on top of the caramel. Use a sharp knife or wooden skewer to swirl the two mixtures into each other to form a marbled pattern.

Tip

Be careful not to over swirl! You want the brownie batter and salted caramel to contrast against each other.

Spread the salted caramel over the bottom layer of brownie batter. Use a wooden skewer or sharp knife to swirl the two mixtures together.

Step 4: Add the easter candy

Decorate the top of the brownie with your choice of easter candy! I used nine small chocolate easter eggs. Make sure to gently press the candy into the surface.

Gently press your choice of easter candy into the top of the brownie.

Step 5: Bake

Bake the brownies for 30-35 minutes, or until the top is crackled and firm around the edges but still soft and gooey in the middle. A wooden skewer or sharp knife inserted into the middle should not come out clean, but with a few moist crumbs attached instead.

Bake the brownie until the edges are firm and the top is well crackled.

Step 6: Cool and slice

Remove the brownies from the oven, and let cool until room temperature before slicing with a sharp knife and serving.

Use a shark knife to slice the cooled brownie.

Step 7: Make the chocolate ganache sauce

Place the finely chopped dark chocolate into a medium-sized mixing bowl. Set aside. Place the remaining 2.9 fluid ounces (85 milliliters) of the heavy cream into a small-sized saucepan set over medium-high heat. Heat, stirring often, until the cream comes to a rolling boil. Remove from the heat and pour the cream over the chocolate. Let the mixture sit for 1 minute to acclimate before stirring until very smooth and glossy.

Stir the chocolate and cream together until it forms a very glossy ganache!

Step 8: Serve the brownies!

You can serve the brownies as they are… or serve them with a generous slather of the chocolate ganache sauce for something even more decadent and delicious! The brownies will keep for up to three days stored in an airtight container at room temperature.

These brownies are so delicious and easy to make!

How to Make Coffee Stout Beer

0

Start to Finish: 1 day to brew, 9 to 10 weeks for fermentation and bottle conditioning

Servings: 5 gallons

Video of the Day

Difficulty Level: Intermediate

Beer is made in three stages: brewing, fermentation and bottling. While all three are important, the brewing stage is the most critical — that is when the beer takes on its flavor and style. Stouts fall into the dark ale style, which emphasizes malt over hops. Dark roasted malts take on bitter and sometimes floral notes that remind drinkers of black coffee. Adding cold-brewed coffee to the beer intensifies these flavors.

In addition to the ingredients, you will need a chemical sanitizer, 5-gallon brew pot, 5-gallon fermenting bucket with airlock, hydrometer, and a siphon. All of this equipment is available — often as a kit — from home brewing supply shops. The same store will carry a variety of beer kits that include all of the malts, hops and yeast you'll need.

Tip

Brewing can take several hours, depending on how long it takes to cool the wort and whether you start with malt syrup or whole grains. It is best, especially for new home brewers, to set aside an entire day.

Ingredients

  • Imperial stout beer kit
  • 2 ounces coarsely ground coffee

Sanitize Everything

Fill the fermentation bucket with approximately 2 1/2 gallons of tap water. Add 2 1/2 tablespoons no-rinse sanitizer. Stir to combine.

Fill the bucket with any equipment you will use to make your beer, including stirring spoons, siphon, hydrometer and airlock. When in doubt, sanitize.

Soak the equipment for at least 30 seconds.

Tip

  • Sanitation eliminates unwanted bacteria from the brewing process. Fermentation is a process of controlled bacterial processing, so starting with a clean slate allows the good bacteria — yeast — to take hold without competing with wild strains. Most home brewers use a one-step sanitizer that dissolves in water and does not require rinsing.
  • Follow the instructions on the sanitizer package.

Make Wort

Steep coffee grounds for at least 1 hour in cold water. Cold water extracts flavor compounds in the coffee without the acid that is present in hot brewing methods. For a 5-gallon beer recipe, you will need 2 ounces of ground coffee and 2 cups of cold water.

Bring 3 gallons of water to a full rolling boil.

Proof the yeast. Sweeten 1/4 cup of boiled water with 1 teaspoon of sugar or malt extract. Add the yeast and let it sit out of direct sunlight for 30 minutes. You should see the yeast foaming; this is a sign of early fermentation. It means the yeast are alive and active. If you do not see any change, the yeast are dead. Restart the proofing process with new yeast.

Add malt extracts and hops once the water has come to a full boil. Stir constantly to reduce foaming as the water returns to a boil.

Add finishing hops, then remove the wort from the heat.

Pitch the Yeast

Stir the cold coffee into the hot wort.

Put the brew kettle into an ice bath to bring the temperature down to 65 – 90 degrees Fahrenheit as quickly as possible. The exact temperature is dictated by the type of yeast you're using. Follow the instructions on the package.

Stir the proofed yeast into the wort.

Tip

An immersion wort chiller made of coiled copper pipe is a non-essential but helpful piece of equipment. It brings the temperature of the wort down much faster than an ice bath.

Move Wort to Primary Fermenter

Pour the wort into a sanitized fermenting bucket or carboy. Seal the lid and add an airlock, which will allow you to monitor the fermentation process.

Put the fermentation bucket or carboy in a dark, out of the way location with a constant temperature of between 55 degrees to 72 degrees F, depending on your strain of yeast.

After 24 hours, you should start to see water bubbling in the airlock. This tells you that fermentation has begun. When the airlock stops bubbling, the beer is ready for bottling.

Tip

  • Pour vigorously, allowing the liquid to churn and splash in the bucket. This will aerate the wort and ensure that the yeast is well mixed.
  • There are many factors that can affect the length of time of fermentation, including temperature and water chemistry. It is best to use the airlock, rather than the calendar, as your guide.

The Best Mini Fridges in 2022

0

inside of mini fridge

Mini fridges aren't just a good buy for college students—they're also great for busy parents and remote workers with a home office. Extra fridge space is never a bad thing, and it can actually be a lifesaver if anything were to go wrong with your main household fridge. It's only when a fridge breaks that you realize how much you depend on it daily.

Video of the Day

A mini fridge is also a good gift idea for working moms and twenty-somethings who have just moved into a new living space. Having some room in the fridge is always appreciated, even if it's just for cold drinks—or breastmilk storage for nursing moms. That said, looking for a new mini fridge may be difficult, especially if you haven't given much thought to refrigerators in the past.

What to Consider When Buying a Mini Fridge

Size:​ Not all mini fridges are "mini" by design. Some are just smaller than a standard kitchen fridge, while others are best used to hold a few cans of soda. A standard-sized mini fridge should be somewhere around 17 inches long, 19 inches wide, and 20 inches high. Larger units are often expected to have more freezer room, but this feature is dependent on your needs. When buying a mini fridge, you'll want to measure beforehand and keep the size of your room in mind.

Capacity:​ Based on the diversity of sizes, it makes sense that mini fridge capacity varies pretty widely. However, you can expect your mini fridge to range anywhere between 1.5 and 7.5 cubic feet. Some mini fridges have an equal amount of freezer and fridge space. Others include more drawers. Some are designed mostly for sodas. Figuring out what capacity you require is a good step in finding your perfect mini fridge.

Cleaning Routine:​ Refrigerators are notoriously tough to clean, but later models are making it easier to pop out shelves to clean them individually. When buying a mini fridge for a student, it's important to keep in mind that they may not have access to a sink in their room. Being able to simply wipe down the insides of a mini fridge on a monthly basis should be good enough.

Wattage:​ Most mini fridges run between 50 and 100 watts of power. In comparison, a kitchen fridge usually runs on 350 to 780 watts. It's good to check the wattage of a fridge—while it's true that higher wattage models will be stronger in nature, they also eat up a lot of power.

Price:​ A compact mini fridge (under 2 cubic feet) will typically set you back $150, while a more spacious model (over 3 cubic feet) costs closer to $200. A personal cooler, which holds up to six soda cans or a smattering of skincare products, only costs about $40.

With these considerations in mind, here are some of the best mini fridges you can buy on the market today.

Wooden desk with books in light living room

Best Budget-Friendly Mini Fridge

Insignia Mini Fridge, 1.7 cubic feet

$109.99 at Best Buy

This sleek mini fridge features an adjustable thermostat that ranges from 32° Fahrenheit to 39° Fahrenheit and a reversible door to accommodate small spaces. It has a 1.7-cubic-foot capacity and includes a full-width wire shelf to keep bottles and cans organized. With an estimated yearly electricity use of 245 kilowatt-hours (kWh), running this model would increase the cost of your electric bill by about $29 per year. While the ultra-quiet fridge may lack a freezer compartment, it's a wonderful buy if you're only looking to keep some basic products cold.

​At a Glance:

  • Dimensions: 19.03" x 17.03" x 18.9"
  • Capacity: 1.7 cu. ft.
  • Reversible door hinge
  • Mechanical controls
  • No freezer compartment

budget mini fridge

Best Glass Door Mini Fridge

COOLLIFE Mini Fridge Cooler with Glass, 1.6 cubic feet

$189.99 at Amazon

If you'd like to be able to monitor your supply of beverages without having to open the door, you'll want to check out this glass-front mini fridge that can hold up to 60 cans or 17 bottles of wine. The swing door can be installed on the right or left side and the wire shelf is removable and adjustable. This freezer-less unit can be set to a wide range of temperatures, from 39° Fahrenheit to 61° Fahrenheit. The internal LED light improves visibility and can be kept on even while the door is shut.

​At a Glance:

  • Dimensions: 17.5" x 18.5" x 19.6"
  • Capacity: 1.6 cu. ft.
  • Can hold up to 60 cans
  • Quiet cooling system
  • Has tight door seal
  • No freezer compartment

glass door mini fridge

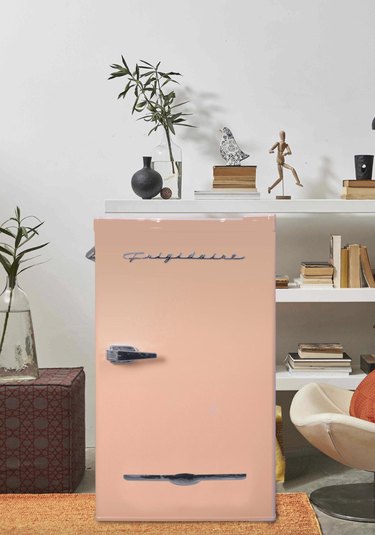
Best Retro-Style Mini Fridge

Frigidaire Retro Compact Refrigerator With Side Bottle Opener, 3.2 cubic feet

$159.00 at Walmart

Why have a boring fridge when something like this exists? With a glossy finish on the outside and a 0.25-cubic-foot freezer compartment on the inside, this fridge is bound to get compliments at your next gathering. It even comes with a built-in bottle opener and a compact ice cube tray. If you've got a lot of taller bottles, you'll be happy to know that this model includes two door compartment shelves as well as two removable glass shelves that'll help flawlessly store what you need. It also touts a one-year warranty for peace of mind.

​At a Glance:

  • Dimensions: ‎21.5" x 19" x 33"
  • Capacity: 3.2 cu. ft.
  • Has three shelves
  • Two-liter bottle storage on door
  • Ice cube tray
  • Has freezer compartment

retro mini fridge with bottle opener

Best Mini Fridge with Freezer

Galanz Two Door Mini Fridge, 3.1 cubic feet

$194.00 at Walmart

As far as freezer space goes, this mini fridge by Galanz offers more room than many other brands. That means it'll be perfect for a late-night pint of ice cream, or even a few extra ice trays. Both the freezer door and refrigerator door offer built-in organizers, including storage for 2-liter bottles and a 4-can dispenser. The fridge compartment features two slide-out glass shelves and a vegetable crisper. There's also a manual temperature control and an interior light that allows you to easily find what you're looking for.​

At a Glance:

  • Dimensions: 19.13" x 21.10" x 32.80"
  • Capacity: 3.1 cu. ft.
  • Two-door design
  • Energy-saving efficiency
  • Two slide-out glass shelves
  • Has freezer compartment

mini fridge with freezer

Best Energy-Saving Mini Fridge

COSTWAY Compact Refrigerator, 3.2 cu ft.

$279.99 at Amazon

Looking for an environmentally-friendly mini fridge? This 65-watt mini fridge has a motor that keeps the Earth in mind. The two-door model contains a 0.95-cubic-foot freezer compartment, a removable glass shelf, and a crisper drawer to help you store anything from veggies to soft drinks. This unit utilizes its space well and would be good in a dorm room or small shared office space. The door can be installed on the right or left side and the feet are adjustable for level placement. Expect an interior light and an adjustable thermostat with seven settings that range from 32° Fahrenheit to 50° Fahrenheit.

​At a Glance:

  • Dimensions: 34'' x 19'' x 17.5''
  • Capacity: 2.2 cu. ft.
  • Two-door design
  • Adjustable glass shelf
  • Has freezer compartment

energy efficient mini fridge

Best Mini Fridge for Maximizing Space

Hisense Freestanding Mini Fridge, 3.3 cubic feet

$219.00 at Lowe's

You can hold plenty of different frozen foods with room to spare in this spacious two-door mini fridge. The freezer compartment measures 1-cubic-foot and has a retainer bar on the door for extra storage. Meantime, the fridge door is equipped with organizers for canned beverages and 2-liter bottles. There are two removable glass shelves and a sliding crisper drawer that will keep your veggies as fresh as possible. This is a mini fridge you can feel good about using since it's Energy Star-certified and consumes about 322 kilowatt-hours (kWh) per year, which equates to approximately $39. But, one of the coolest aspects of this mini fridge is that it has a reversible door along with adjustable feet. That means it's suitable for any type of living space, and you can customize it to make it work best for you.

At a Glance:

  • Dimensions: 21.5" x 18.7" x 33.7"
  • Capacity: 3.3 cu. ft.
  • Two-door design
  • Sliding crisper drawer
  • Energy Star-certified
  • Has freezer compartment

spacious mini fridge

Best Mini Fridge for Dorm Rooms

Magic Chef Retro 2-Door Mini Fridge, 3.2 cubic feet

$279.99 at The Home Depot

This is yet another solid retro pick, but it's perfect for college dorms for a couple of reasons. For one, it's a great way for students to stand out and set a theme for their room. Secondly, it's practical. The Magic Chef Retro comes in four eye-catching colors and contains plenty of freezer space (0.93-cubic-foot) for nighttime microwave pizza. The two glass shelves are removable and easy to clean, even in shared common areas, and the clear crisper drawer holds plenty of fruits and veggies. There's a bright interior light and an adjustable thermostat that ranges from 34.7° Fahrenheit to 42.8° Fahrenheit. It's Energy Star-qualified and comes with a one-year warranty on parts and labor and a five-year warranty on the compressor.

​At a Glance:

  • Dimensions: 20.1" x 19.1" x 33.5"
  • Capacity: 3.2 cu. ft.
  • Two-door design
  • Interior lighting
  • Soda can holder on door
  • Has freezer compartment

retro mint green mini fridge

Best Mini Fridge for Home Offices

BLACK + DECKER Compact Mini Fridge, 1.7 cubic feet

$154.99 at Amazon

One of the most important things about fridges that often gets overlooked is space. You want something that can hold a lot but won't take up too much room. This fridge gets high marks for its ability to hold so much without being bulky—which is excellent if you're using it mostly as a place to access cold, caffeinated drinks throughout the day. It boasts a removable glass shelf and built-in organizers on the door for a 2-liter bottle and a few canned beverages. There's a small freezer compartment (8 inches tall and two inches wide) for storing the included ice tray and a frozen dinner. It's Energy Star-certified and consumes only 201 kilowatt-hours (kWh) per year, bumping up your electric bill by about $24. It doesn't make a lot of noise, making it even more appealing to people who might want to prop it close to a work desk.

​At a Glance:

  • Dimensions: 17.48" x 19.09" x 19.49"
  • Capacity: 1.7 cu. ft.
  • Reversible door that can open from either the left or right
  • High-efficiency, low-energy consumption compressor
  • Leveling front legs
  • Small freezer compartment

compact mini fridge

How to Make Smoothies: 9 Delicious, Nutritious Recipes

0

Smoothies are terrific because they contain refreshing ingredients and are very easy to make. It's a blended beverage that can be enjoyed any time of day. Whether you're looking for a nutritious treat, a healthy breakfast or a post-workout recovery shake, these recipes will help you satisfy any smoothie craving.

How to Make Smoothies

Video of the Day

1. For an Antioxidant Blast

This smoothie recipe packs a refreshing blast of antioxidants and nutrients. Made with berries, matcha powder and beets, it delivers a significant dose of vitamins and minerals that will naturally rejuvenate and strengthen your body. Try this smoothie for when you need to give your system an immunity boost.

A tall glass filled with an antioxidant-rich smoothie.

2. For All-Around Good Health

All you need are fresh fruit, non-dairy milk and spinach to put together a healthy smoothie. It's a simple treat you can enjoy for breakfast, as a snack, or after a good workout.

A healthy strawberry smoothie served with fresh strawberries and pancakes.

3. For a Lean, Green Breakfast

Don't let the appearance of this green breakfast smoothie fool you — it is a lean, green, detox machine. In just one glass, it delivers a surprising amount of nutritional benefits that'll get you through the day. To make this smoothie even sweeter, add half a slice of a banana.

A delightfully rich, green smoothie with a green straw.

4. For Clear Skin

The ingredients in this tropical smoothie not only taste great, but can contribute to healthy, glowing skin. Each ingredient contains many skin-firming and hydrating properties, leaving you with a rejuvenated complexion. Enjoy this smoothie fresh to experience maximum health benefits.

A tropical smoothie with a banana and can of coconut juice on either side.

5. For Detoxing

Replenish your body with a detoxifying smoothie. This smoothie recipe is filled with nutritious ingredients such as ginger, coconut water and leafy greens that help cleanse your system and revitalize your body. This detoxifying smoothie supplies your body with plenty of nutrients and anti-inflammatory qualities.

A glass of a green detoxifying smoothie next to spinach leaves, ginger and a lemon.

6. For Low-Sugar Sweetness

This peaches and cream smoothie is simple and sweet. All it takes is a ripe peach, plain yogurt, cinnamon and vanilla extract to create this creamy concoction. This is a wholesome smoothie to enjoy for breakfast or as a tasty snack.

An aerial view of a peaches and cream smoothie.

7. For Kids

Kids love a good chocolate smoothie, and this one is no exception. It's packed with protein, chocolate, almond butter and bananas that make for a rich and creamy treat. These homemade protein shakes will be sure to please children and anyone with a big sweet tooth.

A bottle filled with a creamy protein shake.

8. For a Dessert-Alternative

For a delicious and drinkable dessert, serve up a batch of this coconut cream pie smoothie. The smoothie is made from simple ingredients such as bananas, coconut milk, graham crackers and honey, which truly make this a unique and refreshing smoothie. Freeze the bananas prior to blending to ensure the smoothie maintains a creamy texture.

A bird\'s eye view of a coconut cream pie smoothie sprinkled with coconut flakes.

9. For Super Food Fans

Add any of these 11 foods to supercharge your smoothie, from acai to chia seeds. The powerful ingredients will give a nutritional boost to any of your favorite smoothie recipes.

How to Pickle Corn in a Crock

0

Things You\’ll Need

  • Large stock pot

  • Chef's knife

  • Cutting board

  • Slotted spoon or tongs

  • Large bowl

  • Ice cubes

  • Colander

  • Paper towels

  • Aromatics (e.g., herb sprigs, garlic cloves, hot peppers, whole peppercorns)

  • Distilled water

  • Kosher salt

  • Heavy plate or other clean, narrow weighted object to fit crock

  • Dishcloth or plastic wrap

Sweet Corn isolated. Chop corn ears crosswise for an easier fit in the pickling crock. Image Credit: Tei_Sinthipsomboon/iStock/Getty Images

Pickled corn serves as a sweet and sour side dish at picnics and summer barbecues. Short, squat crocks that hold at least 4 quarts are sturdier than jars, and they block out heat and sunlight during the fermentation process. Crocks also provide increased width over standard jars, allowing for alternating layers of chopped corn ears with other flavoring ingredients during the pickling process. Use jalapenos and garlic for a pungent punch, or coriander seeds and dill for a tart touch.

Video of the Day

Step 1

Fill the stock pot with water and set it over high heat. While the water comes to a boil, husk the ears and remove their silks. Cut the corn ears, crosswise, into disks about 1.5 inches long.

Step 2

Boil the sliced ears for 5 minutes, then remove the pieces and plunge them into a bowl of ice water. Immediately remove the corn pieces and drain them.

Step 3

Drain the corn in a colander and pat the corn dry with paper towels.

Step 4

Prepare the other flavoring ingredients. Depending on the aromatics you use, preparation might include peeling and chopping garlic cloves, chopping jalapeno sections, and separating clean herb bunches into individual sprigs.

Step 5

Set the first layer of corn pieces in the crock. Alternate corn pieces with the prepared aromatics, until all of the corn is in the crock. A 4-quart — 1 gallon — crock will hold about six chopped corn ears.

Step 6

Make a brine in a large bowl by stirring together about 6 tablespoons kosher salt for every 2 quarts of room-temperature water. Stir vigorously until the salt is completely dissolved.

Step 7

Add the brine to the crock until the corn is submerged. Use a heavy plate or other clean, heavy object to weigh down the corn and keep it under the brine.

Step 8

Cover the crock with a clean dishcloth or loose plastic wrap and set it in a dark room with a temperature that's about 68 degrees Fahrenheit.

Step 9

Test the corn after about a week. When it is at the tartness and texture you prefer, cover the crock with its lid, or seal it with tight wrap. Put it in the refrigerator for up to three months. If the crock is too large for your refrigerator, divide the pickled corn, with its aromatic brine, into individual jars or airtight containers.

Tip

If you have a true corn bounty, use a larger pickling crock and double or triple the amount of brine and aromatics you'd normally use.

If you are buying new crocks, look for those that come with their own weights, which are constructed to fit perfectly into the crocks.

Warning

Take care that your crock, recipe ingredients and kitchen equipment are clean and dry to help prevent food spoilage.

If your home's tap water is hard, the final product may be affected. Use either distilled water in your brine, or boil hard tap water for 15 minutes. Let it stand for 24 hours; then strain the water.

How to Freeze Mushrooms

0

Things You\’ll Need

  • Mushrooms

  • Clean cloth

  • Baking tray or sauté pan

  • Airtight containers

  • Butter, salt and pepper (optional)

...

If you thought freezing mushrooms was impossible, look no further. White button mushrooms are the most widely available fresh mushrooms to freeze, but they aren't particularly flavorful. Crimini and portabella varieties have an earthier flavor as do shiitake mushrooms, which you can identify by their umbrella-shaped caps. Oyster mushrooms are more fragile and don't stand up to long cooking times. You can freeze any of these mushroom varieties, but it's better to cook them first instead of freezing them fresh. Freezing is widely thought to destroy the cell walls of fresh mushrooms, resulting in a mushy texture after they thaw out.

Video of the Day

Freezing Fresh Mushrooms

Step 1

...

Bear in mind that if you choose to freeze fresh mushrooms, you may be disappointed in the texture after you return them to room temperature. The freezing process creates a soggier mushroom when defrosted. You may want to use them in soups, stews and other dishes in which the mushrooms aren't the center of attention.

Step 2

...

Remove any dirt from your mushrooms by wiping them with a clean cloth.

Step 3

...

Place them on a baking tray and put them into the freezer.

Step 4

...

Remove the tray from the freezer when the mushrooms are frozen and pack them into airtight containers. To use, place the frozen mushrooms directly into a dish you're cooking or thaw them first for about one hour.

Freezing Cooked Mushrooms

Step 1

...

Remove any dirt from your mushrooms by wiping them with a clean cloth.

Step 2

...

Heat butter in a sauté pan. Use approximately two tablespoons of butter for one pound of mushrooms.

Step 3

...

Add the mushrooms to the skillet and sauté over high heat for several minutes, stirring constantly, until the mushrooms are the texture you prefer.

Step 4

...

Season the mushrooms with salt and pepper if you choose.

Step 5

...

Let the mushrooms cool, and then place them in airtight containers in the freezer. You can use the mushrooms frozen or thaw them for one hour before using. The Mushroom Council recommends that you use the frozen, sautéed mushrooms within one month.

Tip

Consider dehydrating your fresh mushrooms to preserve them instead of freezing. Use a dehydrator or cut them into pieces and lay them out as a single layer on a cookie sheet. Place them in an oven preheated to 125 to 140 degrees and let them dry until they're brittle. Store in airtight containers.

They're not usually thought of as a nutritional powerhouse, but mushrooms do contain B vitamins, as well as selenium and copper. Mushrooms are low in calories: one cup of raw mushrooms has about 20 calories.

Researchers tout mushrooms for other health benefits such as antiviral and anticancer effects, as well as cholesterol-lowering properties.

How to Preserve Peaches

0

Peaches are in full swing right now and it's the perfect time to use them in your baking, cooking and canning. They are so sweet, delicious and juicy this time of year. Even though fresh peaches are only available for a few months in the summer, there's no reason you can't enjoy them all year long. Just choose some fresh ripe peaches, grab a few jars, a little sugar, and you'll be on your way to preserving these delightful beauties in no time. This winter you can look forward to savoring them right out of the jar, as an ice cream topping, or even in a dessert.

Even though fresh peaches are only available for a few months in the summer, there\'s no reason you can\'t enjoy them all year long. Just choose some fresh ripe peaches, grab a few jars, a little sugar, and you\'ll be on your way to preserving these delightful beauties in no time. Even though fresh peaches are only available for a few months in the summer, there\'s no reason you can\'t enjoy them all year long. Just choose some fresh ripe peaches, grab a few jars, a little sugar, and you\'ll be on your way to preserving these delightful beauties in no time.

Things You\’ll Need

  • 20 pounds of a freestone variety of peaches (Red Haven, Red Globe, O'Henry, Elberta, Angelus, or Canadian Harmony are all good varieties)

  • Sharp knife

  • 6 cups water

  • 3 cups sugar

  • 7 or 8 quart canning jars with 2-piece lids

  • Steam canner

Even though fresh peaches are only available for a few months in the summer, there\'s no reason you can\'t enjoy them all year long. Just choose some fresh ripe peaches, grab a few jars, a little sugar, and you\'ll be on your way to preserving these delightful beauties in no time.

Step 1

Remove the skins from the peaches by scalding them in boiling water for 15 seconds, then dunk them quickly into ice cold water. The skins should slip off easily. Halve the peach and remove the pit. Leave the peaches in halves or slice them. Place the prepared peaches in lemon juice to keep them from turning brown.

Even though fresh peaches are only available for a few months in the summer, there\'s no reason you can\'t enjoy them all year long. Just choose some fresh ripe peaches, grab a few jars, a little sugar, and you\'ll be on your way to preserving these delightful beauties in no time. Even though fresh peaches are only available for a few months in the summer, there\'s no reason you can\'t enjoy them all year long. Just choose some fresh ripe peaches, grab a few jars, a little sugar, and you\'ll be on your way to preserving these delightful beauties in no time. Even though fresh peaches are only available for a few months in the summer, there\'s no reason you can\'t enjoy them all year long. Just choose some fresh ripe peaches, grab a few jars, a little sugar, and you\'ll be on your way to preserving these delightful beauties in no time.

Step 2

Make a simple syrup with 6 cups of water and 3 cups of sugar. Heat until the sugar is dissolved. The sugar will help the peaches retain texture and color. It also adds to the sweetness of the fruit. 2 parts water to 1 part sugar is considered a thin syrup.

Even though fresh peaches are only available for a few months in the summer, there\'s no reason you can\'t enjoy them all year long. Just choose some fresh ripe peaches, grab a few jars, a little sugar, and you\'ll be on your way to preserving these delightful beauties in no time. Even though fresh peaches are only available for a few months in the summer, there\'s no reason you can\'t enjoy them all year long. Just choose some fresh ripe peaches, grab a few jars, a little sugar, and you\'ll be on your way to preserving these delightful beauties in no time.

Step 3

Fill the sterilized quart jars with peaches and leave a 1/2-inch of headroom in each jar. Add the boiling simple syrup leaving a 1/2-inch of headroom. Wipe around the rim of each jar with a clean wet cloth.

Tip

You can use the dishwasher to sterilize the jars. Just wash and set the dry cycle to high heat. Leave them in the dishwasher until you are ready to use them. If you don't have a dishwasher, you can wash the jars with hot soapy water, rinse, then place them upside down on the steam canner shelf for a few minutes and the steam will sterilize them.

Even though fresh peaches are only available for a few months in the summer, there\'s no reason you can\'t enjoy them all year long. Just choose some fresh ripe peaches, grab a few jars, a little sugar, and you\'ll be on your way to preserving these delightful beauties in no time. Even though fresh peaches are only available for a few months in the summer, there\'s no reason you can\'t enjoy them all year long. Just choose some fresh ripe peaches, grab a few jars, a little sugar, and you\'ll be on your way to preserving these delightful beauties in no time.

Step 4

Place a sterilized 2-piece lid on each jar. To sterilize the lids, place them in a small pan with boiling water until you're ready to use them.

Even though fresh peaches are only available for a few months in the summer, there\'s no reason you can\'t enjoy them all year long. Just choose some fresh ripe peaches, grab a few jars, a little sugar, and you\'ll be on your way to preserving these delightful beauties in no time.

Step 5

Set each jar on the shelf of the steam canner. Cover the jars with the steam canner lid. Bring the canner water to a boil and process for 25 minutes. Start the timer when the steam starts to come out of the hole in the canner lid.

Even though fresh peaches are only available for a few months in the summer, there\'s no reason you can\'t enjoy them all year long. Just choose some fresh ripe peaches, grab a few jars, a little sugar, and you\'ll be on your way to preserving these delightful beauties in no time. Even though fresh peaches are only available for a few months in the summer, there\'s no reason you can\'t enjoy them all year long. Just choose some fresh ripe peaches, grab a few jars, a little sugar, and you\'ll be on your way to preserving these delightful beauties in no time. Even though fresh peaches are only available for a few months in the summer, there\'s no reason you can\'t enjoy them all year long. Just choose some fresh ripe peaches, grab a few jars, a little sugar, and you\'ll be on your way to preserving these delightful beauties in no time.

Step 6

When the jars have processed for 25 minutes, remove the jars from the canner and place them on a towel. As they cool, you will start to hear the jar lids pinging. This means they are sealing. After an hour or so of cooling, you can check to see if the jar has sealed by running your finger along the center of the lid. If it springs back, the jar isn't sealed and should be placed in the refrigerator. A sealed jar of peaches should last at least 18 months when kept in a cool dry place. An unsealed jar of peaches will last about a week or so in the refrigerator.

Even though fresh peaches are only available for a few months in the summer, there\'s no reason you can\'t enjoy them all year long. Just choose some fresh ripe peaches, grab a few jars, a little sugar, and you\'ll be on your way to preserving these delightful beauties in no time.

Just peachy!

Even though fresh peaches are only available for a few months in the summer, there\'s no reason you can\'t enjoy them all year long. Just choose some fresh ripe peaches, grab a few jars, a little sugar, and you\'ll be on your way to preserving these delightful beauties in no time. Even though fresh peaches are only available for a few months in the summer, there\'s no reason you can\'t enjoy them all year long. Just choose some fresh ripe peaches, grab a few jars, a little sugar, and you\'ll be on your way to preserving these delightful beauties in no time.

How to Make Toilet Cakes

0

Things You\’ll Need

  • Cake batter

  • Three 8-inch square cake pans

  • 8-inch circular cake pan

  • Ball shaped cake pan

  • Buttercream icing

  • Serving dish

  • Wooden dowels

  • Large serving dish

  • Icing spreader

  • Fondant

  • Rolling pin

  • Food coloring

  • Edible silver, gold or copper dust

  • Piping bag and piping tip (optional)

Toilet cakes seem odd to some, but bakers occasionally receive requests for the specially-shaped treats. The cakes are typically used for plumbers or to celebrate a child's achievements in potty training. Depending on your personal tastes, you can experiment with food coloring and piping to make the basic toilet as traditional or repulsive as you like.

Step 1

Pour cake batter into all five of the cake pans and bake the cakes according to the directions in your specific cake recipe.

Video of the Day

Step 2

Allow the cakes to cool thoroughly.

Step 3

Cut the square cakes in half to make six 4-by-8-inch cakes.

Step 4

Cut a hole in the middle of one of the round cakes. The remaining donut shape will be the toilet seat. Cut a gap in the donuts to make a horseshoe shape.

Step 5

Coat all of the cakes with buttercream frosting.

Step 6

Spread a small amount of frosting on the bottom of the serving dish to create a glue for the cakes.

Step 7

Stack the 4-by-8-inch cakes on one end of the dish to make the toilet tank. Attach each layer to the previous layer using wood dowels and frosting.

Step 8

Roll out enough fondant to cover the toilet tank. Cover the tank with the fondant and trim away excess with a sharp knife.

Step 9

Roll out enough fondant to cover the ball-shaped cake, which will be the toilet bowl. Place the bowl round-side-up and cover it with fondant. Cut off the excess with a sharp knife.

Step 10

Roll out enough fondant to cover the toilet seat. Wrap the fondant around the toilet seat and trim away excess with a sharp knife.

Step 11

Place the toilet bowl in front of the toilet tank, flat-side-up, and place the toilet seat on top of the toilet bowl.

Step 12

Mix buttercream frosting with a few drops of blue food coloring to make water-colored frosting. Spread the blue frosting on the flat surface of the toilet bowl, but not on the toilet seat.

Step 13

Shape fondant into a wedge-shape to make the flusher. Attach the flusher to the toilet tank, using a wooden dowel. Paint metallic dust onto the flusher, using a paintbrush.

Step 14

Color additional buttercream frosting as desired and write a message on the toilet tank, using the piping bag.