Home Blog Page 14

How to Blanch Poblano Peppers

0

Things You\’ll Need

  • Knife

  • Pot

  • Bowl

  • Ice

  • Slotted spoon

  • Cloth

... Green poblanos are usually enjoyed fresh.

The mild spiciness of poblano peppers complements a variety of dishes, including salsa and sauces. Dried, ripe-red poblanos are called ancho peppers, and are typically used as a seasoning or ground into a pepper paste. The peppers are harvest at their green-mature stage for use as a fresh pepper. Blanching, the process of cooking briefly in steam, allows you to freeze the poblanos for later use. Blanching only lightly cooks the pepper and renders it more tender. You can still roast or cook it using other methods prior to serving.

Video of the Day

Step 1

Wash the poblano in cool water. Rub the skin with your thumbs to remove any dirt or soil.

Step 2

Cut the stem end off the poblano. Pull out the core and discard. Leave the seeds in the poblano for a spicier pepper or remove them if you prefer milder pepper.

Step 3

Leave the pepper whole, or cut into strips or a dice, depending on your preferences and intended use. You can also cut the pepper after blanching, if preferred.

Step 4

Bring a pot to a full boil. Set a bowl of ice water on the counter while the water comes to a boil.

Step 5

Submerge the poblanos in the water. Boil the peppers for 3 minutes.

Step 6

Lift the peppers from the water with a slotted spoon. Immerse them immediately in the ice water. Soak in the ice water for 3 minutes.

Step 7

Drain the water from the poblanos. Pat the peppers dry with a clean cloth. Freeze or prepare them as desired immediately.

Warning

Wear gloves when handling hot peppers so the spicy oils don't cling to your fingers.

Can Sausage Be Used After the Sell-By Date?

0

Grilled sausage on serving platter With proper handling, sausage is safe for consumption for days past its sell-by date. Image Credit: Jupiterimages/Stockbyte/Getty Images

With more than 90 percent of Americans throwing food out prematurely and up to 40 percent of the U.S. food supply discarded each year, as CNN reports, you may very well be wasting a lot of food due to confusion over product dating. Your sausage's sell-by date doesn't reflect when it's no longer safe to use. Unless you have good reasons to suspect otherwise, you can certainly use sausage after this date on the package.

Video of the Day

Understanding the Sell-By Date

The producer of the sausage made an estimation as to when the food would no longer be at peak quality. This doesn't mean it expires or instantly becomes unsafe at this point — just that it's no longer at maximum freshness and flavor. The manufacturer then dated the sausage for about 3 to 5 days prior to the final day of peak quality. The sell-by date indicates the last day the producer recommends that the seller offer the product to the public, giving consumers a reasonable amount of time to use the sausage after buying it. So, the sausage remains at peak quality for several days after the sell-by date.

Understanding Those Other Dates

In addition to a best-by date, you may also see a best-if-used-by or a use-by date on sausage and other food packaging. These are not definitive expiration dates. Rather, they identify the producer's estimation of the last day of peak quality. In general, the word "best" reflects a looser estimation, while use-by dates indicate more well-established estimations. Sausage would typically be safe for consumption within a few days past this date, assuming you detect no evidence to the contrary, but you can expect diminished flavor and perhaps a less appealing texture, as peak quality has passed.

Is It Good?

If your sausage isn't fit for consumption, it's generally obvious. When meat products go bad, the first sign is usually a foul odor. Sniff the sausage, and if it has an offensive smell, discard it. Sausage may also turn slimy or mushy or become discolored when it goes bad. If you don't notice anything wrong but find the sausage doesn't taste good after you prepare it, toss it; maybe it's your cooking, but maybe it's spoiled. It's better to be safe than sorry where foodborne illnesses are concerned.

Common Sense

Sausage can go bad before any date on the label, whether it's a sell-by, use-by or best-by date. If there's some contamination during manufacturing, the product may be spoiled from the start. There are plenty of opportunities for mishandling during transport to the store, between arrival and shelving at the store, between purchase and getting it home and during storage at home. Trust your senses over any date. Refrigerate the sausage below 40 degrees Fahrenheit until use. Don't leave it out at temperatures between 40 and 90 F for longer than 2 hours and don't leave it out at temperatures between 90 and 140 F for longer than 1 hour.

How to Instructions for Everclear-Soaked Fruit

0

Things You\’ll Need

  • Assorted fruits

  • Knife

  • Mixing bowl

  • Plastic wrap

  • Maraschino cherries

... Soak fruits in Everclear to create an adults-only fruit salad.

Everclear is a brand of potent grain alcohol available in 151- or 190-proof varieties. While Everclear definitely packs a punch, this alcohol has very little flavor, which makes it a good choice for soaking fruit. Use Everclear to create alcohol-soaked melon balls, pineapple, apples, pears and any other fruit you enjoy. Just be sure to keep your grown-up fruit salad away from kids. Also, remember that it may be easy to over indulge when eating alcohol-soaked fruit, as it is almost impossible to determine exactly how much Everclear you are consuming.

Video of the Day

Everclear Fruit Salad

Step 1

Peel and chop assorted fruits and place them in a large mixing bowl as if you were making a fruit salad. Small fruits such as strawberries, grapes and cherries may be left whole.

Step 2

Pour Everclear into the mixing bowl until the alcohol covers approximately 1/2 of the fruit in the bowl. If you completely cover the fruit with Everclear, you will need to drain off some of the liquid before serving because the fruit will not be able to absorb all of the alcohol.

Step 3

Stir the fruit salad gently to wet all of the fruit pieces with Everclear. Take care not to smash the fruit while you are stirring.

Step 4

Cover the bowl with plastic wrap and place it in your refrigerator overnight. For best results, stir the fruit several times while it chills to evenly distribute the Everclear.

Step 5

Remove the bowl from the refrigerator just before serving.

Everclear Cherries

Step 1

Open a jar of red or green maraschino cherries and carefully pour out and discard the liquid.

Step 2

Fill the jar with Everclear and replace the lid tightly.

Step 3

Chill the cherries in your refrigerator for at least 12 hours to give them time to absorb the alcohol. You can store the cherries for several months and they will become more potent over time.

Step 4

Add the Everclear cherries to cocktails as a garnish.

How to Make Turkish Tea

0

Things You\’ll Need

  • Kettle

  • Teapot or samovar

  • Loose leaf black Rize tea

  • Strainer

  • Small, heatproof glasses or cups

  • Sugar

Turkish Tea Tea in Turkey is served in a short, tulip-shaped glass. Image Credit: RJPINNEY/iStock/Getty Images

Turkish tea aficionados talk of the four rules of the lip: Tea should be the color of lips, served at a temperature that doesn't burn the lips, poured to the lip of the glass, and tannic enough to leave a pleasantly bitter aftertaste on the lips. For the uninitiated, Turkey's national brew might be surprisingly strong, but it cleanses the palate nonetheless. A double-stacked kettle or samovar is the authentic brewing vessel, but a conventional teapot will also brew perfectly good tea.

Video of the Day

Home Brew

Step 1

Boil water in a kettle. Soft, chalk- and chloride-free water gives the cleanest brew, so use bottled water if local tap water is unsuitable.

Step 2

Sluice the teapot, whether metal or porcelain, with boiling water and rinse it out, to warm the pot and avoid sapping heat from the water unnecessarily.

Step 3

Add a teaspoonful of loose leaf black Rize tea per person to the warm pot. Slowly pour in the boiling water. Use just enough water to soak the leaves and release the color and flavors. Allow the tea to steep for 15 minutes.

Step 4

Pour the tea through a strainer into a cup or heat-resistant glass. For a full-strength brew, fill the cup to just below the rim. For a light, refreshing tea, fill the cup half- or quarter-way and top up with hot water from the kettle.

Step 5

Add sugar only, no milk. Some Turkish producers flavor their tea with bergamot, and some drinkers add a slice of lemon, but otherwise the natural flavor of the tea is the focal point.

Authentic Tea

Step 1

Brew Turkish tea in the authentic Black Sea style by using a double-stacked kettle, which has a large pot underneath for brewing the tea, and a smaller pot above for adding water.

Step 2

Pour boiling water over the leaves into the lower kettle and fill the smaller pot with boiling water only. The small kettle has its own lid, and fits into the opening of the one below to seal in the steam and aromas. Leave the tea to steep for 15 minutes.

Step 3

Pour the brewed tea through a strainer into a Turkish tea glass, a tulip-shaped glass with no handle. Leave enough space to hold the glass around the rim without scalding the fingers. Add sugar according to taste.

Tip

Turkish tea can be difficult to find overseas and the best option is usually to order it online. The majority of tea production in Turkey is still controlled by the Directorate of Tea Establishments, and carries the Caykur label.

Tea should be stored in an airtight container and usually expires after two years.

Warning

Do not stir or shake the teapot while the tea is steeping. The dried, fermented leaves will infuse the water with a mahogany color all by themselves.

Discard any remaining tea after 30 minutes as the tannins will be too strong.

Layered Jell-O Shots Tutorial (Match Your NFL Team Colors!)

0

If there is ever a time that calls for color coordinating Jell-O shots, it's a football party. It's an afternoon spent with friends, yelling at the TV, indulging in cheese dip and wings, and hoping that your guys come out ahead. Now that you know how to make an alcoholic treat that celebrates your team's colors, you might just be the one who wins the day.

Layered Jello-O Shots Tutorial (Match Your NFL team Colors!)

Watch the video tutorial

Things You\’ll Need

  • 24 to 28 disposable plastic ramekins with lids

  • 2 colors (3oz each) of Jell-O

  • 2 cups chilled vodka

  • 2 to 3 cups boiling water

  • 2 envelopes unflavored gelatin (if making a white layer)

  • 1 cup chilled pina colada mix (if making a white layer)

Layered Jello-O Shots Tutorial (Match Your NFL team Colors!)

Tip

Find out team colors here! And then adjust, mixing food coloring to make it as close a match to your team's jerseys.

Step 1: Set Up a Tray

Add ramekins to a rimmed baking sheet for easy transport.

Layered Jello-O Shots Tutorial (Match Your NFL team Colors!)

Step 2: Boil Water and Jell-O

Add the color Jell-O (3 ounces) you want to use for the first layer in a large measuring cup (for ease of poring) or bowl. Stir in 1 cup of boiling water until dissolved.

Layered Jello-O Shots Tutorial (Match Your NFL team Colors!)

Step 3: Add Vodka

Stir in the chilled vodka.

Layered Jello-O Shots Tutorial (Match Your NFL team Colors!)

Step 4: Pour into Cups

Add about 1/2 inch of Jell-O to each cup. Chill until set, about 2 hours.

Layered Jello-O Shots Tutorial (Match Your NFL team Colors!)

Tip

Don't like vodka? Use rum or tequila! Works just as well.

Step 5: Make the White Layer (Optional)

If making a white layer (Jell-O doesn't offer a white flavor), try this: add the unflavored gelatin in a large measuring cup (for ease of poring) or bowl. Stir in 1 cup of boiling water until dissolved.

Layered Jello-O Shots Tutorial (Match Your NFL team Colors!)

Step 6: Add the Pina Colada Mix

Add the chilled pina colada mix, stir until well combined.

Layered Jello-O Shots Tutorial (Match Your NFL team Colors!)

Step 7: Pour Over the First Layer

Pour about 1/2 inch over the chilled first layer, chill until set. Unflavored gelatin will set a bit faster than typical Jell-O and should be ready in about 30 minutes. Do not proceed until it has set.

Layered Jello-O Shots Tutorial (Match Your NFL team Colors!)

Step 8: Mix the Third Color

Add the remaining color Jell-O (3 ounces) to a large measuring cup (for ease of poring) or bowl. Stir in 1 cup of boiling water until dissolved.

Layered Jello-O Shots Tutorial (Match Your NFL team Colors!)

Step 9: Add Vodka

Stir in the chilled vodka.

Layered Jello-O Shots Tutorial (Match Your NFL team Colors!)

Step 10: Pour in the Final Layer

Pour into the cups until about 1/8 inch from the top of the cup. Chill until set. Refrigerate until ready to serve.

Layered Jello-O Shots Tutorial (Match Your NFL team Colors!)

Tip

Don't want them quite so boozy? Replace some of the chilled vodka with chilled water.

Layered Jello-O Shots Tutorial (Match Your NFL team Colors!)

Gluten Free, Dairy Free Carrot Cake Recipe

0

Carrot cake lovers all have a firm and distinct opinion on how it should be properly prepared. With pineapple? Shredded coconut? Sultanas instead of raisins? Nuts or no nuts? There are many iterations on how to make a mouth-watering carrot cake, and let's just say that this recipe takes the cake for perfection. Classic carrot cake is an absolute pleasure to prepare and share with family, but for those with food intolerances, finding the right recipe can be a challenge. This gluten-free, dairy-free recipe is great for sharing at a gathering, plus, there are plenty of frosting options to cater to your guests needs.

Two slices of carrot cake How to make gluten-free carrot cake Image Credit: Julia Mueller

Video of the Day

Things You\’ll Need

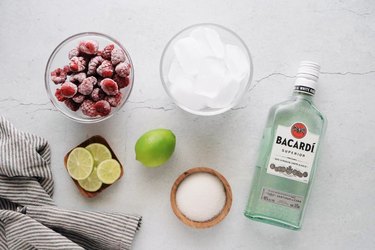
  • 3/4 cup olive oil (see note)*

  • 1 cup applesauce (sweetened or unsweetened works)

  • 3 large eggs at room temperature

  • 2 teaspoons pure vanilla extract

  • 2 cups granulated cane sugar

  • 2 cups gluten-free all-purpose flour

  • 1 teaspoon baking soda

  • 2 teaspoons baking powder

  • 1/2 teaspoon ground cinnamon

  • 1/2 teaspoon sea salt

  • 2 cups grated carrot

  • 1 cup unsweetened shredded coconut

  • 1 cup raw walnuts, chopped

  • 1/2 cup raisins

Frosting Options

  • Use store-bought cream cheese frosting to frost the cake. (Double check that it's dairy-free).
  • Make a traditional Cream Cheese Frosting using the recipe found here.
  • Follow this recipe for Vegan Cream Cheese Frostingfrom Minimalist Baker for a dairy-free option (Note: You will need todouble the recipe to have enough frosting to frost the cakes).

Tip

*If you'd like to add pineapple, you can reduce the oil to 1/4 cup and add 2/3 cup of canned crushed pineapple in juice, undrained.

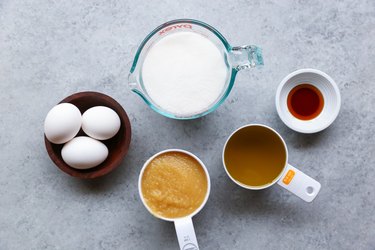
Step 1: Preheat and Prepare the Ingredients

Preheat the oven to 350 degrees Fahrenheit. Lightly oil or spray two 8" round cake pans (you can also use two spring form pans), and line the bottoms with parchment paper. Measure out your ingredients.

Measuring cups of wet ingredients for carrot cake Wet ingredients plus sugar Image Credit: Julia Mueller Dry ingredients measured out Dry ingredients Image Credit: Julia Mueller

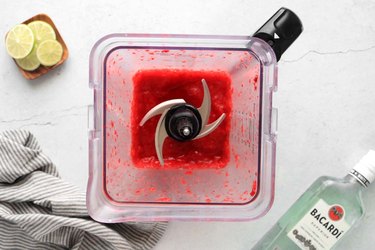
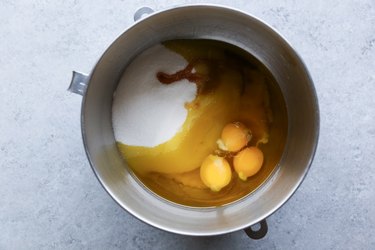
Step 2: Combine Wet Ingredients

Start by combining the wet ingredients (olive oil, applesauce, eggs, and vanilla extract) with the sugar. Add the ingredients to a stand mixer fitted with the paddle attachment or use a mixing bowl and a hand mixer. Beat until mixture is combined and reaches a creamy consistency.

mixing bowl with wet ingredients and sugar Use a stand mixer to beat wet ingredients Image Credit: Julia Mueller

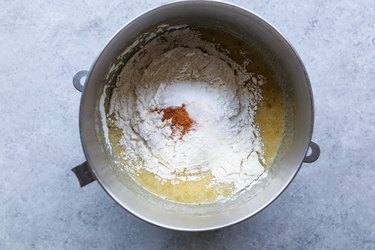
Step 3: Combine the Dry Ingredients

Add the gluten-free all-purpose flour, baking soda, baking powder, cinnamon, and salt to the mixing bowl and beat just until combined.

Mixing bowl with wet and dry ingredients Add the dry ingredients Image Credit: Julia Mueller

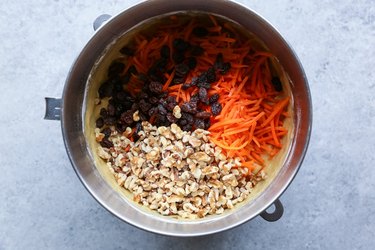
Step 4: Add the Solid Ingredients

Use a rubber spatula or spoon to fold in the grated carrot, shredded coconut, walnuts, and raisins. Continue mixing until everything is combined.

Cake batter with grated carrot, shredded coconut, raisins, and walnuts Mix in the solid ingredients Image Credit: Julia Mueller

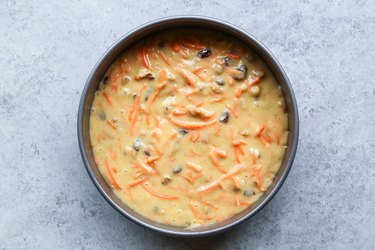
Step 5: Transfer Batter to Baking Pans

Divide the batter between the two prepared 8" cake pans.

Pouring cake batter into cake pan Pour batter into cake pans. Image Credit: Julia Mueller

Smooth into an even layer.

Cake pan with carrot cake batter Smooth batter into an even layer Image Credit: Julia Mueller

Step 6: Bake the Cakes

Place cake pans on the center rack of the preheated oven. Bake 25 to 35 minutes, or until the cakes are golden-brown and test clean when a toothpick is inserted in the center. While the cakes are baking, prepare the cream cheese frosting if making homemade.

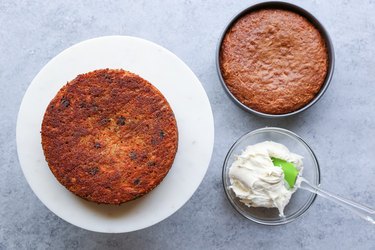
Step 7: Allow Cakes to Cool

Remove the cakes from the oven and allow them to cool 25 minutes. Run a butter knife between the edge of the cakes and the pans to help release the cakes. Turn the cakes out onto a cutting board, peel the parchment paper off of the cake and discard. Allow the cakes to cool at least an additional 30 minutes before frosting them. When ready to frost, place one of the cakes on a cake stand (or dish you'll be using for serving or storing the cake).

Two carrot cakes with bowl of frosting Allow cakes to cool to room temperature. Image Credit: Julia Mueller

Step 8: Frost and Assemble Cake

Spread a thick layer of frosting over the surface of the cake that's sitting on the cake stand, creating the center layer of frosting.

Frosting the bottom cake Frost the bottom cake Image Credit: Julia Mueller

Smooth frosting into an even layer.

Frosted cake on a cake stand 
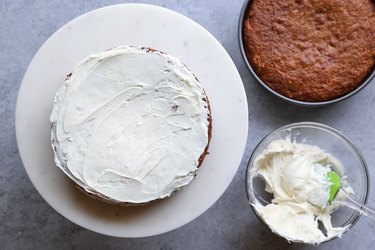
Even out the frosting with a rubber spatula Image Credit: Julia Mueller

Carefully place the second cake on top of the bottom cake, creating the top layer. The easiest way of doing this is first turning the cake out onto a cutting board, then using a spatula to carefully lift the cake off of the cutting board.

Placing the second cake on top of the first 
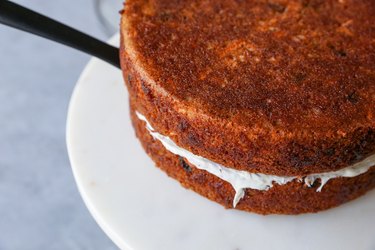
Add the second cake on top Image Credit: Julia Mueller

Frost the remainder of the cake by evenly spreading the cream cheese frosting over the full surface and sides of the cake.

Frosting the rest of the cake 
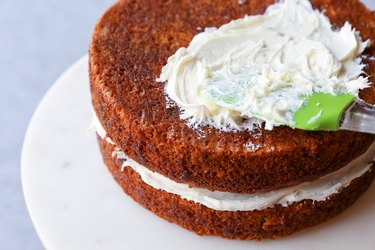
Frost the cake Image Credit: Julia Mueller

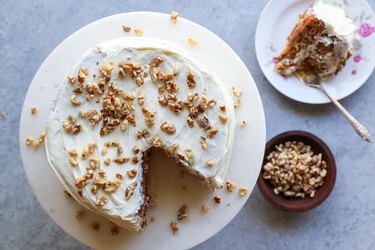
If desired, garnish the cake with chopped nuts.

Carrot cake on a cake stand with cream cheese frosting and chopped walnuts 
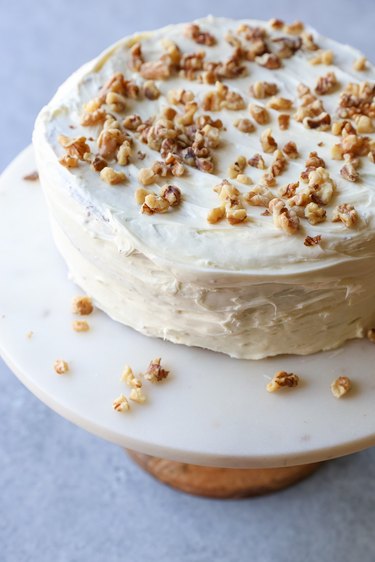
Garnish your carrot cake Image Credit: Julia Mueller

Step 9: Serve and Enjoy!

Slice the carrot cake using a large knife. Note: The cake will be easier to slice after sitting for 12 hours or more.

Carrot cake with one slice removed Serve the carrot cake Image Credit: Julia Mueller Two slices of gluten-free carrot cake 
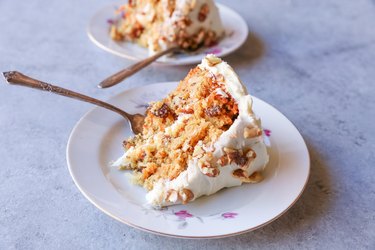
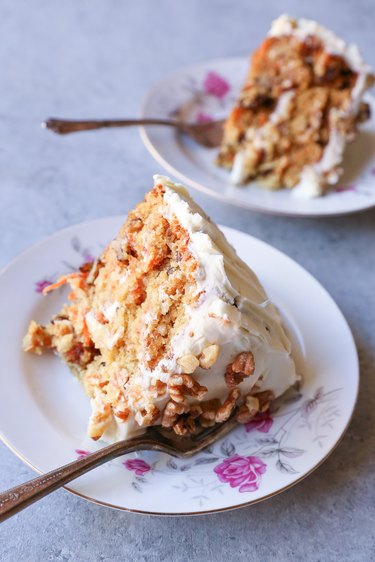
The best gluten-free carrot cake ever! Image Credit: Julia Mueller

How to Make Sour Patch Frozen Grapes

0

eHow may earn compensation through affiliate links in this tutorial.

If you love sour candy, you're in for a real treat – literally! These sour patch frozen grapes taste shockingly like Sour Patch Kids. The recipe consists of fresh green grapes rolled in lime or lemon juice and flavored gelatin, resulting in an addicting and colorful snack. While this version does still have some sugar, it's significantly less than the real thing. Get your candy fix with these sour patch frozen grapes.

Video of the Day

Sour patch frozen grapes

Things You\’ll Need

  • 3 pounds green grapes, washed with stems removed

  • 1 lime or lemon, juiced

  • 1 3-ounce box orange-flavored gelatin mix

  • 1 3-ounce box lemon-flavored gelatin mix

  • 1 3-ounce box lime-flavored gelatin mix

Ingredients for sour patch frozen grapes

Tip

These gelatin flavors are only suggestions. Feel free to mix and match your favorites!

Step 1

Place the grapes in a large bowl. Pour the lime or lemon juice over the grapes and toss well. Cover loosely and chill in the refrigerator for 10 to 15 minutes.

Toss grapes with lime juice

Step 2

Pour each gelatin flavor into a bowl or shallow dish. If you're using three flavors, you'll need about half of each pouch. If you're using more than three, you'll likely need less of each pouch. You can save leftover gelatin in airtight jars at room temperature.

Pour gelatin into bowls

Step 3

Divide the grapes among the bowls. Toss them with a spoon until coated.

Coat grapes with flavored gelatin

Tip

Avoid transferring too much lime or lemon juice to each bowl, as this will make the gelatin clump. You may want to use a slotted spoon to transfer the grapes to each bowl.

Step 4

Line a baking sheet with parchment paper. (You'll need to place this in the freezer, so if you're low on space, use multiple smaller pans or dishes.) Transfer the coated grapes onto the parchment paper in a single layer.

Freeze or chill sour patch grapes

Step 5

Freeze for two to three hours and then store them in freezer-safe bags. Enjoy a handful whenever you're craving a sweet-and-sour snack.

If you have sensitive teeth, biting into the frozen grapes may be uncomfortable. In this case, you can eat the sour patch grapes right after making them or store them in the refrigerator instead. They'll still be delicious!

Completed sour patch frozen grapes

How to Make Dried Cranberries

0

Things You\’ll Need

  • Pot

  • Timer

  • Colander

  • Bowls

  • Ice cubes

  • Cranberry juice

  • Baking spray

  • Food dehydrator

  • Glass jar

... Cranberries add bright color and a tart flavor to your dish.

Cranberries are a flavorful source of vitamin C and delicious when added to meals, baked goods and cold salads. While cranberries are seasonal in autumn, you can enjoy them all year around. One way to preserve fresh cranberries is to dry them. Dried cranberries can be stored in your pantry for several months and used as is or reconstituted for baked goods and other recipes.

Video of the Day

Step 1

Set the cranberries on the counter and allow them to come to room temperature if they were in the refrigerator. Bring a pot of water to a rolling boil. While the water is coming to a boil, fill a large bowl one-third of the way with ice cubes and one-third of the way with water.

Step 2

Pour the fresh cranberries into the boiling water for 20 seconds. Dump the cranberries and water into a colander in the kitchen sink when the timer goes off, then immediately pour the cranberries into the bowl of ice water and allow them to sit for a minute. The process of boiling the cranberries then submerging them in ice water is called "checking the skins" and helps speed the drying process.

Step 3

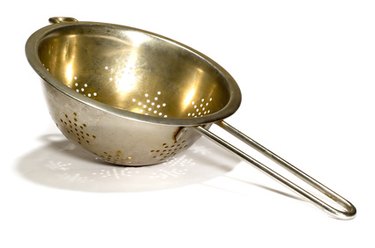
... Drain pretreated cranberries in a colander.

Transfer the cranberries to a bowl and cover with cranberry juice. Soaking the cranberries in juice pretreats the berries, preparing them for drying. Allow the berries to soak for three to five minutes, then drain them in your colander.

Step 4

Spray a thin coat of baking spray on the food dehydrator trays. This helps to keep the natural sugars in the cranberries from causing the cranberries to stick to the trays. Lay the cranberries on the trays in a single layer, making sure the berries are not too close together so there is room for air to circulate around them.

Step 5

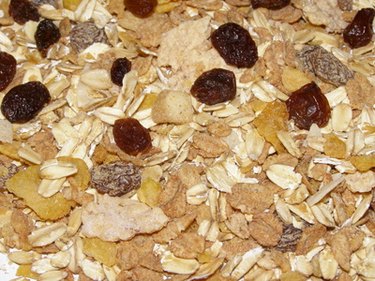
... Dried cranberries add flavor to muesli.

Preheat the food dehydrator, then place trays with cranberries in the dehydrator. Cranberries require 24 to 36 hours to become dry. Test the cranberries for dryness, after 24 hours by cutting one open to make sure there's no moisture left inside.

Step 6

Remove the food dehydrator trays from the dehydrator and set them on the counter. Allow the cranberries to cool for one hour.

Step 7

Pour the cooled, dried cranberries into a glass jar with lid, keeping the cranberries in the jar for one week and periodically shaking the jar to move the cranberries around. This process is called conditioning and distributes excess moisture so your cranberries are evenly dehydrated. Once you've conditioned your dried cranberries you can store them, for several months, in an airtight container.

Tip

Cranberries can also be dried in the sun or your oven.

Always dry berries that are fresh, ripe and free of bad spots or bruises for the best tasting dried cranberries.

Soak dried cranberries in a bowl of water for an hour to make them extra juicy for baked goods.

Warning

If moisture forms inside the container in which you're conditioning your dried cranberries, then the cranberries are not fully dehydrated. Dry the cranberries longer to prevent them from getting moldy, then repeat the conditioning process and store your cranberries.

Pearl Onion vs. Boiling Onion

Shish kebabs Pearl or boiling onions can be used whole to make shish kebabs. Image Credit: Goodshoot/Goodshoot/Getty Images

Unless you are an onion connoisseur, you may be surprised to learn that the main difference between pearl and boiling onions has nothing to do with their flavor and little to do with texture. These onions gain their names from their size and use and aren't a special variety of onion at all. In fact, you can harvest either pearl or boiling onions from the same variety of onion plants.

Video of the Day

What Is a Pearl Onion?

Pearl onions are those delightful little onions you typically see in pickled veggies. While most are pearly white, pearl onions can be yellow or red as well. Pearl onions measure about 1 inch in diameter and are sweet and crisp and come from any variety of onions. These immature onions have not developed the strong flavor of mature onions. Their delicate flavor complements meats and poultry.

What Is a Boiling Onion?

In the case of the boiling onion, its name refers to its common use and size, not a variety of onion. These onions are often boiled whole in soups or stews or nestled around roasts to add flavor. Like the pearl onion, boiling onions are harvested when they are immature. Boiling onions are slightly larger than pearl onions and average 1 to 1 ½ inches in diameter. Boiling onions are typically white or yellow, but can be red as well.

Flavor and Use

The flavor of both pearl and boiling onions varies depending on the type of onion they are harvested from. As a rule, white onions are slightly sweeter, while yellow and red onions have stronger flavors. Because pearl and boiling onions are both immature, sometimes referred to as baby onions, they lack the sharpness of mature onions. Used primarily for pickling with other baby vegetables, or pickled and served a condiment, pearl onions add visual appeal to the meal. Boiling onions, on the other hand, add delicate flavor to soups or stews and enhance the flavor of meats during roasting. When threaded on skewers with meats, poultry and fresh veggies, boiling onions add flavor while making a sharp color contrast to brighten the appearance of shish kebabs.

Common Confusion

Many use the term pearl and boiling onion interchangeably. Those in the grocery or sold at produce stands may be labeled as either. Some sellers refer to only small white onions as pearl onions and small yellow onions as boiling onions. The use of the terms pearl and boiling onion may differ between regions of the United States or from seller to seller. Likewise, the terms may be used interchangeably in recipes.

3 Delicious Homemade Daiquiri Recipes: Peach, Mango & Raspberry

0

This summer, treat yourself with these frozen daiquiri recipes. Each drink calls for real fruit, lime juice and white rum along with a sweetener of your choice. You can skip the sweetener, or for a kid-friendly version, you can skip the rum. Each recipe makes one to two servings depending on the size of your glasses. Cheers!

Peach, mango and raspberry daiquiri recipes

Video of the Day

Raspberry Daiquiri Recipe

Things You\’ll Need

  • 1 1/2 cups frozen raspberries

  • 2 tablespoons lime juice (about 1 lime)

  • 2 to 4 tablespoons sugar or honey

  • 4 ounces white rum (about 2 shot glasses)

  • 2 cups ice

  • Lime slices for garnish

Ingredients for raspberry daiquiri

Tip

In general, shot glasses can hold about 1 1/2 ounces of liquid, but this can vary depending on the manufacturer. Start with 2 to 2 1/2 shot glasses of rum and then add more if desired.

Step 1

In a high-powered blender, combine all the ingredients. Blend until smooth. Taste the mixture and add more sweetener or lime juice if necessary.

Puree all daiquiri ingredients in a blender

Tip

If you prefer a thicker consistency, add more ice. For a thinner consistency, add water one shot glass at a time.

Step 2

Pour into a glass, garnish with a lime slice and enjoy!

Raspberry daiquiri

Mango Daiquiri Recipe

Things You\’ll Need

  • 1 1/2 cups frozen mango, cubed (about 1 1/2 mangoes)

  • 2 tablespoons lime juice (about 1 lime)

  • 2 to 4 tablespoons sugar or honey

  • 4 ounces white rum (about 2 shot glasses)

  • 2 cups ice

  • Lime slices for garnish

Step 1

Place all the ingredients in a high-powered blender. Blend until smooth. Taste and add more sweetener or lime juice if necessary.

Step 2

Pour into a glass and garnish with a slice of lime.

Mango daiquiri

Peach Daiquiri Recipe

Things You\’ll Need

  • 1 1/2 cups frozen peaches, cubed (about 3 peaches)

  • 2 tablespoons lime juice (about 1 lime)

  • 2 to 4 tablespoons sugar or honey

  • 4 ounces white rum (about 2 shot glasses)

  • 2 cups ice

  • Lime slices for garnish

Step 1

In a high-powered blender, puree all the ingredients until smooth. Taste the mixture and add more sweetener or lime juice if necessary.

Step 2

Pour into a glass and garnish with lime slices if desired.

Peach daiquiri