Home Blog Page 13

Easy, No-Fail Potatoes Au Gratin Recipe

0

There is a reason classic recipes stick around and continue to be made year after year. These recipes are simple, delicious, and don't need reinventing! Potatoes au gratin are similar to scalloped potatoes, but with a cheese topping or sometimes even a buttery bread crumb topping. Both are delicious and require potatoes being cooked in a decadent creamy sauce. Let's be honest though: if you are like me, you probably put cheese on all of your potatoes no matter what the recipes says! I am going to show you the basics on making potatoes au gratin that will be the perfect addition to your Sunday supper.

How to Make Potatoes Au Gratin

Video of the Day

Things You\’ll Need

  • 2 pounds of Russet potatoes, washed well (about 4 large russet potatoes)

  • 1 large sweet onion

  • 2 cups of milk (2% or whole)

  • 2 cups of shredded cheddar cheese (Can use any variety of cheese)

  • 3 tablespoon all purpose flour

  • 3 tablespoon butter

  • 1 tablespoon salt

  • 1/2 tablespoon cracked black pepper

  • 3 green onions (optional)

  • Non-stick spray

  • 9 x 12 rectangular baking dish or a 12" circular baking dish

Step 1: Preheat oven to 400 degrees.

Step 2: Slice Potatoes and Onion

Prior to slicing, peel the potatoes if you desire. I happen to love the look and taste of leaving the skin on. Next, slice the potatoes very thin along with slicing the onion into thin rings. Set aside.

How to Make Potatoes Au Gratin

Step 3: Layer Potatoes and Onion into a Baking Dish

Spray the baking dish with non-stick spray and then layer the first layer of potatoes in the bottom of the dish. Next, layer the onion slices over top of the potatoes, and repeat until the baking dish is full.

How to Make Potatoes Au Gratin How to Make Potatoes Au Gratin

Step 4: Heat Flour and Butter in a Large Saucepan

Heat a large saucepan over medium heat. Add flour and butter and whisk for 2 to 3 minutes until flour has cooked slightly.

How to Make Potatoes Au Gratin

Step 5: Add Milk to Create the Cream Sauce

Whisk in milk to the butter and flour, and continue to stir until liquid coats the back of the spoon letting you know it is the right consistency. Season the cream sauce with salt and pepper.

How to Make Potatoes Au Gratin

Step 6: Stir in Cheese

Add the cheese to the cream sauce, reserving 1/2 cup for topping the casserole before baking.

Step 7: Pour the Cheesy Cream Sauce Over the Layered Potatoes

Once the cheese has melted, pour the cheese sauce over the layered potatoes letting it coat all of the potatoes. Top the casserole with the remaining shredded cheese.

How to Make Potatoes Au Gratin

Step 8: Cover the Dish and Bake for 1 1/2 Hours

Cover the potatoes au gratin with aluminum foil and bake for 1 1/2 hours until the potatoes are tender. For the last 15 minutes of cook time, remove the aluminum foil and let the cheese brown on top. Let the casserole sit for 15 minutes and top with chopped green onions if desired.

How to Make Potatoes Au Gratin

Whip up this classic potato recipe and your family will thank you. There isn't anything more comforting than a cheesy potato dish… and you will love this one!

How to Freeze Cooked Potatoes

0

...

The ways in which you cook, package, store and thaw potatoes contribute to their safety and quality when you serve them, but cooling cooked potatoes in an ice-water bath before you freeze them is a vital step. Quick-cooling cooked potatoes to 40 degrees Fahrenheit or below minimizes the time the potatoes stand in the temperature danger zone — the temperature range in which bacteria can reproduce. Do not freeze or refrigerate hot potatoes without cooling them first — they could raise the temperature of the freezer temporarily, making the contents susceptible to contamination.

Video of the Day

Plain Potatoes: Blanch or Boil?

...

The most effective way to prepare plain potatoes without additional ingredients for freezing is to blanch them. Blanching heats the potatoes through, stopping enzyme actions in the potatoes that would result in diminished flavor, texture and coloring. But it does not fully cook the potatoes. Freezing fully cooked, boiled potatoes is possible, but they will likely fall apart when you reheat them due to the water they absorb while boiling.

Freezing Blanched Potatoes

...

Place cut potatoes in a blanching basket, and submerge it in boiling water. Blanch potato pieces for 3 to 6 minutes, depending on their size. Transfer the potatoes to a bowl to quick-cool them in an ice-water bath. Drain them thoroughly. Transfer the potatoes to a resealable plastic freezer bag or a plastic container; leave about half-inch head space. Store the potatoes at or below 0 F up to 12 months. Place the frozen potatoes directly in boiling water to finish cooking them when you are ready to use them.

Freezing Roasted or Baked Potatoes

...

Prepare roasted, baked, stuffed or twice-baked potatoes as usual. Transfer them to a pan to quick-cool them in an ice-water bath. Package roasted potatoes in a resealable plastic freezer bag, plastic container or a disposable aluminum pan covered with foil. Wrap baked, stuffed or twice-baked potatoes individually in aluminum foil. Store potatoes at or below 0 F up to 4 weeks. Unwrap roasted or baked potatoes and transfer them directly to an oven preheated to 400 F to reheat them. Stuffed or twice-baked potatoes must reach 165 F before they are safe to eat.

Freezing Mashed Potatoes

...

Prepare mashed potatoes as usual. Transfer them to a bowl to quick-cool them. Store the entire batch in a freezer-safe plastic or aluminum container, or shape the potatoes into patties. Place two pieces of freezer paper between patties and stack them in freezer-safe packaging. Store mashed potatoes at or below 0 F up to 2 weeks. Thaw the potatoes just enough to remove them from plastic or freezer paper packaging, if necessary. Reheat the potatoes in an oven preheated to 350 F, stirring occasionally, or in a double boiler. Fry frozen mashed potato patties over medium-low heat, if desired. Mashed potatoes that contain any dairy product must be heated to 165 F to be safe.

Freezing Casseroles and Potatoes au Gratin

...

Cook potato casseroles or potatoes au gratin in a disposable aluminum pan, if possible, so you can cook and freeze the potatoes in the same pan. Reserve grated cheese or crumb toppings to add when you reheat the dish. Bake the potatoes until they are almost tender. Quick-cool the casserole or gratin in the pan. Cover it with freezer paper and aluminum foil. Store the potatoes at 0 F or below up to 2 weeks. Transfer the dish directly to an oven preheated to 400 F to reheat; cook the potatoes until they reach 165 F. Stir a little milk into the casserole to smooth an uneven sauce before the potatoes finish reheating. Add the cheese or crumb topping when the potatoes are about 150 to 155 F so it has time to brown.

Freezing Fried Potatoes

...

Cut, rinse and precook fried potatoes according to your recipe. Place the potatoes in hot oil as if you were frying them. Remove the potatoes from the oil when they are tender but not yet browned, after about 5 minutes. Drain them, and transfer them to a bowl to quick-cool them in an ice-water bath. Place the cool pieces in a freezer-safe bag or container. Store the fried potato pieces at or below 0 F up to 4 weeks. Transfer the frozen fries directly to hot oil to finish frying them, or place them in an oven preheated to 425 F until they are golden.

Freezing Potato Pancakes

...

Prepare potato pancakes as usual. Transfer them to a pan to quick-cool in an ice-water bath. Stack the pancakes with two sheets of freezer paper between each pancake; store the stacks in freezer-safe packaging. Freeze potato pancakes at or below 0 F up to 2 months. Thaw the pancakes just enough to remove the freezer paper. Bake them at 400 F for 2 to 3 minutes.

Roasted Frozen Squash

0

Things You\’ll Need

  • Baking dish

  • Two bowls

  • Squash

  • Olive oil

  • Salt

  • Pepper

  • Cinnamon

  • Nutmeg

  • Wooden spoon

  • Applesauce

  • Chopped herbs

  • Alfredo sauce

  • Butter

  • Saucepan

Assortment of squash Don\’t thaw the squash before cooking. Image Credit: Brand X Pictures/Brand X Pictures/Getty Images

When your freezer is stocked with frozen squash, the preparation possibilities are endless. Save mashed squash for soups and casseroles and use chunks of squash for roasting. Roasting gives squash a creamy texture, slight crunch and nutty flavor, and the mild flavor of squash means it can be paired with a number of seasonings. While you can roast any variety of squash, hearty types such as acorn and butternut will work better than watery varieties like zucchini. Regardless of the variety, squash should last in your freezer for up to 10 months.

Video of the Day

Step 1

Preheat the oven to 375 degrees Fahrenheit and select a large glass baking dish. The dish must be large enough to spread out the squash pieces in a single layer, so you may need multiple dishes if you're roasting more than 2 cups of squash.

Step 2

Place the frozen squash in a bowl. Drizzle olive oil over the chunks and sprinkle them with salt and pepper. You might also add some chopped garlic to the bowl. If you're roasting a sweet variety of squash such as butternut, try skipping the salt and pepper and sprinkling cinnamon and nutmeg on instead. Use a wooden spoon to mix up the chunks until they're all coated in oil.

Step 3

Pour the squash into the baking dish. Use the wooden spoon to spread the pieces into a single layer.

Step 4

Bake the dish for 30 minutes. Pull out one piece of squash and cut it open. If it's still cold inside, return the dish to the oven. Keep checking it every 5 minutes. The larger the pieces of squash, the longer it will take for them to roast. The chunks should be lightly browned and hot inside when you remove them.

Step 5

Transfer the warm squash to a serving bowl. If you've added cinnamon to the dish, eat it as is or mix it with warmed applesauce. For a savory squash, mix in fresh herbs such as parsley, rosemary or sage. If you prefer a creamy dish, spread alfredo sauce over the squash or cook butter in a saucepan until it's browned and nutty. Drizzle the browned butter over the squash and enjoy.

Tip

To get the best results, use squash that was blanched before freezing. This process, which involves boiling squash for a few minutes followed by immediate cooling, halts the vegetable's enzymes from breaking down, so the squash stays colorful and flavorful even after freezing.

How to Cook Pea Pods

0

Pea pods, or Chinese snow peas, are an essential staple vegetable in Chinese stir-fry cuisine. They differ from sugar snap peas in that the pods are flat and are available either fresh or frozen. They are also equivalent to green beans in that you can eat both the pod and the sweet, tender inside seeds. For a refreshing change, substitute pea pods for green beans in any recipe.

...

Video of the Day

Things You\’ll Need

  • Glass Or Ceramic Casserole Dish With Lid (If Using A Microwave)

  • Stainless Steel Basket Steamer Or Colander

  • Small Stainless Steel Pan

Preparing Pea Pods on the Stove

Step 1

...

Rinse the pea pods, and snap off the tips and ends. Peel off the strings on both sides.

Step 2

...

Place about an inch of water in a stainless steel pan with a tight-fitting lid. Place a basket steamer or colander in the pan, and add the pea pods.

Step 3

...

Bring the water to a boil. Cover the pan, and steam the pea pods for about 1 to 5 minutes, depending on how crisp or tender you prefer them.

Preparing Pea Pods in the Microwave

Step 1

...

Rinse the pea pods, and snap off the tips and ends. Peel off the strings on both sides.

Step 2

...

Place about an inch of water in a casserole dish, and add the pea pods. Cover the dish, and heat it in the microwave about 1 to 2 minutes.

Step 3

...

Stir the pea pods. Cover the dish, and microwave it for an additional 3 to 4 minutes. Let the pea pods cool for about 2 to 3 minutes before serving.

Tip

If desired, cut the pea pods in halves or thirds before cooking.

Add raw pea pods to salads, or serve them on a raw vegetable plate with dip.

How to Make Candy Sushi (Fun Party Food!)

0

Your guests will do a double take when you tell them what this "sushi" is made of because there's no fish in sight. Instead, three kinds of candy sushi come together in just a few simple steps, starting with basic rice cereal treats.

Candy sushi

To make the entire platter above, you'll need the following ingredients.

Things You\’ll Need

  • 10 ounces marshmallows (miniature or regular size)

  • 4 cups crispy rice cereal

  • 2 tablespoons butter

  • Gummy worms

  • Swedish fish

  • Fruit strips such as Fruit by the Foot

  • Licorice

  • Assorted gummy fruit candies

ingredients for candy sushi

Step 1: Prep the Rice Cereal Treats

In a very large mixing bowl, combine butter and marshmallows. Microwave for 2 minutes until the marshmallows are fluffy and melted. Immediately add rice cereal and mix.

Butter a small casserole dish (9×9 inches is perfect) and press half of your rice and marshmallow mixture into a square, about 2 inches thick.

Reserve the other half of your rice and marshmallow mixture in the bowl.

Prep the Rice Krispies Treats

Tip

This mixture will be very sticky. Spray your hands with non-stick oil and the rice will be easier to work with.

Step 2: How to Make "Hosomaki" Candy Sushi Rolls

Start with a sheet of waxed paper. Flatten out a handful of the rice and marshmallow mixture from the bowl and line up 3 gummy worms on one side.

Tip

Hosomaki is generally a sushi roll wrapped in seaweed on the outside.

line up 3 gummy worms on one side

Use the wax paper to guide the rice up and over the gummy worms.

Use the wax paper to guide the rice up and over the gummy worms.

Press down with both of your hands as you roll, slowly and carefully.

Press down with both of your hands as you roll, slowly and carefully.

Peel back the wax paper and use your fingertips to press together any part of the roll with gaps.

Peel back the wax paper.

Slide your fruit strips underneath the roll and wrap it around one end.

wrap fruit by the yard around

Slice the end of your roll, just at the edge of the fruit strip.

Tip

A serrated knife works best for slicing.

Slice the end of your roll.

Cut or tear off the end of your fruit strip.

Cut or tear off the end of your fruit strip.

To add "roe," dice up a gummy fruit.

To add "roe", dice up a gummy fruit.

Roll the candy pieces in your fingers and add to the top.

Roll the pieces in your fingers. Candy sushi with roe

Step 3: How to Make "Futomaki" Large Candy Sushi Rolls

Remove the rice and marshmallow mixture from the 9×9 pan, setting it on a sheet of wax paper. Use a knife to cut a strip about 3 inches by 1 1/2 inches.

Roll a Swedish fish into the rice, using the wax paper as a guide.

Tip

Futomaki is literally translated to "fat rolled sushi".

Roll a Swedish Fish into the rice, using the wax paper as a guide.

The fish should be poking up at the top. Use your fingers to press the edges together so they stick firmly.

The fish should be poking up at the top.

Wrap a fruit strip around the whole roll and cut or tear off the excess.

Wrap a fruit strip around the whole roll and cut or tear off the excess. How to make a large roll

Step 4: How to Make Candy Nigiri

Using the flattened rice and marshmallow mixture from the pan, measure a piece about as big as one Swedish fish and cut. Then trim corners to follow the shape of the fish.

Tip

Nigiri usually refers to a piece of raw fish served over a small mound of rice.

Measure a piece about as big as a Swedish Fish and cut.

Wrap with a fruit strip, and either cut or tear the excess.

Wrap with a fruit strip and you\'re done. candy nigiri

This dessert also doubles as an activity: Set out all the ingredients and let guests make their own!

let guests make their own.

13 Super Cute Small Bite Recipes

0

Cute recipes 1 of 14

You've heard of the romcom "meet-cute": the moment in a movie or television show where a couple meets for the first time, usually in a romantic or sweetly funny way. But you've probably never heard of an "eat-cute": the moment where you see a dish or dessert so dang adorable you become the personification of a heart-eyes emoji. Okay, so an eat-cute isn't a real thing — but cute food you fall in love with definitely is. Meet 13 recipes that will have you head over heels for their cuteness.

Image Credit: eHow Breakfast cookies. 2 of 14

Cacao Breakfast Cookies

When you find a breakfast item that incorporates a chocolatey flavor, you know it's real. Bake these cookies with cacao nibs, coconut and bananas for a delectable morning treat. If you want to take your love to the next level, swap the cacao nibs out for real chocolate.

Image Credit: Ashlae Warner Donut holes. 3 of 14

Cinnamon Sugar Donut Holes

Use extra pancake mix to make homemade donut holes, complete with a generous dusting of cinnamon and sugar. Arrange a few on a pretty plate and take a snap — you'll have a brunch photo that will have all of your Snapchat friends asking where you got those donut holes.

Image Credit: Thalia Ho Mini casseroles. 4 of 14

Healthy Mini Casseroles

You're up in the gym just working on your fitness, and you want a breakfast that's as cute as you are in your favorite workout outfit. Treat yourself to sweet potato and oatmeal mini casseroles: you'll love the size and how healthy they are.

Image Credit: Kevin Curry Pizza cones. 5 of 14

Pizza Cones

If you wish that Facebook would let you say you're in a relationship with pizza, you'll wonder where these pizza cones have been all your life. Don't skimp on the toppings!

Image Credit: Zora Hughes Lobster sliders. 6 of 14

Lobster Sliders

Everything mini seems to taste better than the regular size. A lobster roll already sounds mouthwatering, but these delicious sliders on brioche buns are calling your name.

Image Credit: Jennifer Farley Pork dumplings. 7 of 14

Pork Dumplings

A smile will spread across your face when you pop one of these pork dumplings in your mouth. Try different filling combinations to find a match made in heaven.

Image Credit: Jennifer Farley Finger foods. 8 of 14

Kid-Friendly Finger Foods

For the cute kids in your life, make finger foods that you can all share. Your presentation can even be adorable: celery sticks that look like butterflies and sandwiches shaped like stars.

Image Credit: Charity Curley Mathews Chocolate-covered bananas. 9 of 14

Chocolate-Covered Bites

Get up to some monkey business with chocolate-covered banana slices. Pecan pieces or flaked coconut are good topping options, but go for the sea salt on the melted dark chocolate. Your taste buds will thank you.

Image Credit: Ashlae Warner Mug cake. 10 of 14

Funfetti Mug Cake

If you're serving up cuteness for one, make a Funfetti mug cake in the microwave. Save this recipe for a gloomy day when cuddling up with a warm piece of cake sounds wonderful.

Image Credit: Trisha Sprouse S\'mores in a jar. 11 of 14

S’mores in a Jar

Want to cute-ify your summer barbecue? Put chocolatey and gooey s'mores in a small jar. If you're bringing them to a friend's backyard bash, tie small bows around the rims and add a lid.

Image Credit: Ashlae Warner Mini cherry-blueberry pies. 12 of 14

Mini Pies

There's just something about a mini cherry-blueberry pie that makes you want to squeal with delight. If you can't get fresh berries to bake yours, don't worry — the frozen option works just fine.

Image Credit: Ashlae Warner Mini cheesecakes in eggshells. 13 of 14

Sweet Springtime Cheesecakes

The key to making a dessert that everyone thinks is adorable is often how you present it. Cheesecake is great, but you know what makes it cute? Cheesecake served in eggshells in the springtime.

Image Credit: Thalia Ho Bunny cupcakes. 14 of 14

Bunny Cupcakes

The moment you set your eyes on these bunny cupcakes, you won't be able to hold back the "Awww!" Dream up other animals to make different versions. So #cute!

Image Credit: Sara Budisantoso

How to Dispose of French Press Coffee Grounds

Things You\’ll Need

  • French coffee press

  • Wooden spoon

... French coffee presses should be cleaned carefully to avoid breakage.

With a regular coffee maker, the coffee grinds are filtered. This action separates the majority of the essential oils and diminishes the robustness of the flavor. Issues such as water temperature and preparation time come into play with a French press; the process can't be rushed. Once you've brewed coffee in your French press, it's time to dispose of the grounds.

Video of the Day

Step 1

Push down the plunger located on the top of the press to confirm that all the coffee grounds are packed at the bottom of the carafe.

Step 2

Pour out any leftover coffee. Alternately, you can pour it into a sealable container and store it in your fridge.

Step 3

Pull the plunger up and remove the mesh filter. It should not have a lot of coffee grounds on it and can be cleaned easily with warm water and soap.

Step 4

Grip the top of the carafe, and gently remove it from the metal base.

Step 5

Scoop out the coffee grounds from the glass carafe with a wooden spoon. A metal utensil may crack the carafe. A plastic utensil may bend or break, because the coffee grounds are packed tightly in the bottom of the carafe.

Step 6

Dispose of the coffee grounds in the garbage can or add them to your compost pile, if you have one.

Step 7

Wash the carafe with warm and soapy water. This mixture cuts through the leftover oils from the coffee grinds. Clean out as much of the coffee grounds as possible before washing the carafe to avoid clogging your sink drain.

Tip

For a weaker cup of coffee, immediately brew a second round with the same coffee grounds.

Warning

Never brew anything except coffee in the French press. Always make sure that the carafe is secure in the metal base before brewing.

How to Get Rid of Beer Breath

Things You\’ll Need

  • Peanuts

  • Gum

  • Water

  • Mouthwash

Three men sitting at bar having drinks Drink beer Image Credit: Getty Images/Lifesize/Getty Images

Beer breath can be unpleasant for anyone that you are talking to, so it's important to try to get rid of the odor. Chewing gum after drinking beer is one way to help get rid of beer breath, but it may only mask the odor for a short time. You can also consider trying a different type or brand of beer that may not make your breath smell as bad.

Video of the Day

Step 1

A businessman holding peanuts in his hand Eat peanuts Image Credit: Visage/Stockbyte/Getty Images

Eat food that will absorb the alcohol, such as peanuts. Eating along with drinking will help to produce more saliva in your mouth to help cover the smell of beer.

Step 2

0 Breath mints Image Credit: Photos.com/AbleStock.com/Getty Images

Chew gum after drinking. It may seem obvious to get rid of beer breath with breath mints and gum, but it's important to chew sour-flavored or mint gum that will keep your mouth smelling fresh even after you spit the gum out.

Step 3

Man drinking water Drink water Image Credit: Jupiterimages/Comstock/Getty Images

Drink plenty of water to hydrate yourself and detox as much beer out of your system as possible. Drinking water will also help to prevent a hangover in the morning.

Step 4

close-up of a man brushing his teeth and looking in the mirror Brush your teeth Image Credit: George Doyle/Stockbyte/Getty Images

Brush your teeth, floss and use mouthwash before you go to sleep. This is the most beneficial way to cleanse your mouth of beer breath and will also make you more appealing if you are with a significant other. This also helps to remove any food that is stuck in your teeth that was helping the beer smell linger.

Rinse your mouth with mouthwash for up to five minutes. Also, make sure to use an alcohol-based mouthwash and then rinse your mouth with a cup of water.

Warning

Always drink responsibly.

3 Rye Cocktail Recipes for Autumn

0

Autumn is upon us like a wild stampede of All Things Pumpkin. Now that the fall is REALLY here and not just at that awkward pre-puberty state everyone goes crazy for, it's time to get real serious about cocktails.

autumn_rye_eHow_heroS

Video of the Day

By now, you're wearing some flannel, maybe even a scarf; and if you're really adventurous, you're wearing both at the same time while figuring out what to do with all those apples you've been picking over the last couple of weeks. But with this colder weather come fantastic drinks. Chilled as they may be, it's the flavors and aromas that convey this time of year and therefore, I present you with (insert crazy dubstep music here) some absolute dynamite rye whiskey cocktails!

Why just rye and not bourbon or Scotch or maybe, oh, I don't know… ANY other spirit known to man?! Well, friend. I'll tell ya': rye whiskey IS autumn. Man, if that wasn't the best scientific answer just now. For those who love rye or for those new to whiskey, good rye has all these lovely notes of spices and a genuine warmth that's missing from brother bourbon, a whiskey that is more about smoothness and delicate sweetness. They both smell great but I think that quality rye whiskeys like Rittenhouse, Templeton, Bulleit or WhistlePig (though that one is more of a sip-it-neat kind of whiskey) make for deeper, more intricate cocktails.

So without further ado, I present you with a series of excellent rye whiskey-based cocktails to sip on while contemplating just how many leaves you have to rake and just how many pies you need to make to rid yourself of those apples.

Remember The Maine

A classic cocktail (1939) variant of a Manhattan with beautiful wood notes and cherry.

autumn_rye_eHow_maineS

Things You\’ll Need

  • 2 ounces rye whiskey

  • 3/4 ounces sweet vermouth

  • 1/4 ounce Cherry Heering

  • Absinthe rinse

Step 1

Pour the rye, vermouth and Cherry Heering into a mixing glass full of ice and stir until chilled and diluted. Strain into a martini glass you had previously rinsed with the absinthe (like you would a Sazerac). Add a cherry for garnish.

The Pledge

This is an original cocktail of mine; but dare I say, it's tasty.

autumn_rye_eHow_pledgeS

Things You\’ll Need

  • 1 1/2 ounces rye whiskey

  • 1/2 ounce Amaro Averna

  • 1/2 ounce yellow chartreuse

  • 2 dashes of Angostura bitters

Step 1

Pour the all ingredients into a mixing glass full of ice and stir until nicely chilled. Strain into a small rocks glass with a big cube of ice and garnish with a lemon peel after pressing its oils into the drink.

Toronto

A modern classic in every sense.

autumn_rye_eHow_torontoS

Things You\’ll Need

  • 2 ounces rye whiskey

  • 1/4 ounce Fernet Branca

  • 1/4 ounce demerara syrup

Pour all three ingredients into a mixing glass. Stir and strain into a chilled glass and garnish with an orange peel after pressing its oils in and around the drink.

How to make Applejack

0

Things You\’ll Need

  • 2-gallon fermentation bucket and lid

  • Air lock

  • Measuring cup

  • Glass pint jar and lid

  • Long-handled metal spoon

  • Non-chlorine bleach

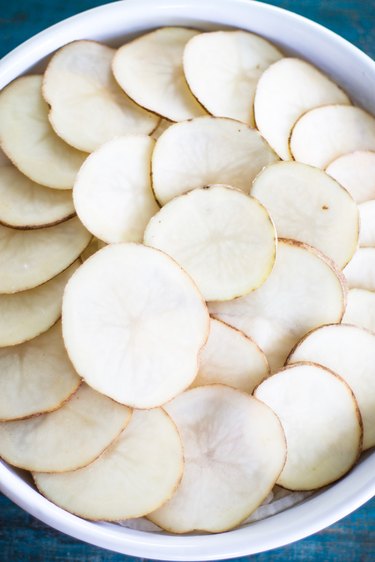
  • 1 gallon unpasteurized ecological apple cider

  • 1 pound of white sugar

  • 1 teaspoon of yeast nutrient

  • 1/8 teaspoon of pectin nutrient

  • 1/4 teaspoon of wine tannin

  • 1/8 teaspoon of pectin enzyme

  • 1/8 teaspoon of ascorbic acid

  • 2 sodium metabisulfate tablets

  • 5-gram package of EC-1118 saccharomyces bayanus yeast

  • Hydrometer

  • Funnel

  • 1-gallon glass jug

  • Racking cane and tip

  • Siphon hose and clamp

  • 1 tablespoon of bentonite powder

  • 1-pint glass jar and lid

  • Manual wine stirrer

  • Cheesecloth

  • 2-gallon freezer-safe food container

  • Stainless-steel mesh strainer

  • Conical sieve

glass of cognac 
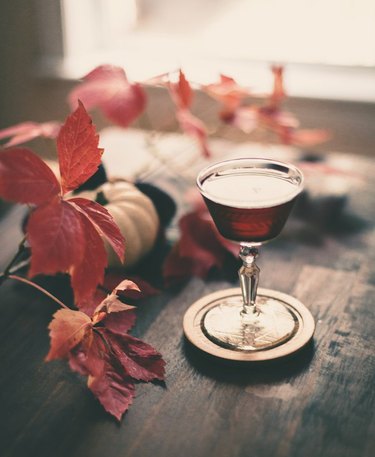
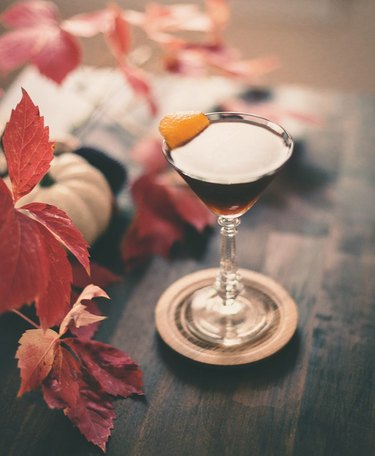
Applejack works seamlessly as a whiskey substitute in most cocktails. Image Credit: nata_vkusidey/iStock/Getty Images

Applejack exemplifies fundamental fermentation techniques at their purest. Not much has changed in applejack production since the American colonial period. Production starts with unpasteurized, preservative-free apple cider and ends with a timidly sweet, bold drink that finishes crisp and has just enough savory tannins for balance. Applejack gets its bump in alcohol content — which ranges from 20 to 33 percent — from freeze concentration, a method that essentially separates water from wine at sub-zero temperatures.

Video of the Day

Apple Wine

Step 1

Sterilize a 2-gallon fermentation bucket and lid, air lock, measuring cup, glass pint jar and lid, and a long-handled metal spoon in a solution of 1 gallon of water mixed with 1 tablespoon of bleach. Air dry the bucket and utensils.

Step 2

Pour 1 gallon of cider in the fermentation bucket. Add 1 pound of white sugar, 1 teaspoon of yeast nutrient, 1/8 teaspoon of pectin nutrient, 1/4 teaspoon of wine tannin, 1/8 teaspoon of pectin enzyme and 1/8 teaspoon of ascorbic acid.

Step 3

Stir the cider and fermentation agents for several minutes using the sterilized spoon. Stir in 1 crushed sodium metabisulfate tablet, set the lid on the bucket, and leave it unsealed. Let the cider sit for 24 hours to sterilize.

Step 4

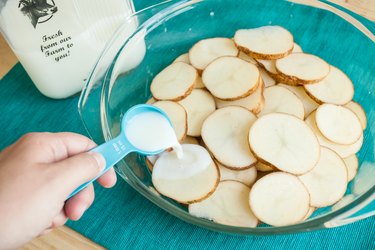
Portion 1 cup of cider in the measuring cup and transfer it to the sterilized jar. Sprinkle 1 5-gram package of EC-1118 saccharomyces bayanus yeast over the cider in the jar and stir it using the sterilized spoon.

Step 5

Seal the jar with the sterilized lid and shake it. Let the jar stand until it proofs, or until you see foam. This takes about 1 to 2 hours.

Step 6

Using the sterilized spoon, stir the activated yeast into the fermentation bucket, seal the lid, and attach the fermentation lock. Let the cider ferment for 3 days. You'll see yeast activity in the fermentation lock. Sterilize a hydrometer in bleach water.

Step 7

Measure the specific gravity of the cider on the third day using the hydrometer. It should measure between 1.000 to 1.050; if it measures less, let the cider ferment another day or two until it reaches the proper gravity.

Step 8

After the hydrometer measures between 1.00 and 1.050, sterilize a funnel, a 1-gallon glass jug with an airlock, a racking cane and tip, a siphon hose, and clamp using bleach water.

Step 9

Set the bucket of cider on a table or counter. The cider has to sit at least 1 1/2 to 2 feet above the jug. Place the jug on a chair and place the funnel in the neck. Take the lid off the bucket.

Step 10

Connect one end of the siphon hose to the hook of the racking cane; slide the hose clamp about 6 inches above the other end of the hose. Hold the clamp-end of the hose under slow-running tap water to clear the air; when water runs out the racking cane close the hose clamp.

Step 11

Connect the racking cane tip to the end of the cane and set it in the bottom of the fermentation bucket. Hold the other end of the hose by the clamp and guide the tip into the funnel; open the clamp.

Step 12

Let the cider siphon down until you start to see sediment in the line; shut the clamp when you do. Attach and close the air lock on the glass jug and set in a dark place with a 70-degree-Fahrenheit or above temperature to ferment for 2 weeks.

Step 13

Sterilize the hydrometer and check the wine after 2 weeks. It should measure around .990 or below. If it measures above, which it might, reattach the airlock and let it ferment another week.

Step 14

In a sterilized jar, mix 1 tablespoon of bentonite powder with hot filtered water using a sterilized spoon. Stir the bentonite vigorously and break up as many clumps as possible. Seal the jar with the lid and let it sit for 24 hours.

Step 15

Insert a manual wine stirrer into the jar and stir the wine for several minutes, alternate stirring direction. Shake the jar of bentonite vigorously and let it settle.

Step 16

Pour the bentonite slurry into the wine and stir again for at least 5 to 10 minutes. Stir the wine periodically over the next 24 hours; it should clarify by the next day. Let the wine stand until it clarifies.

Step 17

Stir 1 crushed sodium metabisulfate tablet into the wine, wrap the jug opening with 4 to 5 layers of cheesecloth and secure them with a rubber band. Let the wine sit for 24 hours to sterilize.

Freezing

Step 1

Place a sterilized funnel in a wide 2-gallon freezer-safe food container. Pour the apple wine into the second jug. The cheesecloth will catch most of the sediment if it gets through. Pour the wine slowly so you disturb the sediment as little as possible.

Step 2

Place the food container in a chest freezer. Loosely cover the container with the lid but don't seal it. Freeze the wine for 24 hours.

Step 3

Skim off the ice on top of the wine using a stainless-steel mesh strainer and discard the ice. Return the wine to the freezer.

Step 4

Freeze the wine another 24 hours and skim again. Continue freezing and skimming until no ice forms. It can take up to 3 days for the wine to stop freezing (or even depending on the grade of freezer).

Step 5

Place a funnel in a sterilized glass jug; place a conical sieve in the funnel. Have a helper hold the sieve and funnel in place while you pour the applejack into the jug.

Step 6

Wrap a couple layers of cheesecloth around the jug opening and let it sit for 2 days to ensure all carbonation is evaporated. Seal the jug with a rubber stopper. Store and serve applejack at room temperature.

Tip

Chest freezers work best for freeze concentration. You can expect apple jack to reach about 20 percent Alcohol By Volume when concentrated at minus 10 degrees below zero Fahrenheit; freeze concentrating at 30 degrees below zero can produce 30 ABV. (reference 3) Use organic, freshly pressed apple cider for best results. You can get freshly pressed cider from farmers markets in the fall.