Home Blog Page 109

DIY Cupid\’s Arrow Cake Pops

0

Whether you're celebrating Valentine's Day or Singles Awareness Day this year, you can still count on enjoying all the sweets! Take a stab at this simple and fun Valentine's Day cake pops tutorial with a bloody twist.

Cupid\'s Arrow Cake Pops

Video of the Day

Things You\’ll Need

  • Boxed or homemade cake of your choice

  • Canned or homemade frosting of choice

  • Red chocolate melts

  • Red decorating gel

  • Seedless raspberry jam

  • Heart cookie cutter

  • Gold edible glitter (optional)

  • Cake sticks

  • Construction paper

  • Scissors

  • Hot glue

  • Pencil

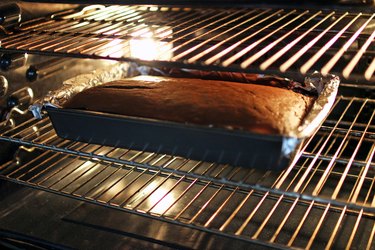
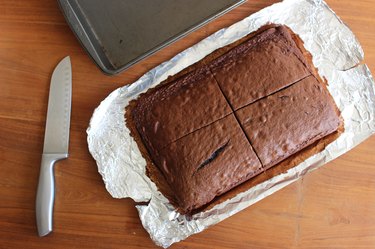
Step 1: Bake Your Cake

Bake your cake per the instructions on the box/your homemade recipe.
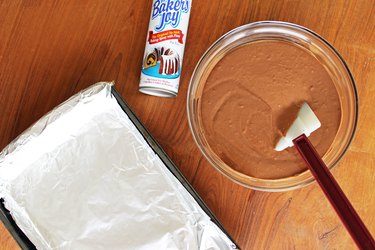
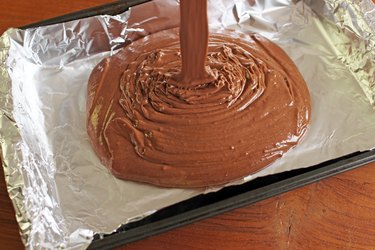
Prep to Bake Pour Your Cake

Tip

Lining your cake pan with tin foil helps aid in an easier clean up! You can pull the cake out and save yourself a trip to the sink to scrub the caramelization off.

Baked Cake

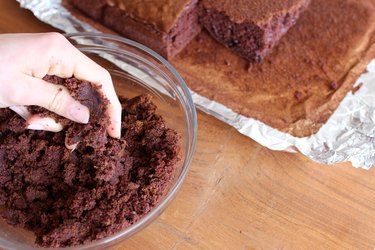
Step 2: Cool & Crumble

Allow your cake to cool entirely. Cut it up into sections (making it easier to handle) and crumble into a large bowl.

Cut Cake Crumble Cake

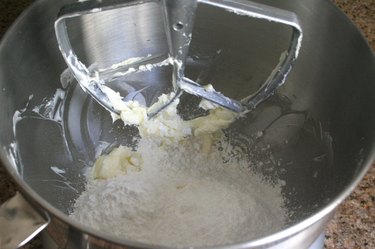
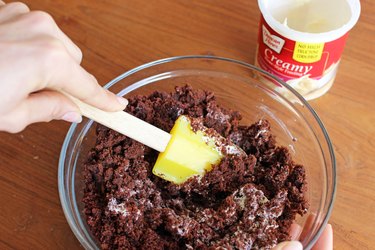
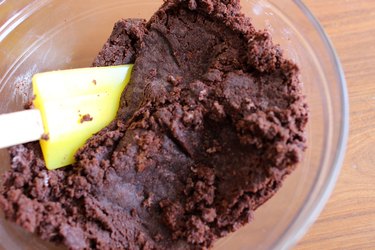
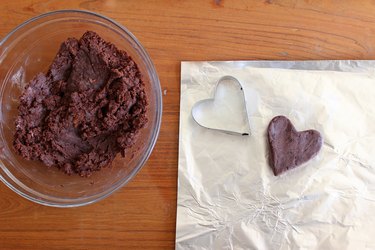
Step 3: Mix, Roll & Shape

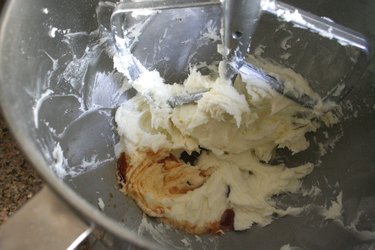
Once you've crumbled your cake, grab your choice of frosting and scoop one large spoonful. Mix that thoroughly and add more as needed until the texture is like play-dough.

Mixing It Up Mixture Up Close

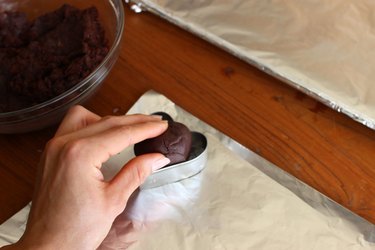
Grab your heart-shaped cookie cutter and scoop out enough cake mixture to fill it up. Roll it into a smooth ball so it sticks together, then press it down into the cookie cutter.

Cake Ball

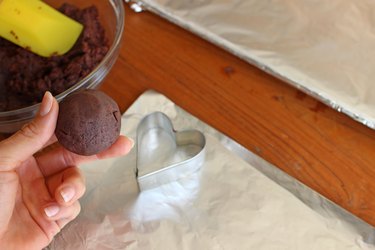
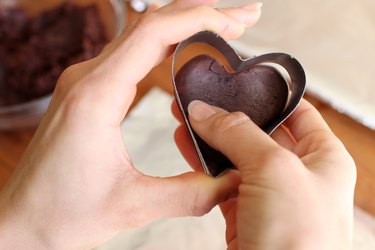
Press your cake ball into the heart cookie cutter, making sure to mold it completely to the shape.

Press Ball Into Mold Press Down

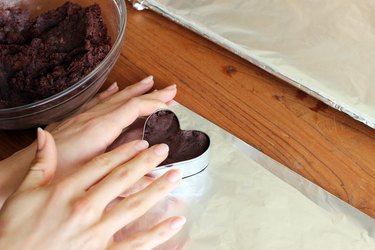
Then, gently push your cake out of the mold.
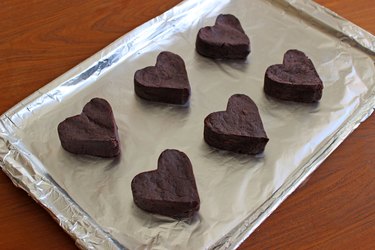
Push Out Heart Molded

Step 4: Chill Cakes

Chill the heart cakes in the refrigerator for 10-20 minutes until firm.

Overhead Shot Molded

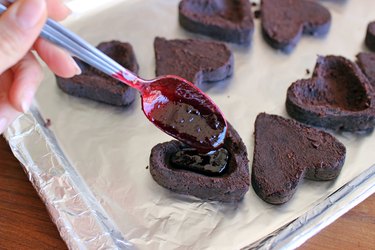
Step 5: Fill the Cakes

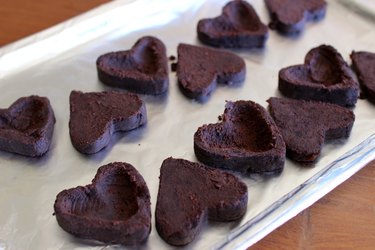
After the hearts have chilled for a bit in the fridge, take them out and cut them in half.

Cut In Half Part 1

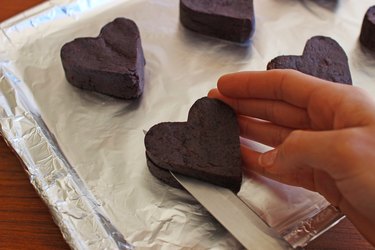
Carefully hollow out one side of each heart with a spoon. Then fill the hollow side up with the seedless raspberry jam.

Hollow Out Hollowed Out Fill It Up

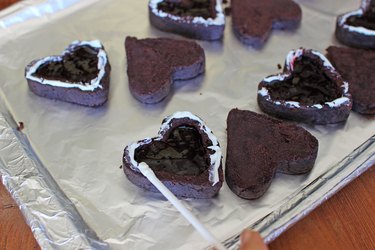
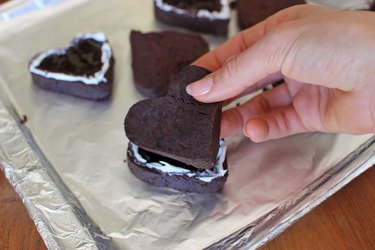
Take a bit of frosting and pipe it along the edges of each heart like glue to bond the tops back on. Then place the cakes back in the fridge to chill for another 10-20 minutes.

Frosting Edge Put Back Together

Step 6: Add Cake Sticks

Melt down your red chocolate and dip the tip of your cake sticks into it.

Insert Cake Stick

Place the sticks into your heart cake pops anywhere you'd like. I got creative and went for different angles. Remember that this is supposed to look like Cupid shot his arrow into the hearts from afar, so have fun with it!

Cake Sticks In

Add some of the melted chocolate to the seam where the frosting was to secure it more.

Frost the Sides

Place the cakes back in the fridge until the chocolate dries and firms.

Fridge

Step 7: Dip the Hearts

Take your hearts out of the fridge and cover them in the red melted chocolate. Shake the excess chocolate off and place the cakes on your cookie sheet to harden.

Dipping Pops Excess Off

Step 8: Add Arrow Tails

You can detail your cake pop arrows however you'd like. Get creative and switch up the colors or patterns.

Materials for Tail

Things You\’ll Need

  • Glue gun

  • Construction paper

  • Scissors

  • Pencil

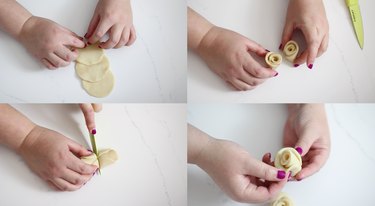
Sketch out an arrow tail shape and trace it multiple times onto your construction paper, then cut them out. Cut two tail pieces for each cake pop you are making (example: 10 cake pops = 20 tail pieces).

Arrow Template Arrow Tails

Hot glue the sides of the arrow tails back-to-back onto each tip of your cake pop sticks.

Hot Glue Putting Pieces Together Gluing Them

Cut diagonal slits on each tail, then fray the slits a little bit to give them more texture.

Cutting the Slits Fray the Edges

Step 9: Add Glitter

For more flare, add gold glitter as the "love dust" on the tip of Cupid's arrows.

Glitter

Step 10: Pipe On Some "Blood"

You can find food decorating gel at most grocery stores. Pipe the gel around the base of the cake stick so that it will drip down like blood.

Adding Blood Close Up Glitter Overhead Shot

Step 11: Display & Devour

The cakes are now ready to set out and serve! They instantly enhance any dessert table and are absolutely delicious. The raspberry filling is the perfect touch (and a refreshing complement to the chocolate).

Heart Cake Pops Cutting Down Cut Open Option 2

How to Make a Quick and Easy Buttercream Frosting

0

Classic buttercream frosting is a delicious addition to a freshly-baked treat, whether it's on a dozen cupcakes, under an edible topper, or in a handy mug. And as it turns out, the process of making frosting from scratch only requires a few minutes — or a little more time than it takes to polish off your delectable dessert. So what are you waiting for? Get baking!

Cupcakes

Video of the Day

Things You\’ll Need

  • 1 stick unsalted butter, at room temperature

  • 2 cups confectioner's sugar, plus more if necessary

  • 2 tablespoons heavy whipping cream

  • 1 teaspoon vanilla extract

  • Stand mixer with paddle attachment, or hand mixer

Ingredients

Step 1: Whip the Butter

On medium speed, whip one stick of room temperature butter until soft, or for about 15–20 seconds.

Whipped butter

Step 2: Add the Confectioner\’s Sugar

Pour two cups of confectioner's sugar onto the whipped butter.

Powdered sugar and butter

Step 3: Mix the Butter and Confectioner\’s Sugar Together

Whip the butter and confectioner's sugar together until smooth, or for about 10–15 seconds.

Powdered sugar and butter mixed together

Step 4: Drop the Vanilla Extract Into the Bowl

Add the vanilla extract to the butter mixture, and then mix them together on low speed.

Vanilla extract added

Step 5: Pour in the Heavy Whipping Cream and Whisk Everything Together

Add heavy whipping cream to the bowl, and continue mixing on low speed. Add additional confectioner's sugar if the consistency is not thick enough.

Frosting mixed together

Step 6: Layer the Frosting Onto Your Cooled Dessert

After your baked good has cooled, add the buttercream frosting to it using piping tools or utensils. Enjoy!

Cupcakes Cupcakes

How to Make a Riddling Rack

Champagne and wine lovers can enjoy a little piece of history while storing their collection—with a nod to history and some classic, vintage style—by creating their own riddling rack. The "Riddling Rack" dates all the way back to the early 1800s and was used in the process of creating Champagne.

... Dusty bottles stored at a proper angle in a large riddling rack.

Video of the Day

Today it is lovely way to display wine and many connoisseurs use it to store bottles at a proper angle. According to cellarraiders.com, wine bottles should always be stored either horizontally or at the 45º angle with the cork facing down —an angle which a riddling rack can provide. This keeps the wine in contact with the cork making sure that air cannot get in the bottle. And, as a conversation piece, it does a good job as well. Bottles of newborn champagne begin life stored on their sides in cavernous cellars in Champagne, France, before being moved to riddling racks—which are vital to the method of creating Champagne. The process of "remuage," or riddling, collects the yeast and sediment and concentrates it close to the bottle's mouth. The riddler rotates every bottle a few scant degrees daily, raising the bottom slightly and increasing the angle of storage, and the professional riddler can handle up to 40,000 bottles every day. The process ends with bottles being placed in a sub-zero solution for several minutes. This forms an ice plug with the yeast and unwanted sediments that is then disgorged prior to corking. The result, exquisite bubbles and taste.

Things You\’ll Need

  • Chains

  • Stain Or Paint

  • Piano Hinge

  • Oak Planks

Step 1

The basics:

Traditionally created from French Oak, the rack is made of two rectangular boards hinged together at the top. Each side then has a series of bored holes, cut to hold the neck of a champagne bottle at an angle. The traditional number of holes is 120, however modern interpretations allow for more and less—and even tabletop versions are available for purchase online. However, if you have some basic workworking tools and a few days to spare, you can create one to suit your own space, tastes and that can perfectly hold and display your wine collection.

Step 2

To create your own version, the experts at lumberjocks.com recommend you begin with:

Woodworking: Cut oak planks to suit your specific size requirements. Drill 2.5-inch holes, equally spaced with your drill press table set at 30 degrees. Round all edges, if desired.

Step 3

Finishing: Round all edges, if desired before staining or painting. Use a piano hinge to connect the top and simple pieces of chain to stabilize the bottom and acquire a 45-degree angle for proper wine storage.

Why Do People Drink Coffee After Dinner?

Paying for Dinner A single coffee shot can provide an exquisite finish to a dinner. Image Credit: Steve Mason/Photodisc/Getty Images

What started as a niche beverage in the Horn of Africa around the 15th century has graduated to a ubiquitous dining subculture. Worldwide, coffee is among the most valuable commodities, and caffeine, its vital ingredient, is the most commonly consumed psychoactive substance. More than half of American adults drink at least one cup daily. Whether a gourmet brew percolated with specialty apparatus or a generic mug-whisked instant, coffee remains a universal conclusion to dinner.

Video of the Day

Coffee Tradition

In the era of unbridled tobacco consumption, serving coffee after dinner provided a tacit signal for guests to light up cigarettes or cigars. At formal dinner parties, the practice still exists of serving coffee in separate lounges to men and women, usually accompanied by cigars or digestifs such as Cognac. Where smoking is not permitted or desired, coffee remains an appropriate method of balancing the palate after a particularly sweet dessert. In France, coffee is always served after dessert, not with it, and is savored at length before the check is requested.

Health Benefits

Coffee aficionados argue that an after-dinner Robusta or Arabica brew is not so much indulgence as plain healthy living. Coffee is one of the single leading sources of antioxidants in the Western diet, absorbed more effortlessly into the bloodstream than other nutrients. Likewise, coffee increases the metabolic rate by up to 11 percent, improving fat burning after a heavy meal. Evidence also exists that coffee boosts cognitive brain function, including alertness, by facilitating the enhanced firing of neurotransmitters. After a long, sumptuous dinner, a quick shot of coffee is the ideal way to counter sluggishness and lethargy.

Myths Busted

Many diners shy away from the after-dinner coffee in the belief that even the shortest dose is responsible for indigestion, stomach pains or even heart palpitations. The real culprit of these symptoms is often overindulgence of foods that were too spicy or rich. Medical evidence shows that drinking an espresso after dinner slows digestion, better equipping the body to break down a heavy meal. In particular, caffeine slows the transfer of food from the stomach to the duodenum and increases metabolism. Contrary to popular belief, coffee does not cause stomach ulcers, although it can exacerbate heartburn in some people.

Cultural Considerations

Italian or French restaurants typically serve a short shot of espresso in a demitasse cup as their after-dinner coffee, delivering the perfect amount of rich roast flavor to complement a heavy dinner. While it is acceptable to add a dash of milk or cream (called a macchiato), it would be something of a faux pas to order a cappuccino after dinner. This frothy, foaming milk and coffee blend dusted with chocolate powder is strictly a morning drink; purists would never drink it after midday, because the milk is thought to hamper digestion. Italians do not drink it after any meal, even lunch.

Decorative Pie Crusts Tutorial

0

The secret to a beautiful pie is easier than you think. Here are eleven easy-as-pie ways to pretty up your crusts. No one will ever know if you used store-bought dough!

Four pies decorated with all of the techniques below

1. Lattice

Use a pastry wheel (or pizza cutter) to cut long strips of dough. You can cut thin strips, thick strips, or a mixture of both. Place the vertical strips on the pie first. Fold back the tip of every other vertical strip, lay a horizontal strip across them, and then fold the vertical strips back over top. Continue weaving the horizontal strips across the pie, alternating rows in an over-under pattern.

Strips of dough woven into lattice pattern on pie

2. Braid

Cut three long strips of dough and pinch the ends together. Braid the three strands just as you would if you were braiding hair. Pinch the open ends together and then place the braid on the pie, curving it around to fit the shape of the pie. You'll likely need to create three to four separate braids to cover the entire circumference of the pie.

Braiding strips of dough

3. Roses

Use a glass or mug to cut out three circles of dough. Overlap the three circles together and then roll them up tightly. Slice the roll in the center and then spread out the layers of dough to create "petals."

Creating a rose shape with dough

To make the roses look more authentic, cut out a few freehand leaves and place them on the sides of the roses.

Pie decorated with lattice, braids and roses

4. Snowflakes

Use a large snowflake cookie cutter to cut out a snowflake in the center of the crust. Create a snow flurry effect by cutting out smaller snowflakes around the large one. Place the snowflake cutouts around the negative space of the pie to create texture.

Snowflake shapes cut out of pie crust

5. Crimped Edge

Press the tines of a fork diagonally into the edge of the pie crust. Now press the tines going in the opposite direction, overlapping them slightly with the previous indentation. Continue alternating the directions and overlapping the design around the edge of the pie.

Crimping edge of pie with fork

6. Fluted Edge

Press your thumb on one hand in an outward direction on the edge of the pie crust while simultaneously pressing your thumb and forefinger on your other hand in an inward direction to create an U-shaped impression.

Fluting edge of pie with thumbs and forefinger

7. Corkscrew Edge

Lay the tip of a corkscrew flat on the edge of the pie and press it firmly into the dough to create a corkscrew indentation. Continue around the entire edge of the pie, leaving a slight space in between each corkscrew shape.

Pressing corkscrew into edge of dough

8. Roped Edge

Press the side of your forefinger into the edge of the pie crust to create an indentation. Continue pressing the side of your forefinger into the dough, leaving a small space in between each impression.

Pressing forefinger into dough to create rope pattern

9. Lace

Lay a clean crocheted doily or fabric lace face down on top of the pie crust. Press the fabric firmly into the crust and then lightly roll a rolling pin on top a few times to further work the design of the fabric into the dough. Peel the fabric off carefully. Be sure to cut a few slits in the crust to adequately ventilate the pie.

Rolling lace doily into pie dough

10. Scalloped Edge

Hold a spoon backwards and press the tip of it into the edge of the pie crust. Now place the tip of the spoon just underneath the indentation you just made and press again to create a double U-shape. Continue around the edge of the pie making double U-shapes.

Pressing spoon into edge of dough to create scalloped pattern

11. Harvest Cutouts

Use pie cutters in harvest shapes — pumpkins, leaves, acorns — to cut out dough. Arrange the cutouts on the pie. For example, on a pumpkin pie, place a pumpkin cutout in the center and autumn leaves around the entire edge of the pie.

Pie decorated with pumpkin and leaves cutouts

Have fun experimenting and try combining a few of the techniques on the same pie!

Four different pies decorated with all of the techniques above

How to Make a Veggie Party Platter

A raw vegetable platter is always a hit at parties. Crisp, seasonal veggies can add color and flavor to a table, and heath conscious guests will appreciate the tasty, guilt-free offering. Served with rich dressings or dips, though, and even the most health-resistant person will be tempted to nibble. A homemade vegetable platter can have twice the offerings a store-bought packaged platter does for the same price, and by picking each vegetable yourself you can ensure it is at the peak of freshness.

... Visit your local farmers market for fresh, organic produce in season.

Video of the Day

Things You\’ll Need

  • Rag

  • Dip Bowl (Optional)

  • Cutting Board

  • Selection Of Fresh Vegetables

  • Dip (Optional)

  • Large Platter

  • Colander

  • Vegetable Peeler

  • Cleansing Spray

  • Sharp Knife

  • Bowl Or Can For Garbage

Step 1

Wash all your vegetables ahead of time and let them drain in a colander until dry. Clean your counter well and put a bowl or can near your cutting board for discarded peels and seeds. Place a large platter or tray near you so that you can arrange the vegetables as you cut them. Set a dip bowl in the center of the platter if you are using a dip.

Step 2

Choose bell peppers with vibrant colors, such as red, yellow or orange. They are riper, and therefore tenderer, than green bell peppers. Turn bell peppers stem side-down on the cutting board and cut it in half. Cut off the stems and remove the seeds. Slice peppers lengthwise into 1/4- to 1/3-inch strips.

Step 3

Lay the peppers on the platter, piling them so they are all lined up in the same direction. If you have more than one color pepper, separate them into different colored piles. If it's a round platter, the vegetables should be radiating outward from the center or dip bowl. If it's a rectangular or square platter, you can line them up in rows from left to right, working around the dip bowl when you come to it.

Step 4

Peel vegetables such as cucumbers and zucchini. Cut them in half lengthwise and scoop out the seeds with a spoon. Turn them so the flat side is down and cut them into 1/2-inch wide strips. Cut the strips in half crosswise to make the pieces a more manageable length. Arrange them on the tray along-side the colorful peppers.

Step 5

Slice the florets off of a bunch of broccoli. You can use a head of cauliflower if you prefer, or use both for color variation. Pile them, floret side-up, on the tray.

Step 6

Trim the top and bottom edges off celery stalks and cut them into 3-inch long pieces. If the celery stalks are very wide, you can slice them in half lengthwise. Line them up next to a more colorful vegetable.

Step 7

Trim the top and bottom edges off celery stalks and cut them into 3-inch long pieces. If the celery stalks are very wide, you can slice them in half lengthwise. Line them up next to a more colorful vegetable.

Step 8

Pile cherry tomatoes, sugar pea pods and peeled baby carrots in rows on the tray. Add a row of crackers or quartered pita bread.

Step 9

Prepare your favorite vegetable dip, or open a ready-made package. Stir it and scoop it into the center bowl. Some good options are garlic and chives flavored cream cheese, sour cream and onion dip, hummus, blue cheese or ranch dressing. Cover the tray with plastic wrap tightly and keep refrigerated until the party starts.

Tip

Prepare the vegetable platter the night before the party to save time. Add the crackers or bread at the last minute.

Alternate green vegetables with vegetables of other colors to make your tray look festive.

Food Processor Mayonnaise/Aioli Tutorial

0

Both homemade mayonnaise and aioli are very easy to prepare at home, and they taste much better than the jarred products available at stores! They come together in mere minutes, and will last for approximately 2 weeks in the refrigerator (though they taste best if consumed within the first week). Are you wondering what the difference is between mayonnaise and aioli? Not much! They're made using the exact same process, only aioli is traditionally made with the addition of garlic paste. It's also sometimes flavored with additional ingredients, such as some pesto or Sriracha.

I'll get this out of the way immediately: the thing that makes people squeamish about these recipes is that they use raw eggs. Keep this in mind, though: if you've ever ordered anything with aioli at a restaurant, you were served raw eggs. It's OK. The trick is to use pasteurized eggs whenever possible. They're heated to reduce the risk of food-borne illness in dishes that are not cooked, such as this one.

Video of the Day

Food Processor Mayonnaise/Aioli Tutorial | eHow

Things You\’ll Need

  • 1 large egg, preferably pasteurized

  • 2 large egg yolks, preferably pasteurized

  • 2 tablespoons fresh squeezed lemon juice (white vinegar may be substituted)

  • Optional: 1 clove garlic, grated into a paste

  • 1 1/2 cups canola or regular olive oil

  • Kosher salt to taste

  • Ground black or white pepper to taste

Step 1: Gather your ingredients and tools.

In Mastering the Art of French Cooking, Julia Child gives instructions for preparing homemade mayonnaise with a bowl and whisk. She instructs the reader to add a drop of oil at a time while vigorously whisking. I did this once, never again. 20 minutes later, my arm was on fire. Use the food processor. Lemon juice and white vinegar will both work in this recipe, but I prefer the more delicate citrus of the lemon. It's less astringent.

Food Processor Mayonnaise/Aioli Tutorial | eHow

Tip

The garlic paste for aioli was traditionally made using a mortar and pestle. Since I don't own (or need one), I use a microplane zester, the same tool I use for zesting citrus and grating nutmeg. It's a fast way to get a perfectly smooth garlic paste. You can also make the paste by chopping and then mashing it with a chef's knife.

Food Processor Mayonnaise/Aioli Tutorial | eHow

Step 2: Add egg and yolks to food processor.

Add the egg and yolks to the food processor. Turn the machine on for about 30 seconds and puree until frothy.

Food Processor Mayonnaise/Aioli Tutorial | eHow

Step 3: Add lemon juice, salt and pepper.

Add the lemon juice (or vinegar), along with a pinch of salt and pepper. If using, add the garlic paste as well. Puree for another 30 to 60 seconds.

Food Processor Mayonnaise/Aioli Tutorial | eHow

Step 4: Add the oil.

Very slowly begin adding the oil while the machine is running. If your food processor's lid pusher has a tiny hole, as many of them do, you can fill the lid and let that slowly distribute the oil.

Food Processor Mayonnaise/Aioli Tutorial | eHow

Step 5: Add additional seasonings, if desired.

One the oil is added, give the ingredients a stir. Add additional salt and pepper to taste, if desired. This is also when you can get creative with flavors like hot sauce, spices, etc. Store in the refrigerator in an airtight container.

Food Processor Mayonnaise/Aioli Tutorial | eHow

How to Make Greek Yogurt at Home

0

Creamy, thick and lusciously smooth, there's no denying Greek yogurt's superiority over the plain stuff. Not only is it a tasty addition to a meal at any time of day — whether it's paired with fruit at breakfast or used in a topping at dinner — but it's also loaded with healthy nutrients. Such versatility should make it a staple in your fridge, and you don't need to search a dairy aisle to make that happen. Check out just how easy it is to make your own Greek yogurt at home, and you can always have some ready for your next recipe.

yogurt

Video of the Day

Things You\’ll Need

  • 8 cups of milk, any type

  • 1 tablespoon store-bought Greek yogurt (ingredients should only say "milk and live/active cultures")

  • Candy thermometer

  • Plastic wrap

  • Kitchen towels

  • Fine-mesh strainer

  • Paper towels

Step 1: Bring the Milk to 180 Degrees Fahrenheit

Pour the milk into a medium-sized sauce pot with a candy thermometer attached. Keep the heat on "medium-low" to start, and slowly bring the temperature up to 180 degrees fahrenheit while stirring frequently. Be sure not to scorch the milk or let it come to a boil.

Heating milk to make Greek yogurt

Step 2: Pour the Milk into a Bowl

Once the thermometer hits 180 degrees, transfer the milk to a new bowl and let it cool to 115 degrees. Stir occasionally to deter any skin from forming on the top of the milk. If it does, remove the skin — it can't be stirred back into the mixture and it will create clumps in your yogurt. The whole cooling process will take about 20 to 30 minutes.

Cooling milk for homemade Greek yogurt

Step 3: Whisk in the Greek Yogurt

Whisk the Greek yogurt into the milk until it is completely incorporated and smooth. Cover the yogurt with plastic wrap, and then wrap the bowl with a couple of kitchen towels. Set aside in a warm place for 8 to 12 hours.

Tip

If your oven has a "bread proofing" feature, this is the perfect opportunity to use it. Otherwise, you can just turn the oven on for 1 minute to briefly heat it up, and then turn off the heat and place the bowl inside. Repeat this every hour or two to keep the oven slightly warm.

Resting DIY Greek yogurt

Step 4: Strain the Yogurt

After it has rested, the yogurt should have a consistency that's similar to custard. Place a fine mesh strainer over a large bowl and line it with a double-layer of paper towels. Scoop the yogurt into the strainer, cover it with plastic wrap and place the strainer in the refrigerator. Let it strain for about 6 hours.

Straining Greek yogurt

Step 5: Remove the Strained Yogurt and Mix Well

When you remove the strained yogurt from the refrigerator, the whey will have drained to the bottom of the bowl and you'll be left with thick yogurt on top. Transfer the yogurt to a bowl and mix well.

Strained Greek yogurt

Step 6: Store the Yogurt in a Container

The yogurt is ready! If you're not enjoying the yogurt immediately, store it in mason jars or any other air-tight container. Homemade yogurt will last for about one week, but chances are you'll finish it well before that.

DIY Greek yogurt

DIY Frozen Dog Treat Popsicles

0

This summer, help your pup beat the heat with these frozen dog treat popsicles. Made with just three simple ingredients, these treats are equal parts nutritious and refreshing! Use a standard mini popsicle mold if you'd like to insert sticks or opt for a silicone candy mold (like our adorable paw-print mold) for a hands-free version. Here's how to make the treats for your furry friend along with a tasty variation.

Frozen dog treat popsicles

Video of the Day

Things You\’ll Need

  • 1 1/2 cups plain nonfat or low-fat Greek yogurt (see tip)

  • 4 tablespoons peanut butter (see tip)

  • 1 banana, sliced, fresh or frozen

  • Paw-print silicone mold

Ingredients for frozen dog treat popsicles

Tip

Be sure to use yogurt and peanut butter without xylitol or other added sweeteners. Xylitol is toxic to dogs, according to the American Kennel Club. Also, some dogs might have trouble digesting dairy foods, like yogurt. Always check with your vet before making treats for your dog.

Step 1

In a food processor or blender, add all the ingredients.

Add ingredients to a food processor

Step 2

Blend until smooth and combined.

Blend ingredients until smooth

Step 3

Spoon the yogurt mixture into the molds. Depending on the size of your molds, you might have leftover mixture. In this case, store it in the refrigerator to be frozen later.

Transfer mixture into molds

Step 4

Loosely cover the molds and freeze for three to four hours or until the treats are solid. To save space in your freezer, remove the frozen popsicles from the mold and store them in an airtight container. They should last two to three months in the freezer.

Peanut butter banana frozen dog treat popsicless

For a blueberry version, replace the peanut butter with 1/3 to 1/2 cup fresh or frozen blueberries. Use the same ingredients above for a "berry" sweet dog treat!

Blueberry frozen dog treat popsicles

How to Make Mulled Wine

0

Things You\’ll Need

  • Decent quality but inexpensive red wine or fortified wine such as port

  • Whole spices, such as cinnamon sticks, cloves and star anise

  • Fresh herbs, such as rosemary (optional)

  • Sweet orange, such as satsuma

  • Lemon

  • Sugar

...

Whether proof of a well-to-do medieval household's wealth or simply a way to stay warm during a Northern European winter, the many variations of mulled wine possess a couple of commonalities: red wine and aromatic ingredients introduced to Northern Europe by the Romans, such as oranges and cloves. With an inexpensive red wine and four or five of your favorite spices, you can recreate the recipe at home.

Video of the Day

Step 1

...

Put half the wine and the whole spices in a heavy-bottomed saucepan. For each bottle of wine, mulled wine typically gets the following spices: 4 or 5 bruised cardamom pods, 1 or 2 cinnamon sticks, a few cloves and 3 or 4 star anise. Additional ingredients you can add to taste include freshly grated nutmeg, allspice berries, bay leaf, vanilla beans and white peppercorns.

Step 2

...

Add a fresh herb or two, if desired. Fresh, floral and aromatic varieties pair best. Rosemary, for example, adds a pine needle-like aroma redolent of freshly cut Christmas trees and picturesque sleigh rides. Mint and lemon balm play well off of nutmeg and cardamom.

Step 3

...

Zest and juice 1 sweet orange for every bottle of wine. Satsuma oranges are sweet, cold-hardy and commonly found in colder months. If you can't find satsumas, use navel, Hamlin or Parson Brown varieties. Add the juice and zest to the wine.

Step 4

...

Add the zest of 1 lemon to the wine. With its moderate to heavy sweetness, mulled wine needs a fresh, crisp food acid to contrast it, and lemon zest has just enough zip.

Step 5

...

Add 1/4 cup of sweetener per bottle of wine, such as white sugar, brown sugar or raw sugar. Use half-honey and half-sugar for a touch of honey taste without its cloying sweetness.

Step 6

...

Simmer the wine until it thickens, stirring occasionally, about 5 to 7 minutes, then take it off the heat.

Step 7

...

Stir in the rest of the wine. Fortify the wine with a shot or two of sloe gin, apple brandy or hard cider, if desired. Pour the wine through a sieve to strain the spices or ladle it from the saucepan into the mugs.

Tip

Unoaked wines have more acidity and fruitiness than oaked wines and work better for mulling. It's difficult to tell an unoaked red wine by its appearance. They tend to have a darker color, but ask the merchant to make sure.