A good stand mixer is a baker's best friend. It makes certain parts of the prep process—like mixing, beating, whipping, blending and kneading—quicker and much less strenuous on the arm. They're stronger and sturdier than hand mixers, and they have the added advantage of not requiring continuous use of your hands, letting you multitask in the kitchen.
Video of the Day
From lighter tasks like whipping cream or eggs to perfectly blending batters to heavier-duty work like kneading thick bread dough, all electric stand mixers are not created equal. It's important to consider certain aspects of a model to determine whether it meets your particular needs, whether it's easy and convenient to use, and whether it's worth its price tag.
What to Consider When Purchasing an Electric Stand Mixer
With so many electric stand mixers to choose from, certain considerations help you hone in on the right model for your needs:
Work Bowl Capacity: Generally, a 5-quart work bowl is enough for standard recipes and baking needs. Smaller bowls are available if you mostly prepare small batches and have limited kitchen space. If you tend to go big though, or often find yourself doubling recipes, opt for a work bowl of at least 7 quarts.
Power and Speed: Most stand mixers fall within 300 to 500 watts, though there are outliers. This range is enough to handle most home needs, while less than 300 watts isn't well suited to doughs. If you work with particularly heavy doughs and doubled recipes, look for wattage higher than this range. As for speeds, six to 10 is common and sufficient for most at-home uses. But more advanced bakers may prefer more speeds for greater precision.
Size and Weight: Whether your electric stand mixer has a permanent kitchen countertop home or you store it in a cabinet, choose a model that fits in the space available. Weight matters if you keep it in a high cabinet, taking it down and hoisting it back up there with every use. In that case, you might prefer a lighter model. However, as a general rule, the heavier the stand mixer, the sturdier it is. So, if you need it for thick doughs and large recipes, choose one with some heft.
Price: Electric stand mixers retail from under $50 to over $1,000. While there's some connection between cost and quality, there are certainly reliable, versatile models available at the lower end of the cost spectrum, and not every expensive appliance is worth its high price tag.
Tilt Head or Bowl Lift: Some stand mixers require you to tilt the mixer head back to access the work bowl, while others have a stationary head and you lift and lower the bowl for access. Tilt-head mixers are typically smaller, lighter and lower-priced, favored by more casual bakers. Bowl-lift mixers tend to be more stable, more powerful and pricier, preferred by more serious bakers.
Accessories and Attachments: All stand mixers come with a paddle, a whisk and a dough hook. These take care of the basic functions of the appliance. But some offer additional included or optional accessories to greatly expand what you can do with your stand mixer. For example, would you like a splash guard, grater, pasta maker, spiralizer, food processor or juicer?
With all these considerations in mind, here are some of the best stand mixers available.

The Best Overall Stand Mixer
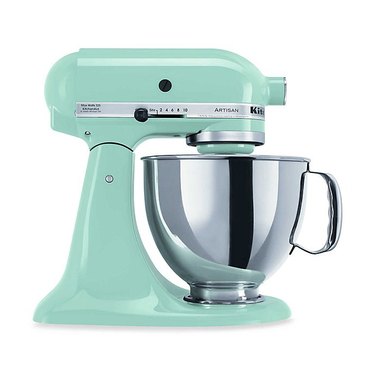
KitchenAid Artisan Series 5-Quart Stand Mixer
$349.99 at Bed Bath & Beyond
In terms of its specs, this tilt-head stand mixer finds a lot of sweet spots that make it ideal for many home kitchens. It's moderately sized but sturdy, and easy to clean. It comes with a 5-quart stainless steel work bowl that has a comfortable, cushioned handle, and it has the versatility of 10 speed settings and a decent amount of power. At the same time, it doesn't have a lot of fancy features that are nice but not necessary (e.g., timer, automatic shut-off), and that increases the cost of other stand mixers.
Its mid-range price is fair for all you get, and this model accommodates a number of accessories, like a grater, grain mill, pasta maker, ravioli press, ice cream maker, meat grinder, spiralizer and juicer. This quiet model also has a pouring shield and a fun side, available in plenty of colors so you can match your decor or acquire a nice accent piece. If you prefer not to get splattered, you'll appreciate the slow-start feature. The metal construction makes it durable too, so it's an investment that lasts.
At a Glance:
- 5 qt. stainless steel work bowl
- Tilt head
- Dimensions (LxWxH): 8.7" x 14.1" x 13.9"
- Weight: 27.9 lbs.
- Speeds: 10
- Power: 325W
The Best Compact Stand Mixer
KitchenAid Artisan Mini 3.5-Quart Tilt-Head Stand Mixer
$299.95 at Amazon
This model has basically everything going for it that the full-size KitchenAid Artisan Series 5-Quart Stand Mixer offers—see the previous entry above—but it's 25% lighter and has a 20% smaller footprint. Despite its smaller size and slightly lower motor power, this appliance still delivers great performance for a wide range of stand mixer tasks. Also of note is that you get a somewhat smaller 3.5-quart work bowl. It costs less than the larger version, too. So, if you're looking for a dependable, durable, less costly electric stand mixer you can accommodate with less counter or cabinet space, this is a perfect pick.
At a Glance:
- 3.5 qt. stainless steel work bowl
- Tilt head
- Dimensions (LxWxH): 12.5" x 7.75" x 12.5"
- Weight: 16.5 lbs.
- Speeds: 10
- Power: 250W
The Best Value Stand Mixer
Hamilton Beach 7-Speed Electric Stand Mixer
$109.99 at Amazon
If you're looking for a great appliance that's more budget-friendly than many of the other options out there, this lightweight model delivers. As would be expected at its price, it's at the lower end of the typical range for power and speed settings (at 300 watts and seven speeds), but it still performs well using its planetary-style mixing with everything from delicate tasks like evenly whipping egg whites to tougher jobs like kneading bread dough. Its two-handled, 4-quart stainless steel bowl is adequate for most standard at-home uses.
Atop the tilting head, you'll find a guide identifying which tasks you can do with each setting, making it user-friendly for novices. Other nice features are the splash guard, the handle on top for easy relocation and the suction cups that secure this stand mixer to your counter or tabletop. The speed dial is easy to turn and its numbers are printed large in case you've misplaced your reading glasses. Conveniently, the work bowl, paddle, whisk and dough hook are all dishwasher safe.
At a Glance:
- 4 qt. stainless steel work bowl
- Tilt head
- Dimensions (LxWxH): 10.4" x 15.5" x 16.3"
- Weight: 12.5 lbs.
- Speeds: 7
- Power: 300W

The Best High-End Stand Mixer
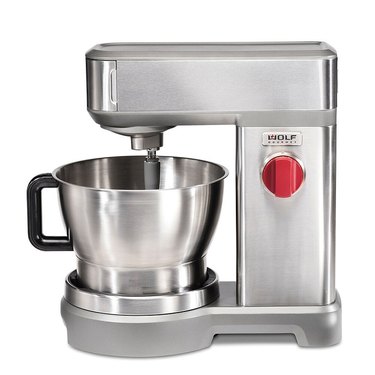
Wolf Gourmet High Performance Stand Mixer
$999.95 at Sur La Table
If you're willing to splurge when buying a new electric stand mixer, this bowl-lift model from Wolf, a respected name in high-end kitchen appliances, is a good buy. Its attractive, somewhat industrial look fits in nicely with a professional-style kitchen. But this large, heavy, elegant mixer isn't just style—it has lots of substance to make it an essential kitchen tool for even the most serious bakers and to help justify the significant cost.
The spacious 7-quart stainless steel work bowl accommodates large loads, and with a 500-watt motor and variable infinite speed dial, it has all the power and speed settings you need to handle them, no matter how delicate or tough the task at hand. Of course, the speed settings aren't literally infinite, but there are dozens, and you can stop anywhere in between for superior fine-tuning capabilities. The mixer always starts up slowly, preventing unpleasant splatters when you turn it on, and there's a splatter shield for additional protection throughout use. Food processing accessories let you do even more with this appliance, too.
At a Glance:
- 7 qt. stainless steel work bowl
- Bowl lift
- Dimensions (LxWxH): 11" x 18" x 18"
- Weight: 29.5 lbs.
- Speeds: Variable infinite speed dial
- Power: 500W
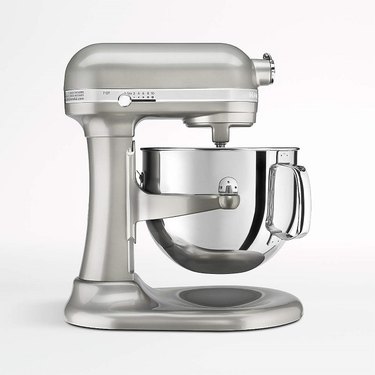
The Best Electric Stand Mixer for Pros
KitchenAid Pro Line Stand Mixer
$649.99 at KitchenAid
For even the most serious, creative, ambitious or advanced bakers, this formidable KitchenAid model gets any job done. Its 7-quart stainless steel work bowl is big enough for baking a large cake, and with 10 speed settings and an impressive 1.3-horsepower motor, there's no task this stand mixer can't handle. The KitchenAid Pro Line tackles even the toughest dough kneading with power and efficiency. And at 31 pounds, it's sturdy enough, too. But keep its size and weight in mind when considering whether you have room for it and whether it will be practical to work with.
The wide, oval-shaped whisk and efficient planetary mixing motion do an excellent job of preventing ingredients from sticking to the side of the work bowl. This means better-incorporated ingredients and relief from one of the most common annoyances associated with many electric stand mixers. All the attachments are dishwasher safe. This is a recommended purchase for serious home bakers and for professional bakers and chefs as well.
At a Glance:
- 7 qt. stainless steel work bowl
- Bowl lift
- Dimensions (LxWxH): 17" x 20" x 13"
- Weight: 31 lbs.
- Speeds: 10
- Power: 1.3 HP (approximately 1,000 watts)

")