Home Blog Page 104

How to Make Apple Cider Without a Press

Things You\’ll Need

  • Apples that you choose

  • Cheesecloth

  • Airtight container

  • Freezer

  • Blender or food processor

  • Large bowl

  • Sink with soap and lukewarm water

Apple cider is a great beverage for all seasons. It can be warm in the fall and winter and cold in the spring and summer. It is simple for you to create from scratch without a press, and can be made in large batches for parties or your family.

Step 1

Choose large, sweet, fresh apples to begin making your apple cider. Red Delicious, Gala and Jonathon apples are perfect for making cider. Clean them thoroughly with soap and warm water.

Video of the Day

Step 2

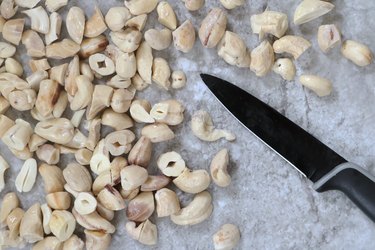
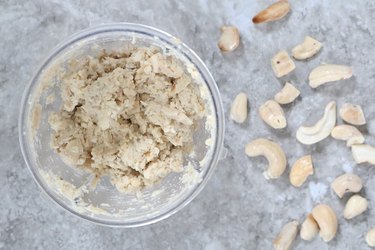
Cut the apples into chunks, keeping the skins on (this provides more nutrients). Place all of the apple chunks in a food processor or blender. If you are making a large amount of apple cider, do this in batches. Puree the apple chunks until smooth.

Step 3

Get a large bowl. Pour the batches of pureed apples through a cheesecloth, squeezing through as much as you can. If solids get through the cheesecloth, that is okay; just make sure it is not large amounts. This will give the cider juice a cloudier appearance. The amount of juice you produce is the amount of cider you will have, so keep this in mind.

Step 4

Pour all of the apple juice into a container that you can seal as airtight. Make sure to fill the juice up to the very top of the container, so oxygen doesn't stay in the container above the juice. Seal the container.

Step 5

Store it in the freezer, or below 40 degrees Fahrenheit, for at least two months. After you take it out of the freezer, thaw the cider out and pour into glasses to either heat up or keep cool, depending on what you choose.

Tip

Keep in mind that for very large batches of cider, it is best to use a cider press.
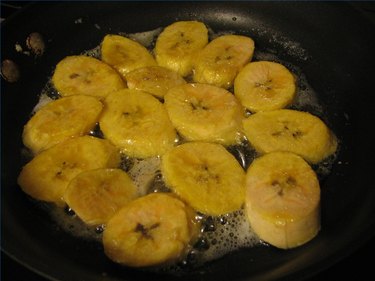
How to Open a Mini Keg

Things You\’ll Need

  • Mini keg

  • Cold beer mugs

... About 14 12-ounce cups can be poured ROM a mini keg.

Mini kegs have become a popular addition to small home parties or get together as they allow for a smaller amount of beer than a regular size keg yet with more convenience than individual cans. Some can be kept fresh for up to thirty days in the fridge, and allow for a cheaper price per pint than single serving bottles. With a few simple preparations, frothy beer straight from a keg can be had at home without breaking the bank, or your back.

Video of the Day

Step 1

Set the mini keg on the counter so that the hole where the spout is on the bottom and faces outwards off the edge.

Step 2

Insert the spout or beer line provided with the keg.

Step 3

Unscrew the cap covering the hole in the top of the keg by twisting it counter-clockwise. Set it aside.

Step 4

Place the cups underneath the spout, which should be hanging over the side of the counter.

Step 5

Push the lever on the spout firmly to one side, allowing the beer to flow out. Tilt the glass on at 45 degree angle while pouring to reduce the amount of foam.

Tip

A mini keg generally holds 1.32 gallons of beer, or 14 12-ounce cups.

Warning

Mini-kegs cannot be reused, so just recycle them when they are done.

Read how long the beer can be kept for, as this varies with different mini-kegs.

Healthy Whole Wheat Shrimp Pesto Pasta

0

Having easy recipes on hand for busy weeknights is a must in my house! One of my favorite go-to recipes is whole wheat shrimp pesto pasta. I add in extra vegetables and use whole grain pasta to create a satisfying and healthy meal. I love playing around with the ingredients based upon what I have in my fridge. My kale pesto with shrimp and whole wheat pasta is going to be your new favorite recipe, and I bet even your picky eaters will be all about this healthy one pot meal.

Healthy One Pot Meal: Whole Wheat Shrimp Pasta with Kale Pesto

Video of the Day

To cut calories, I omitted cheese from the pesto and added in kale for extra nutrients. In the past, I have also swapped the whole grain pasta for a rice pasta to make this whole meal gluten free. Feel free to make this recipe your own based upon your family's tastebuds and dietary needs!

Things You\’ll Need

  • 1 pound whole wheat pasta (substitute rice pasta for a gluten free version)

  • 1 pound large shrimp, peeled and deveined

  • 1 cup fresh basil leaves

  • 2 cups kale, stems removed and washed thoroughly (substitute spinach, if you prefer)

  • 1 garlic clove

  • 1/4 cup extra virgin olive oil + 2 tablespoons

  • 1/4 cup pecans (substitute almonds or pine nuts if you prefer)

  • 2 teaspoons kosher salt + extra for pasta water

  • 1 teaspoon cracked black pepper

  • 1/2 cup frozen peas

  • 1/4 cup sliced sun-dried tomatoes

Healthy One Pot Meal: Whole Wheat Shrimp Pasta with Kale Pesto

Tip

A traditional pesto has Parmesan cheese, however I omitted it for a calorie saver. Feel free to add it in if you prefer. You can also substitute spinach for the kale and swap the nuts if you so desire.

Step 1: Make the pesto.

Combine 1 cup of basil, 1 cup of kale, 1 garlic clove, 1/4 cup extra virgin olive oil, pecans, 1 teaspoon salt, and 1/2 teaspoon black pepper in a food processor or blender and blend until smooth. Add more olive oil if needed for consistency.

Healthy One Pot Meal: Whole Wheat Shrimp Pasta with Kale Pesto

Step 2: Bring water to a boil and cook pasta.

Bring a large pot of water to a rapid boil. Add a good handful of salt to flavor the pasta water and then add in the pasta. Cook according to directions on the package. Before draining your pasta, be sure to reserve 1/2 cup of pasta water to add to your sauce.

Step 3: Cook the shrimp.

While the pasta is cooking, add 1 tablespoon of olive oil to a large skillet and heat over medium heat. Add the shrimp and season with the rest of the salt and pepper on both sides. Let the shrimp cook for 2 to 3 minutes per side until pink. Remove from the pan and set aside.

Healthy One Pot Meal: Whole Wheat Shrimp Pasta with Kale Pesto

Step 4: Sauté remaining kale and peas.

Add 1 tablespoon of olive oil to the pan and add in the remaining kale. Cook for about 5 minutes until the kale is wilted and then add in the sun-dried tomatoes along with the shrimp back to the pan. Stir to combine ingredients and add in frozen peas for the last couple of minutes of cooking, just to heat through.

Step 5: Drain the pasta and add to the pan.

Drain the pasta, reserving the 1/2 cup of pasta water and add the pasta to the shrimp and kale. Add all of the pesto in at this time along with half of the reserved pasta water. Stir to combine adding more pasta water if needed to create a nice sauce.

Healthy One Pot Meal: Whole Wheat Shrimp Pasta with Kale Pesto

Step 6: Serve.

After the sauce has been well combined and all ingredients are coated with the pesto, serve and enjoy!

Healthy One Pot Meal: Whole Wheat Shrimp Pasta with Kale Pesto

Be prepared to get yourself a second helping of this one! This recipe is easy, delicious, and made with nothing but good for you ingredients. Enjoy!

Types of Plantain Bananas

... Types of Plantain Bananas

In the supermarket, you might have seen what you thought to be large firm bananas. They are, in fact, plantains. While they share the same genetic family as bananas, there are some striking differences.

Video of the Day

Types

There are two primary groups of plantains, French and Horn. There are subgroups of each depending on the particular variety that is mostly dependent on size or growing style.

Description

Plantains, like banana, grow in bunches called "hands". The trees can vary in size from 12 feet to 25 feet tall with huge broad leaves as wide as two feet across.

Geography

Plantains need tropical weather for successful fruit production. They are native to Africa and used as a starch, not unlike the potato. When explorers came to the Caribbean Islands and South America, they found the climate to be perfect for plantains where they are still thriving today.

Use

... Fried Plantains

Plantains, unlike the common sweet banana, are usually cooked or processed in some way and not eaten raw. A popular method of fixing plantains is to fry them. Peeled plantains cut into thick slices can be fried, then smashed lightly and re-fried again. Seasoning can be sweet, like butter and sugar, or savory, like garlic butter.

Nutrition

Plantains are a good source of vitamins C, B6 and A. Low in fat; they are a good way to add fiber and carbohydrates to your diet. Like common bananas, plantains are also an excellent source of potassium.

How to Get Rid of the Smell of Beer

Things You\’ll Need

  • Water

  • Shampoo

  • Vacuum

  • Peanuts and other alcohol-absorbing foods

  • Chewing gums and other sour candies

  • Toothbrush

  • Toothpaste

  • Floss

  • Mouth wash

...

While the taste of beer is popular, the smell it generally is not. Coming home smelling like a brewery may also cause, especially if your partner doesn't drink or your parents don't approve of alcohol. Unfortunately if you smell of beer it's not always as easy as just chewing on some gum to get rid of the odor, since the odor can seep out of your pores and get on your clothing and in your car.

Video of the Day

Step 1

Get rid of the smell of beer from your area. If there are beer stains, clean them with a mixture of warm water and shampoo. If the stain has been is dried use a sponge to apply the shampoo and water and then sprinkle it with baking soda. Let it sit for 30 minute. The baking soda will absorb the smells coming from the beer. Remove the baking soda afterwards using a vacuum cleaner.

Step 2

Get rid of the smell of beer from your breath. When drinking beer, it is good to eat peanuts, popcorn, or other foods that can absorb the smell of the alcohol. These foods allow make you produce more saliva, and help to cover up for the smell of the beer. After drinking beer, chew gum, breath mints or other hard candies. These will not eliminate the smell of the beer but it will mask it. Brush and floss your teeth after drinking beer and use a mouthwash to ensure that the stink of beer is removed from your breath. Also brush your tongue as a lot of bacteria contributing to beer breath can be found here.

Step 3

Take a shower and change your clothes. Drinking can sometimes be a messy affair. If you have managed to spill beer on yourself or your clothes you will likely reek of it. When you shower make sure to wash your hair and afterwards change into a clean set of clothes.

Step 4

Flush the beer out of your body by drinking several glasses of water. The water will help flush the alcohol out of your body, thus removing the smell and it will also keep you from getting dehydrated, and will help you to recover from a hangover as well.

Vegan Cream Cheese Recipe

0

From bagels to dips, traditional cream cheese is an all-time favorite. But when you lead a vegan lifestyle or have a dairy allergy, the popular spreadable cheese seems out of the question. Luckily, it doesn't need to be that way! With ingredients like cashews, nutritional yeast, and non-dairy yogurt, you can make vegan "cream cheese" in the comfort of your own home. The finished product will have a mild yet flavorful taste that is reminiscent of the real thing. To make it yourself, check out this deliciously easy tutorial.

Vegan cream cheese

Video of the Day

Things You\’ll Need

  • 1 1/2 cups cashews

  • 1/4 cup soy or coconut yogurt

  • 3 tablespoons nutritional yeast

  • 1 tablespoon lemon juice

  • 1/4 teaspoon salt

  • 1 tablespoon minced garlic

  • Dash of ground black pepper

  • Water

Vegan cream cheese ingredients

Tip

For best results, use a food processor to ensure a smooth and even consistency. However, if you opt for a high-powered blender, keep in mind that it is best to puree the mixture in batches. It might also take longer to smooth out and you may need to scrape down the sides more often. This will likely vary depending on the specific appliance.

Step 1

Soak the cashews in water for at least 4 hours. If possible, let them sit overnight, for at least 8 hours. This will make it easier on your food processor or blender.

Soak cashews in water

Step 2

Drain the cashews and chop up.

Chop soaked cashews

Step 3

Process the cashews, pausing every now and then to scrape down the sides. Continue until the mixture reaches a doughy consistency.

If you are using a blender, this step is best done in batches.

Puree soaked cashews

Step 4

Combine the pureed cashews with the yogurt, nutritional yeast, lemon juice, salt, pepper, and minced garlic.

If using a food processor, this step can be done right in the container. If using a blender, mix these ingredients in a bowl and return to the blender, working in batches.

Mix ingredients together

Step 5

Puree until you are happy with the consistency. If needed, slowly add water, non-dairy milk or yogurt to help smooth out the cream cheese. You can also add more lemon juice, nutritional yeast, salt or pepper, according to your taste buds.

Vegan cream cheese

This basic vegan cream cheese recipe is easy to customize. Simply mix in your favorite ingredients for a delicious, one-of-a-kind flavored homemade "cheese" spread. For example, if you love a little heat, add sriracha or Chipotle peppers. Sweeten things up with cinnamon sugar, mashed berries, or pumpkin puree. Craving something savory? Use chopped scallions or dried herbs. Don't be afraid to experiment with what you have on hand.

Flavored vegan cream cheese ideas

Vegan cream cheese can be used just like traditional cream cheese. Spread it on bagels, eat it as dip, or stuff it in pastries. Yum!

Vegan cream cheese

Garlic Butter Cod Recipe

0

Ready in about 15 minutes, this garlic butter cod recipe is perfect for a quick weeknight dinner. It's also deliciously versatile, as it pairs well with myriad vegetables. Try it with sautéed grape tomatoes, spinach and a squeeze of fresh lemon juice. Serve it atop a bed of rice or pasta or enjoy it on its own.

Garlic butter cod recipe

Video of the Day

Things You\’ll Need

  • 4 small cod fillets, patted dry

  • 6 tablespoons unsalted butter

  • 2 garlic cloves, minced

  • 2 tablespoons lemon juice

  • 2 tablespoons all-purpose flour

  • Salt

  • Ground black pepper

  • 1/4 teaspoon paprika

  • 1/4 cup broth

  • Sautéed vegetables, for serving

  • Pasta or rice, for serving

  • 3 to 4 tablespoons fresh parsley, chopped

Ingredients for garlic butter cod recipe

Tip

To make this recipe gluten-free, use gluten-free all-purpose flour.

Step 1

On a plate or shallow dish, toss the flour and spices together.

Mix flour and spices

Step 2

Coat both sides of each fillet in the flour mixture.

Coat cod with flour mixture

Step 3

In a large skillet over medium heat, melt 2 tablespoons of butter. Cook the cod until it is golden brown and flaky, about 3 to 4 minutes on each side.

Cook cod fillets

Tip

Don't worry if the cod slightly falls apart. You will be deglazing the pan to make a sauce, so nothing will go to waste.

Step 4

Remove the cod and place it on a separate plate. Add the garlic and remaining butter to the skillet. Cook for about 30 seconds.

Add butter and garlic to skillet

Step 5

Add the lemon juice, broth and parsley. Cook until slightly reduced and thick, about 1 to 2 minutes, scraping the skillet with a spatula.

Add lemon juice, broth and parsley

Step 6

Plate the cod with cooked vegetables and pasta or rice. Pour the garlic-butter sauce over the cod and top with more fresh parsley if you'd like.

Plated garlic butter cod

How to Preserve Chestnuts

Things You\’ll Need

  • Bowl

  • Tray

  • Sharp knife

  • Freezer containers

... Chestnuts make great gifts.

Whether you're hunting for chestnuts in the woods or harvesting nuts from your own tree, taking the time to properly preserve the nuts ensures that they stay fresh and that you will be able to enjoy them at a later date. After preservation, box up bundles of chestnuts to give away as gifts, eat them as snacks or use for cooking projects. Properly preserved chestnuts maintain their flavor well and make tasty additions to salads, steamed vegetables, desserts and other dishes.

Video of the Day

Step 1

Remove the green fuzzy shell around the nut and place them in a bowl. This outer shell should pull off easily. Look at each chestnut to make sure the nut has a shiny, blemish-free exterior.

Step 2

Place the chestnuts on a tray so that they get good air circulation. Allow the chestnuts to dry at room temperature between 65 and 75 degrees for two days. Throw away any nuts that develop mold.

Step 3

Store dried chestnuts in sealed containers and leave the inner shell intact until you eat the nuts. The nuts should keep at room temperature for several months.

Step 4

Roast the chestnuts until they are golden brown after drying if you plan on freezing the nuts for long periods of time. Preheat your oven to 400 degrees Fahrenheit and use a sharp knife to make a small slit in each inner shell. Place the chestnuts on a baking tray and roast for 20 minutes. Allow the chestnuts cool down completely, then remove the inner shell. Place the chestnuts in sealed containers and store them in the freezer.

Step 5

Give some of your chestnuts away as gifts and store the rest for yourself, family and friends.

Tip

Washing the nuts usually isn't necessary because the dirt is found on the exterior hairy shell. However sometimes dirt can get on some nuts. Quickly rinse these nuts under tap water. Never soak nuts in water because this can cause mold to develop.

How to Harvest and Freeze Okra for Frying

0

Things You\’ll Need

  • Sharp knife

  • Baking sheet

  • Oven

  • Freezer bags

... Freeze your okra harvest for year-round use.

Fresh fried okra is a summertime favorite, but by harvesting okra correctly and using the right preparation method when freezing, it can be enjoyed year-round in many different recipes.

Video of the Day

Step 1

Look for young, tender okra pods no longer than 4 to 6 inches, without bruises or dark streaks. Use a sharp knife to cut the pods off about half an inch below the okra cap. Growing okra in the home garden means having to harvest it every other day since it grows quickly in hot weather. Wear gloves and long sleeves when harvesting okra to protect yourself from the plant's prickly hairs.

Step 2

Wash the okra, and cut off the caps and the bottom tips and discard them. Slime is normal, just be careful with the knife. Slice each pod crosswise into half-inch-thick sections. The okra seeds are edible, so don't try to remove them. Preheat the oven to 350 degrees Fahrenheit.

Step 3

Lay the okra slices in a single layer on an ungreased baking sheet. Place the sheet in the 350-degree oven for 10 minutes to dry-blanch the okra. Let the okra cool, then place the slices in freezer bags and freeze.

Step 4

Take the okra out of the freezer anytime fried okra is wanted or for soups and gumbos. Simply toss the still frozen okra with flour, salt and pepper, and then fry in a little hot oil. Okra will fry up fine right from the freezer and won't be soggy.

Tip

The Clemson Spineless cultivar has proven itself to be a great garden variety for both freezing and fried okra. The fresher the okra, the better it will slice up for okra recipes later on, so try to process it within a few hours of harvesting if possible.

Properties of Aluminum Cans

... Aluminum cans are an eco-friendly means of packaging

Aluminum cans are a ubiquitous feature in grocery stores, used as a replacement for glass bottles as a container for beverages from soda to beer. How did aluminum cans become so popular? It's due to the unique properties of aluminum cans, which make them a safe, cheap and eco-friendly way to have a drink.

Video of the Day

Recyclable

The biggest benefit of aluminum cans is that they're highly recyclable. Nearly 100 percent of the aluminum used in a can can be melted down and used again. The time-frame for recycling is quick, too — oftentimes a recycled can will be back on the shelf in less than 90 days.

Strength

The aluminum used in cans is often stretched to a width of less than 1/10th of an inch thick. Despite the small amount of material used, cans as still highly durable and difficult to penetrate, particularly at pressure.

Rustproof

Unlike other forms of metal, aluminum cans are rust-proof. This makes them an ideal means of containing and storing liquid beverages.

Weight

Partially do the the small amount of metal needed to form a can, aluminum cans are lightweight. This drives down the cost to consumers, as retailers and manufacturers spend less to transport material packaged in aluminum cans than they would with glass bottles.